--- > React for CLIs. Build and test your CLI output using components. Ink provides the same component-based UI building experience that React offers in the browser, but for command-line apps. It uses to build Flexbox layouts in the terminal, so most CSS-like properties are available in Ink as well. If you are already familiar with React, you already know Ink. Since Ink is a React renderer, all fe
Tools
Tools
No tool list yet. Remote servers get one after the first health check.
Copy the stdio config for Cursor, Claude Desktop, Claude Code, or VS Code on this page. It uses the publisher's install, not a PlugMCP proxy.
Does Ink need an API key?
No required environment variable is listed on this record.
What transport does Ink use?
Ink runs locally over stdio.
When was Ink last checked?
Last checked 2026-11-11. --- > React for CLIs. Build and test your CLI output using components. Ink provides the same component-based UI building experience that React offers in the browser, but for command-line apps. It uses to build Flexbox layouts in the terminal, so most CSS-like properties are available in Ink as well. If you are already familiar with React, you already know Ink. Since Ink is a React renderer, all fe
From the publisher
Documentation
React for CLIs. Build and test your CLI output using components.
Ink provides the same component-based UI building experience that React offers in the browser, but for command-line apps.
It uses Yoga to build Flexbox layouts in the terminal, so most CSS-like properties are available in Ink as well.
If you are already familiar with React, you already know Ink.
Since Ink is a React renderer, all features of React are supported.
Head over to the React website for documentation on how to use it.
Only Ink's methods are documented in this readme.
Fully AI-generated pull requests are not accepted. You can use AI, but should be verified and cleaned up by a human. Only Opus 4.6+ (high-effort) and Codex 5.4+ (extra high) are accepted models. Preferably created with Opus and verified by Codex.
Install
Key features
01. 🌈 React for interactive command-line apps
02. --- > React for CLIs
03. Build and test your CLI output using components
04. Ink provides the same component-based UI building experience that React offers in the browser, but for command-line apps
05. It uses to build Flexbox layouts in the terminal, so most CSS-like properties are available in Ink as well
npm install ink react
[!NOTE]
This readme documents the upcoming version of Ink. For the latest stable release, see Ink on npm.
Use create-ink-app to quickly scaffold a new Ink-based CLI.
npx create-ink-app my-ink-cli
Alternatively, create a TypeScript project:
npx create-ink-app --typescript my-ink-cli
Set up Babel with a React preset to ensure all examples in this readme work as expected.
After installing Babel, install @babel/preset-react and insert the following configuration in babel.config.json:
npm install --save-dev @babel/preset-react
{
	"presets": ["@babel/preset-react"]
}
Next, create a file source.js, where you'll type code that uses Ink:
import React from 'react';
import {render, Text} from 'ink';

const Demo = () => <Text>Hello World</Text>;

render(<Demo />);
Then, transpile this file with Babel:
npx babel source.js -o cli.js
Now you can run cli.js with Node.js:
node cli
If you don't like transpiling files during development, you can use import-jsx or @esbuild-kit/esm-loader to import a JSX file and transpile it on the fly.
Ink uses Yoga, a Flexbox layout engine, to build great user interfaces for your CLIs using familiar CSS-like properties you've used when building apps for the browser.
It's important to remember that each element is a Flexbox container.
Think of it as if every <div> in the browser had display: flex.
See <Box> built-in component below for documentation on how to use Flexbox layouts in Ink.
Note that all text must be wrapped in a <Text> component.
App Lifecycle
An Ink app is a Node.js process, so it stays alive only while there is active work in the event loop (timers, pending promises, useInput listening on stdin, etc.). If your component tree has no async work, the app will render once and exit immediately.
To exit the app, press Ctrl+C (enabled by default via exitOnCtrlC), call exit() from useApp inside a component, or call unmount() on the object returned by render().
This component can display text and change its style to make it bold, underlined, italic, or strikethrough.
import {render, Text} from 'ink';

const Example = () => (
	<>
		<Text color="green">I am green</Text>
		<Text color="black" backgroundColor="white">
			I am black on white
		</Text>
		<Text color="#ffffff">I am white</Text>
		<Text bold>I am bold</Text>
		<Text italic>I am italic</Text>
		<Text underline>I am underline</Text>
		<Text strikethrough>I am strikethrough</Text>
		<Text inverse>I am inversed</Text>
	</>
);

render(<Example />);
[!NOTE]
<Text> allows only text nodes and nested <Text> components inside of it. For example, <Box> component can't be used inside <Text>.
color
Type: string
Change text color.
Ink uses chalk under the hood, so all its functionality is supported.
This property tells Ink to wrap or truncate text if its width is larger than the container.
If wrap is passed (the default), Ink will wrap text and split it into multiple lines.
If hard is passed, Ink will fill each line to the full column width, breaking words as necessary.
If truncate-* is passed, Ink will truncate text instead, resulting in one line of text with the rest cut off.
Sets a minimum height of the element in lines (rows).
You can also set it as a percentage, which will calculate the minimum height based on the height of the parent element.
Sets a maximum height of the element in lines (rows).
You can also set it as a percentage, which will calculate the maximum height based on the height of the parent element.
aspectRatio
Type: number
Defines the aspect ratio (width/height) for the element.
Use it with at least one size constraint (width, height, minHeight, or maxHeight) so Ink can derive the missing dimension.
Padding
paddingTop
Type: number
Default: 0
Top padding.
paddingBottom
Type: number
Default: 0
Bottom padding.
paddingLeft
Type: number
Default: 0
Left padding.
paddingRight
Type: number
Default: 0
Right padding.
paddingX
Type: number
Default: 0
Horizontal padding. Equivalent to setting paddingLeft and paddingRight.
paddingY
Type: number
Default: 0
Vertical padding. Equivalent to setting paddingTop and paddingBottom.
padding
Type: number
Default: 0
Padding on all sides. Equivalent to setting paddingTop, paddingBottom, paddingLeft and paddingRight.
<Box paddingTop={2}><Text>Top</Text></Box>
<Box paddingBottom={2}><Text>Bottom</Text></Box>
<Box paddingLeft={2}><Text>Left</Text></Box>
<Box paddingRight={2}><Text>Right</Text></Box>
<Box paddingX={2}><Text>Left and right</Text></Box>
<Box paddingY={2}><Text>Top and bottom</Text></Box>
<Box padding={2}><Text>Top, bottom, left and right</Text></Box>
Margin
marginTop
Type: number
Default: 0
Top margin.
marginBottom
Type: number
Default: 0
Bottom margin.
marginLeft
Type: number
Default: 0
Left margin.
marginRight
Type: number
Default: 0
Right margin.
marginX
Type: number
Default: 0
Horizontal margin. Equivalent to setting marginLeft and marginRight.
marginY
Type: number
Default: 0
Vertical margin. Equivalent to setting marginTop and marginBottom.
margin
Type: number
Default: 0
Margin on all sides. Equivalent to setting marginTop, marginBottom, marginLeft and marginRight.
<Box marginTop={2}><Text>Top</Text></Box>
<Box marginBottom={2}><Text>Bottom</Text></Box>
<Box marginLeft={2}><Text>Left</Text></Box>
<Box marginRight={2}><Text>Right</Text></Box>
<Box marginX={2}><Text>Left and right</Text></Box>
<Box marginY={2}><Text>Top and bottom</Text></Box>
<Box margin={2}><Text>Top, bottom, left and right</Text></Box>
Gap
gap
Type: number
Default: 0
Size of the gap between an element's columns and rows. A shorthand for columnGap and rowGap.
<Box gap={1} width={3} flexWrap="wrap">
	<Text>A</Text>
	<Text>B</Text>
	<Text>C</Text>
</Box>
// A B
//
// C
columnGap
Type: number
Default: 0
Size of the gap between an element's columns.
<Box columnGap={1}>
	<Text>A</Text>
	<Text>B</Text>
</Box>
// A B
rowGap
Type: number
Default: 0
Size of the gap between an element's rows.
<Box flexDirection="column" rowGap={1}>
	<Text>A</Text>
	<Text>B</Text>
</Box>
// A
//
// B
<Box>
	<Box marginRight={1}>
		<Text>X</Text>
	</Box>
	<Text>Y</Text>
</Box>
// X Y

<Box flexDirection="row-reverse">
	<Text>X</Text>
	<Box marginRight={1}>
		<Text>Y</Text>
	</Box>
</Box>
// Y X

<Box flexDirection="column">
	<Text>X</Text>
	<Text>Y</Text>
</Box>
// X
// Y

<Box flexDirection="column-reverse">
	<Text>X</Text>
	<Text>Y</Text>
</Box>
// Y
// X
<Box alignItems="flex-start">
	<Box marginRight={1}>
		<Text>X</Text>
	</Box>
	<Text>
		A
		<Newline/>
		B
		<Newline/>
		C
	</Text>
</Box>
// X A
//   B
//   C

<Box alignItems="center">
	<Box marginRight={1}>
		<Text>X</Text>
	</Box>
	<Text>
		A
		<Newline/>
		B
		<Newline/>
		C
	</Text>
</Box>
//   A
// X B
//   C

<Box alignItems="flex-end">
	<Box marginRight={1}>
		<Text>X</Text>
	</Box>
	<Text>
		A
		<Newline/>
		B
		<Newline/>
		C
	</Text>
</Box>
//   A
//   B
// X C
alignSelf
Type: string
Default: auto
Allowed values: autoflex-startcenterflex-endstretchbaseline
Defines alignment between flex lines on the cross axis when flexWrap creates multiple lines.
See align-content.
Unlike CSS (stretch), Ink defaults to flex-start so wrapped lines stay compact and fixed-height boxes don't gain unexpected empty rows unless you opt in to stretching.
A shortcut for setting overflowX and overflowY at the same time.
contentOffsetX
Type: number
Default: 0
Horizontal offset applied to the element's children, in columns. Children are shifted left by this amount. Combine with overflow="hidden" to build scrollable views.
Offsets are terminal cell coordinates, so fractional values are truncated toward zero and non-finite values are treated as 0.
contentOffsetY
Type: number
Default: 0
Vertical offset applied to the element's children, in rows. Children are shifted up by this amount. Combine with overflow="hidden" to build scrollable views.
Offsets are terminal cell coordinates, so fractional values are truncated toward zero and non-finite values are treated as 0.
When an offset splits a wide character, such as CJK, the hidden half still owns a terminal cell and is rendered as a blank so the columns after it stay aligned. Styling of that blank is best-effort: the split character's inline background or color is not carried over to it.
import {useState, useRef} from 'react';
import {Box, useInput, useBoxMetrics} from 'ink';

const ScrollView = ({height, children}) => {
	const ref = useRef(null);
	const contentRef = useRef(null);
	const {clientHeight} = useBoxMetrics(ref);
	const content = useBoxMetrics(contentRef);
	const [requestedScrollTop, setRequestedScrollTop] = useState(0);
	const maxScrollTop = Math.max(0, content.height - clientHeight);
	// Clamp on every render, since the maximum shrinks when the content gets
	// shorter or the terminal gets taller.
	const scrollTop = Math.min(requestedScrollTop, maxScrollTop);

	useInput((input, key) => {
		if (key.upArrow) {
			setRequestedScrollTop(Math.max(0, scrollTop - 1));
		}

		if (key.downArrow) {
			setRequestedScrollTop(Math.min(maxScrollTop, scrollTop + 1));
		}
	});

	return (
		<Box
			ref={ref}
			height={height}
			overflow="hidden"
			contentOffsetY={scrollTop}
			flexDirection="column"
		>
			<Box ref={contentRef} flexDirection="column" flexShrink={0}>
				{children}
			</Box>
		</Box>
	);
};
Note: put any padding on the content wrapper rather than the viewport. clientHeight excludes borders but not padding, so a padded viewport reports more room than its content actually gets and content.height - clientHeight comes out one row short per padded edge, leaving the last row unreachable.
Note: wrap the content in a flexShrink={0} container so it keeps its natural height. Without it, Yoga squeezes the children into the fixed-height viewport and the content is never taller than the viewport, leaving nothing to scroll. Measuring that wrapper with its own useBoxMetrics ref is what gives you the scroll bounds, since the viewport only knows its own size.
Add a border with a specified style.
If borderStyle is undefined (the default), no border will be added.
Ink uses border styles from the cli-boxes module.
Change border background color.
Accepts the same values as backgroundColor in <Text> component.
A shorthand for setting borderTopBackgroundColor, borderRightBackgroundColor, borderBottomBackgroundColor, and borderLeftBackgroundColor.
Change top border background color.
Accepts the same values as backgroundColor in <Text> component.
Falls back to borderBackgroundColor if not specified.
Change bottom border background color.
Accepts the same values as backgroundColor in <Text> component.
Falls back to borderBackgroundColor if not specified.
Change right border background color.
Accepts the same values as backgroundColor in <Text> component.
Falls back to borderBackgroundColor if not specified.
Change left border background color.
Accepts the same values as backgroundColor in <Text> component.
Falls back to borderBackgroundColor if not specified.
A flexible space that expands along the major axis of its containing layout.
It's useful as a shortcut for filling all the available space between elements.
For example, using <Spacer> in a <Box> with default flex direction (row) will position "Left" on the left side and will push "Right" to the right side.
In a vertical flex direction (column), it will position "Top" at the top of the container and push "Bottom" to the bottom.
Note that the container needs to be tall enough to see this in effect.
<Static> component permanently renders its output above everything else.
It's useful for displaying activity like completed tasks or logs - things that
don't change after they're rendered (hence the name "Static").
It's preferred to use <Static> for use cases like these when you can't know
or control the number of items that need to be rendered.
For example, Tap uses <Static> to display
a list of completed tests. Gatsby uses it
to display a list of generated pages while still displaying a live progress bar.
import React, {useState, useEffect} from 'react';
import {render, Static, Box, Text} from 'ink';

const Example = () => {
	const [tests, setTests] = useState([]);

	useEffect(() => {
		let completedTests = 0;
		let timer;

		const run = () => {
			// Fake 10 completed tests
			if (completedTests++ < 10) {
				setTests(previousTests => [
					...previousTests,
					{
						id: previousTests.length,
						title: `Test #${previousTests.length + 1}`,
					},
				]);

				timer = setTimeout(run, 100);
			}
		};

		run();

		return () => {
			clearTimeout(timer);
		};
	}, []);

	return (
		<>
			{/* This part will be rendered once to the terminal */}
			<Static items={tests}>
				{test => (
					<Box key={test.id}>
						<Text color="green">✔ {test.title}</Text>
					</Box>
				)}
			</Static>

			{/* This part keeps updating as state changes */}
			<Box marginTop={1}>
				<Text dimColor>Completed tests: {tests.length}</Text>
			</Box>
		</>
	);
};

render(<Example />);
[!NOTE]
<Static> only renders new items in the items prop and ignores items that were previously rendered. This means that when you add new items to the items array, changes you make to previous items will not trigger a rerender.
See examples/static for an example usage of <Static> component.
items
Type: Array
Array of items of any type to render using the function you pass as a component child.
style
Type: object
Styles to apply to a container of child elements.
See <Box> for supported properties.
Function that is called to render every item in the items array.
The first argument is the item itself, and the second argument is the index of that item in the
items array.
Note that a key must be assigned to the root component.
<Static items={['a', 'b', 'c']}>
	{(item, index) => {
		// This function is called for every item in ['a', 'b', 'c']
		// `item` is 'a', 'b', 'c'
		// `index` is 0, 1, 2
		return (
			<Box key={index}>
				<Text>Item: {item}</Text>
			</Box>
		);
	}}
</Static>
<Transform>
Transform a string representation of React components before they're written to output.
For example, you might want to apply a gradient to text, add a clickable link, or create some text effects.
These use cases can't accept React nodes as input; they expect a string.
That's what the <Transform> component does: it gives you an output string of its child components and lets you transform it in any way.
[!NOTE]
<Transform> must be applied only to <Text> children components and shouldn't change the dimensions of the output; otherwise, the layout will be incorrect.
[!IMPORTANT]
When children use <Text> styling props (e.g. color, bold), the string passed to transform will contain ANSI escape codes. If your transform manipulates whitespace or does string operations like .trim(), you may need to use ANSI-aware methods (e.g. from slice-ansi or strip-ansi).
Since the transform function converts all characters to uppercase, the final output rendered to the terminal will be "HELLO WORLD", not "Hello World".
When the output wraps to multiple lines, it can be helpful to know which line is being processed.
For example, to implement a hanging indent component, you can indent all the lines except for the first.
import {render, Transform} from 'ink';

const HangingIndent = ({indent = 4, children}) => (
	<Transform
		transform={(line, index) =>
			index === 0 ? line : ' '.repeat(indent) + line
		}
	>
		{children}
	</Transform>
);

const text =
	'WHEN I WROTE the following pages, or rather the bulk of them, ' +
	'I lived alone, in the woods, a mile from any neighbor, in a ' +
	'house which I had built myself, on the shore of Walden Pond, ' +
	'in Concord, Massachusetts, and earned my living by the labor ' +
	'of my hands only. I lived there two years and two months. At ' +
	'present I am a sojourner in civilized life again.';

render(<HangingIndent indent={4}>{text}</HangingIndent>);
transform(outputLine, index)
Type: Function
Function that transforms children output.
It accepts children and must return transformed children as well.
children
Type: string
Output of child components.
index
Type: number
The zero-indexed line number of the line that's currently being transformed.
Hooks
useInput(inputHandler, options?)
A React hook that returns void and handles user input.
It's a more convenient alternative to using useStdin and listening for data events.
The callback you pass to useInput is called for each character when the user enters any input.
However, if the user pastes text and it's more than one character, the callback will be called only once, and the whole string will be passed as input.
You can find a full example of using useInput at examples/use-input.
Terminal replies and mouse reports that don't map to a key are not passed to the callback. Legacy mouse reports (mouse tracking without SGR mode) are only dropped on a best-effort basis, because their raw coordinate bytes can decode ambiguously. If your app enables mouse tracking, enable SGR mode (\u001B[?1006h) as well.
import {useInput} from 'ink';

const UserInput = () => {
	useInput((input, key) => {
		if (input === 'q') {
			// Exit program
		}

		if (key.leftArrow) {
			// Left arrow key pressed
		}
	});

	return …
};
inputHandler(input, key)
Type: Function
The handler function that you pass to useInput receives two arguments:
input
Type: string
The input that the program received.
key
Type: object
Handy information about a key that was pressed.
key.leftArrow
key.rightArrow
key.upArrow
key.downArrow
Type: boolean
Default: false
If an arrow key was pressed, the corresponding property will be true.
For example, if the user presses the left arrow key, key.leftArrow equals true.
key.return
Type: boolean
Default: false
Return (Enter) key was pressed.
key.escape
Type: boolean
Default: false
Escape key was pressed.
key.ctrl
Type: boolean
Default: false
Ctrl key was pressed.
key.shift
Type: boolean
Default: false
Shift key was pressed.
key.tab
Type: boolean
Default: false
Tab key was pressed.
key.backspace
Type: boolean
Default: false
Backspace key was pressed.
key.delete
Type: boolean
Default: false
Delete key was pressed.
key.pageDown
key.pageUp
Type: boolean
Default: false
If the Page Up or Page Down key was pressed, the corresponding property will be true.
For example, if the user presses Page Down, key.pageDown equals true.
key.home
key.end
Type: boolean
Default: false
If the Home or End key was pressed, the corresponding property will be true.
For example, if the user presses End, key.end equals true.
The type of key event. Only available with kitty keyboard protocol. Without the protocol, this property is undefined.
options
Type: object
isActive
Type: boolean
Default: true
Enable or disable capturing of user input.
Useful when there are multiple useInput hooks used at once to avoid handling the same input several times.
usePaste(handler, options?)
A React hook that calls handler whenever the user pastes text. Bracketed paste mode (\x1b[?2004h) is automatically enabled while the hook is active, so pasted text arrives as a single string rather than being misinterpreted as individual key presses.
usePaste and useInput can be used together in the same component. They operate on separate event channels, so paste content is never forwarded to useInput handlers when usePaste is active.
import {useInput, usePaste} from 'ink';

const MyInput = () => {
	useInput((input, key) => {
		// Only receives typed characters and key events, not pasted text.
		if (key.return) {
			// Submit
		}
	});

	usePaste((text) => {
		// Receives the full pasted string, including newlines.
		console.log('Pasted:', text);
	});

	return …
};
handler(text)
Type: Function
Called with the full pasted string whenever the user pastes text. The string is delivered verbatim — newlines, escape sequences, and other special characters are preserved exactly as pasted.
text
Type: string
The pasted text.
options
Type: object
isActive
Type: boolean
Default: true
Enable or disable the paste handler. Useful when multiple components use usePaste and only one should be active at a time.
useApp()
A React hook that returns app lifecycle methods.
exit(errorOrResult?)
Type: Function
Exit (unmount) the whole Ink app.
errorOrResult
Type: Error | unknown
Optional value that controls how waitUntilExit settles:
exit() resolves with undefined.
exit(error) rejects when error is an Error.
exit(value) resolves with value.
import {useEffect} from 'react';
import {useApp} from 'ink';

const Example = () => {
	const {exit} = useApp();

	// Exit the app after 5 seconds
	useEffect(() => {
		setTimeout(() => {
			exit();
		}, 5000);
	}, [exit]);

	return …
};
waitUntilRenderFlush()
Type: Function
Returns a promise that settles after pending render output is flushed to stdout.
Temporarily hands the terminal over to a child process (such as $EDITOR, less, or fzf), then restores Ink's terminal state and forces a full redraw.
While suspended, Ink stops writing output, stops consuming input, and restores the terminal modes the child expects (raw mode off, cursor visible, bracketed paste off, alternate screen exited, kitty keyboard protocol off). When the suspension ends, Ink reapplies its own terminal state and repaints from scratch.
callback
Type: Function
When a callback is provided, Ink suspends, runs the callback, and restores the terminal once it settles, even if the callback throws.
When called without a callback, it returns a suspension you resume yourself. resume() is async because restoring the terminal may need to wait for ordered writes and a full redraw.
The suspension is also a disposable, so it can be resumed automatically with await using:
await using suspension = await suspendTerminal();
await runEditor();
Suspending while a suspension is already active throws. This is supported only in interactive TTY mode; in non-interactive output the callback still runs but Ink performs no terminal handoff.
useStdin()
A React hook that returns the stdin stream and stdin-related utilities.
stdin
Type: stream.Readable
Default: process.stdin
The stdin stream passed to render() in options.stdin, or process.stdin by default.
Useful if your app needs to handle user input.
import {useStdin} from 'ink';

const Example = () => {
	const {stdin} = useStdin();

	return …
};
isRawModeSupported
Type: boolean
A boolean flag determining if the current stdin supports setRawMode.
A component using setRawMode might want to use isRawModeSupported to nicely fall back in environments where raw mode is not supported.
A React hook that returns the stdout stream where Ink renders your app and stdout-related utilities.
stdout
Type: stream.Writable
Default: process.stdout
import {useStdout} from 'ink';

const Example = () => {
	const {stdout} = useStdout();

	return …
};
write(data)
Write any string to stdout while preserving Ink's output.
It's useful when you want to display external information outside of Ink's rendering and ensure there's no conflict between the two.
It's similar to <Static>, except it can't accept components; it only works with strings.
data
Type: string
Data to write to stdout.
import {useStdout} from 'ink';

const Example = () => {
	const {write} = useStdout();

	useEffect(() => {
		// Write a single message to stdout, above Ink's output
		write('Hello from Ink to stdout\n');
	}, []);

	return …
};
A React hook that returns the current layout metrics for a tracked box element.
It updates when layout changes (for example terminal resize, sibling/content changes, or position changes).
Use hasMeasured to detect when the currently tracked element has been measured.
Distance from the left edge of the parent. These are layout coordinates and do not include any contentOffsetX/contentOffsetY applied by an ancestor, so hit-testing inside a scrolled container has to subtract those offsets too.
top
Type: number
Distance from the top edge of the parent. These are layout coordinates and do not include any contentOffsetX/contentOffsetY applied by an ancestor, so hit-testing inside a scrolled container has to subtract those offsets too.
clientWidth
Type: number
Element width excluding borders.
clientHeight
Type: number
Element height excluding borders.
hasMeasured
Type: boolean
Whether the currently tracked element has been measured.
[!NOTE]
The hook returns zeros for all metrics until the first layout pass completes. It also returns zeros when the tracked ref is detached.
useStderr()
A React hook that returns the stderr stream and stderr-related utilities.
stderr
Type: stream.Writable
Default: process.stderr
Stderr stream.
import {useStderr} from 'ink';

const Example = () => {
	const {stderr} = useStderr();

	return …
};
write(data)
Write any string to stderr while preserving Ink's output.
It's useful when you want to display external information outside of Ink's rendering and ensure there's no conflict between the two.
It's similar to <Static>, except it can't accept components; it only works with strings.
data
Type: string
Data to write to stderr.
import {useStderr} from 'ink';

const Example = () => {
	const {write} = useStderr();

	useEffect(() => {
		// Write a single message to stderr, above Ink's output
		write('Hello from Ink to stderr\n');
	}, []);

	return …
};
useWindowSize()
A React hook that returns the current terminal dimensions and re-renders the component whenever the terminal is resized.
[!NOTE]
When the terminal is resized narrower, ghost lines may briefly appear depending on the terminal emulator's reflow behavior.
useFocus(options?)
A React hook that returns focus state and focus controls for the current component.
A component that uses the useFocus hook becomes "focusable" to Ink, so when the user presses Tab, Ink will switch focus to this component.
If there are multiple components that execute the useFocus hook, focus will be given to them in registration order. Reordering keyed components does not change their registration order.
This hook returns an object with an isFocused boolean property, which determines whether this component is focused.
options
autoFocus
Type: boolean
Default: false
Auto-focus this component if there's no active (focused) component right now.
isActive
Type: boolean
Default: true
Enable or disable this component's focus, while still maintaining its position in the list of focusable components.
This is useful for inputs that are temporarily disabled.
id
Type: string
Required: false
Set a component's focus ID, which can be used to programmatically focus the component. This is useful for large interfaces with many focusable elements to avoid having to cycle through all of them. The ID must be unique among focusable components.
import {render, useFocus, Text} from 'ink';

const Example = () => {
	const {isFocused} = useFocus();

	return <Text>{isFocused ? 'I am focused' : 'I am not focused'}</Text>;
};

render(<Example />);
Switch focus to the next focusable component.
If there's no active component right now, focus will be given to the first focusable component.
If the active component is the last in the list of focusable components, focus will be switched to the first focusable component.
[!NOTE]
Ink calls this method when user presses Tab.
Switch focus to the previous focusable component.
If there's no active component right now, focus will be given to the first focusable component.
If the active component is the first in the list of focusable components, focus will be switched to the last focusable component.
[!NOTE]
Ink calls this method when user presses Shift+Tab.
A React hook that returns methods to control the terminal cursor position after each render.
This is essential for IME (Input Method Editor) support, where the composing character is displayed at the cursor location.
Row position from the top of the Ink output (0 = first line).
useIsScreenReaderEnabled()
A React hook that returns whether a screen reader is enabled.
This is useful when you want to render different output for screen readers.
import {useIsScreenReaderEnabled, Text} from 'ink';

const Example = () => {
	const isScreenReaderEnabled = useIsScreenReaderEnabled();

	return (
		<Text>
			{isScreenReaderEnabled
				? 'Screen reader is enabled'
				: 'Screen reader is disabled'}
		</Text>
	);
};
useAnimation(options?)
A React hook that drives animations. Returns a frame counter, elapsed time, frame delta, and a reset function. All animations share a single timer internally, so multiple animated components consolidate into one render cycle.
Whether the animation is running. When set to false, the animation stops. When toggled back to true, all values reset to 0.
Return value
frame
Type: number
Discrete counter that increments by 1 each interval. Useful for indexed sequences like spinner frames.
time
Type: number
Total elapsed time in milliseconds since the animation started or was last reset. Useful for continuous math-based animations like sine waves: Math.sin(time / 1000 * Math.PI * 2).
delta
Type: number
Time in milliseconds since the previous rendered tick. Accounts for throttled renders. Useful for physics-based or velocity-driven motion: position += speed * delta.
reset
Type: () => void
Resets frame, time, and delta to 0 and restarts timing from the current moment. Useful for one-shot animations triggered by events.
Configure whether Ink should listen for Ctrl+C keyboard input and exit the app.
This is needed in case process.stdin is in raw mode, because then Ctrl+C is ignored by default and the process is expected to handle it manually.
patchConsole
Type: boolean
Default: true
Patch console methods to ensure console output doesn't mix with Ink's output.
When any of the console.* methods are called (like console.log()), Ink intercepts their output, clears the main output, renders output from the console method, and then rerenders the main output again.
That way, both are visible and don't overlap each other.
Once unmount starts, Ink restores the native console before React cleanup runs. Teardown-time console.* output then follows the normal console behavior instead of being rerouted through Ink.
This functionality is powered by patch-console, so if you need to disable Ink's interception of output but want to build something custom, you can use that.
Runs the given callback after each render and re-render with render metrics.
This callback runs after Ink commits a frame, but it does not wait for stdout/stderr stream callbacks.
To run code after output is flushed, use waitUntilRenderFlush().
If true, each update will be rendered as separate output, without replacing the previous one.
maxFps
Type: number
Default: 30
Maximum frames per second for render updates.
This controls how frequently the UI can update to prevent excessive re-rendering.
Higher values allow more frequent updates but may impact performance.
Setting it to a lower value may be useful for components that update very frequently, to reduce CPU usage.
incrementalRendering
Type: boolean
Default: false
Enable incremental rendering mode which only updates changed lines instead of redrawing the entire output.
This can reduce flickering and improve performance for frequently updating UIs.
On changed lines, unchanged prefixes are also skipped when safe, preserving styles and grapheme boundaries.
Lines containing unsupported terminal controls fall back to whole-line updates.
concurrent
Type: boolean
Default: false
Enable React Concurrent Rendering mode.
When enabled:
Suspense boundaries work correctly with async data fetching
useTransition and useDeferredValue hooks are fully functional
Updates can be interrupted for higher priority work
render(<MyApp />, {concurrent: true});
[!NOTE]
Concurrent mode changes the timing of renders. Some tests may need to use act() to properly await updates. Reusing the same stdout across multiple render() calls without unmounting is unsupported. Call unmount() first if you need to change the rendering mode or create a fresh instance.
interactive
Type: boolean
Default: true (false if in CI (detected via is-in-ci) or stdout.isTTY is falsy)
Override automatic interactive mode detection.
By default, Ink detects whether the environment is interactive based on CI detection and stdout.isTTY. When non-interactive, Ink skips terminal-specific features like ANSI erase sequences, cursor manipulation, synchronized output, resize handling, and kitty keyboard auto-detection. Only the final frame of non-static output is written at unmount.
Most users should not need to set this option. Use it when you have your own "interactive" detection logic that differs from the built-in behavior.
[!NOTE]
Reusing the same stdout across multiple render() calls without unmounting is unsupported. Call unmount() first if you need to change this option or create a fresh instance.
// Use your own detection logic
const isInteractive = myCustomDetection();
render(<MyApp />, {interactive: isInteractive});
alternateScreen
Type: boolean
Default: false
Render the app in the terminal's alternate screen buffer. When enabled, the app renders on a separate screen, and the original terminal content is restored when the app exits. This is the same mechanism used by programs like vim, htop, and less.
Note: The terminal's scrollback buffer is not available while in the alternate screen. This is standard terminal behavior; programs like vim use the alternate screen specifically to avoid polluting the user's scrollback history.
Ink intentionally treats alternate-screen teardown output as disposable. It does not preserve or replay teardown-time frames, hook writes, or console.* output after restoring the primary screen.
Only works in interactive mode. Ignored when interactive is false or in a non-interactive environment (CI, piped stdout).
[!NOTE]
Reusing the same stdout across multiple render() calls without unmounting is unsupported. Call unmount() first if you need to change this option or create a fresh instance.
render(<MyApp />, {alternateScreen: true});
kittyKeyboard
Type: object
Default: undefined
Enable the kitty keyboard protocol for enhanced keyboard input handling. When enabled, terminals that support the protocol will report additional key information including super, hyper, capsLock, numLock modifiers and eventType (press/repeat/release).
import {render} from 'ink';

render(<MyApp />, {kittyKeyboard: {mode: 'auto'}});
'auto': Query interactive TTY terminals for support (CSI ? u) once an input hook such as useInput enables raw mode, so the reply is read by Ink instead of echoed. The protocol is enabled when Ink's input handler receives a response within 200 milliseconds. Pending detection is canceled when the terminal is suspended.
'enabled': Force enable the protocol. Both stdin and stdout must be TTYs.
'reportEventTypes' - Report key press, repeat, and release events
'reportAlternateKeys' - Report alternate key encodings. Ink accepts these sequences but does not expose alternate keys. Without associated text, useInput uses the primary key as its input fallback.
'reportAllKeysAsEscapeCodes' - Report all keys as escape codes
'reportAssociatedText' - Report associated text with key events. Automatically enables reportAllKeysAsEscapeCodes.
Behavior notes
When the kitty keyboard protocol is enabled, input handling changes in several ways:
Non-printable keys produce empty input. Navigation and editing keys retain their supported key properties, such as key.upArrow and key.delete. Other functional keys, including F1-F35, modifier-only keys, media keys, Caps Lock, and Print Screen, are not individually exposed through the key object.
Ctrl+letter shortcuts work as expected. The terminal sends the unshifted letter codepoint with the Ctrl modifier. For example, Ctrl+C produces input === 'c' and key.ctrl === true.
Text and key identity differ. Enable reportAssociatedText when using reportAllKeysAsEscapeCodes to receive composed and shifted text in input. Without associated text, input falls back to the primary unshifted key. Alternate shifted and base-layout keys are not exposed or used for shortcut matching.
Key disambiguation. The protocol allows the terminal to distinguish between keys that normally produce the same escape sequence. For example:
Ctrl+I vs Tab - without the protocol, both produce the same byte (\x09). With the protocol, they are reported as distinct keys.
Shift+Enter vs Enter - the shift modifier is correctly reported.
Escape key vs Ctrl+[ - these are disambiguated.
Event types. With the reportEventTypes flag, key press, repeat, and release events are distinguished via key.eventType.
renderToString(tree, options?)
Returns: string
Render a React element to a string synchronously. Unlike render(), this function does not write to stdout, does not set up any terminal event listeners, and returns the rendered output as a string.
Useful for generating documentation, writing output to files, testing, or any scenario where you need the rendered output as a string without starting a persistent terminal application.
Terminal-specific hooks (useInput, useStdin, useStdout, useStderr, useApp, useFocus, useFocusManager) return default no-op values since there is no terminal session. They will not throw, but they will not function as in a live terminal.
useWindowSize reports the virtual terminal size: columns from the option and 24 rows.
useEffect callbacks will execute during rendering (due to synchronous rendering mode), but state updates they trigger will not affect the returned output, which reflects the initial render.
useLayoutEffect callbacks fire synchronously during commit, so state updates they trigger will be reflected in the output.
The <Static> component is supported — its output is prepended to the dynamic output.
If a component throws during rendering, the error is propagated to the caller after cleanup.
tree
Type: ReactNode
options
Type: object
columns
Type: number
Default: 80
Width of the virtual terminal in columns. Controls where text wrapping occurs.
const output = renderToString(<Text>{'A'.repeat(100)}</Text>, {
	columns: 40,
});
// Text wraps at 40 columns
Instance
This is the object that render() returns.
rerender(tree)
Replace the previous root node with a new one or update the props of the current root node.
Returns a promise that settles when the app is unmounted.
It resolves with the value passed to exit(value) and rejects with the error passed to exit(error).
When unmount() is called manually, it settles after unmount-related stdout writes complete.
const {unmount, waitUntilExit} = render(<MyApp />);

setTimeout(unmount, 1000);

await waitUntilExit(); // resolves after `unmount()` is called
waitUntilRenderFlush()
Returns a promise that settles after pending render output is flushed to stdout.
Useful when you need to run code only after a frame is written:
const {rerender, waitUntilRenderFlush} = render(<MyApp step="loading" />);

rerender(<MyApp step="ready" />);
await waitUntilRenderFlush(); // output for "ready" is flushed

runNextCommand();
cleanup()
Unmount the current app and delete the internal Ink instance associated with the current stdout.
This is mostly useful for advanced cases (for example, tests) where you need render() to create a fresh instance for the same stream.
Unlike deleting the internal instance directly, this also tears down terminal state such as the alternate screen.
clear()
Clear output.
const {clear} = render(<MyApp />);
clear();
measureElement(ref)
Measure the layout metrics of a particular <Box> element.
Returns an object with x, y, width, height, clientWidth and clientHeight properties.
x and y are the element's position within the live layout region, computed by walking up the layout tree. These are layout-tree coordinates, not terminal viewport coordinates. To compare them with mouse events, convert the event coordinates using the live region's viewport position. This is necessary even in alternate-screen mode when output, such as <Static> content, appears above the live region. These are layout coordinates and do not include any contentOffsetX/contentOffsetY applied by an ancestor, so hit-testing inside a scrolled container has to subtract those offsets too.
clientWidth and clientHeight are the element's dimensions excluding borders, which is the amount of space its content can occupy. To build a scrollable view, measure the content wrapper separately and clamp the offset with content.height - viewport.clientHeight, together with the contentOffsetX/contentOffsetY props. That bound assumes an unpadded viewport, since clientWidth/clientHeight exclude borders but not padding; put padding on the content wrapper instead.
[!NOTE]
measureElement() returns zeros for all properties when called during render (before layout is calculated). Call it from post-render code, such as useEffect, useLayoutEffect, input handlers, or timer callbacks. When content changes, pass the relevant dependency to your effect so it re-measures after each update.
ref
Type: MutableRef
A reference to a <Box> element captured with the ref property.
See Refs for more information on how to capture references.
import {render, measureElement, Box, Text} from 'ink';

const Example = () => {
	const ref = useRef();

	useEffect(() => {
		const {x, y, width, height} = measureElement(ref.current);
		// x = 0, y = 0, width = 100, height = 1
	}, []);

	return (
		<Box width={100}>
			<Box ref={ref}>
				<Text>This box will stretch to 100 width</Text>
			</Box>
		</Box>
	);
};

render(<Example />);
Testing
Ink components are simple to test with ink-testing-library.
Here's a simple example that checks how the component is rendered:
import React from 'react';
import {Text} from 'ink';
import {render} from 'ink-testing-library';

const Test = () => <Text>Hello World</Text>;
const {lastFrame} = render(<Test />);

lastFrame() === 'Hello World'; //=> true
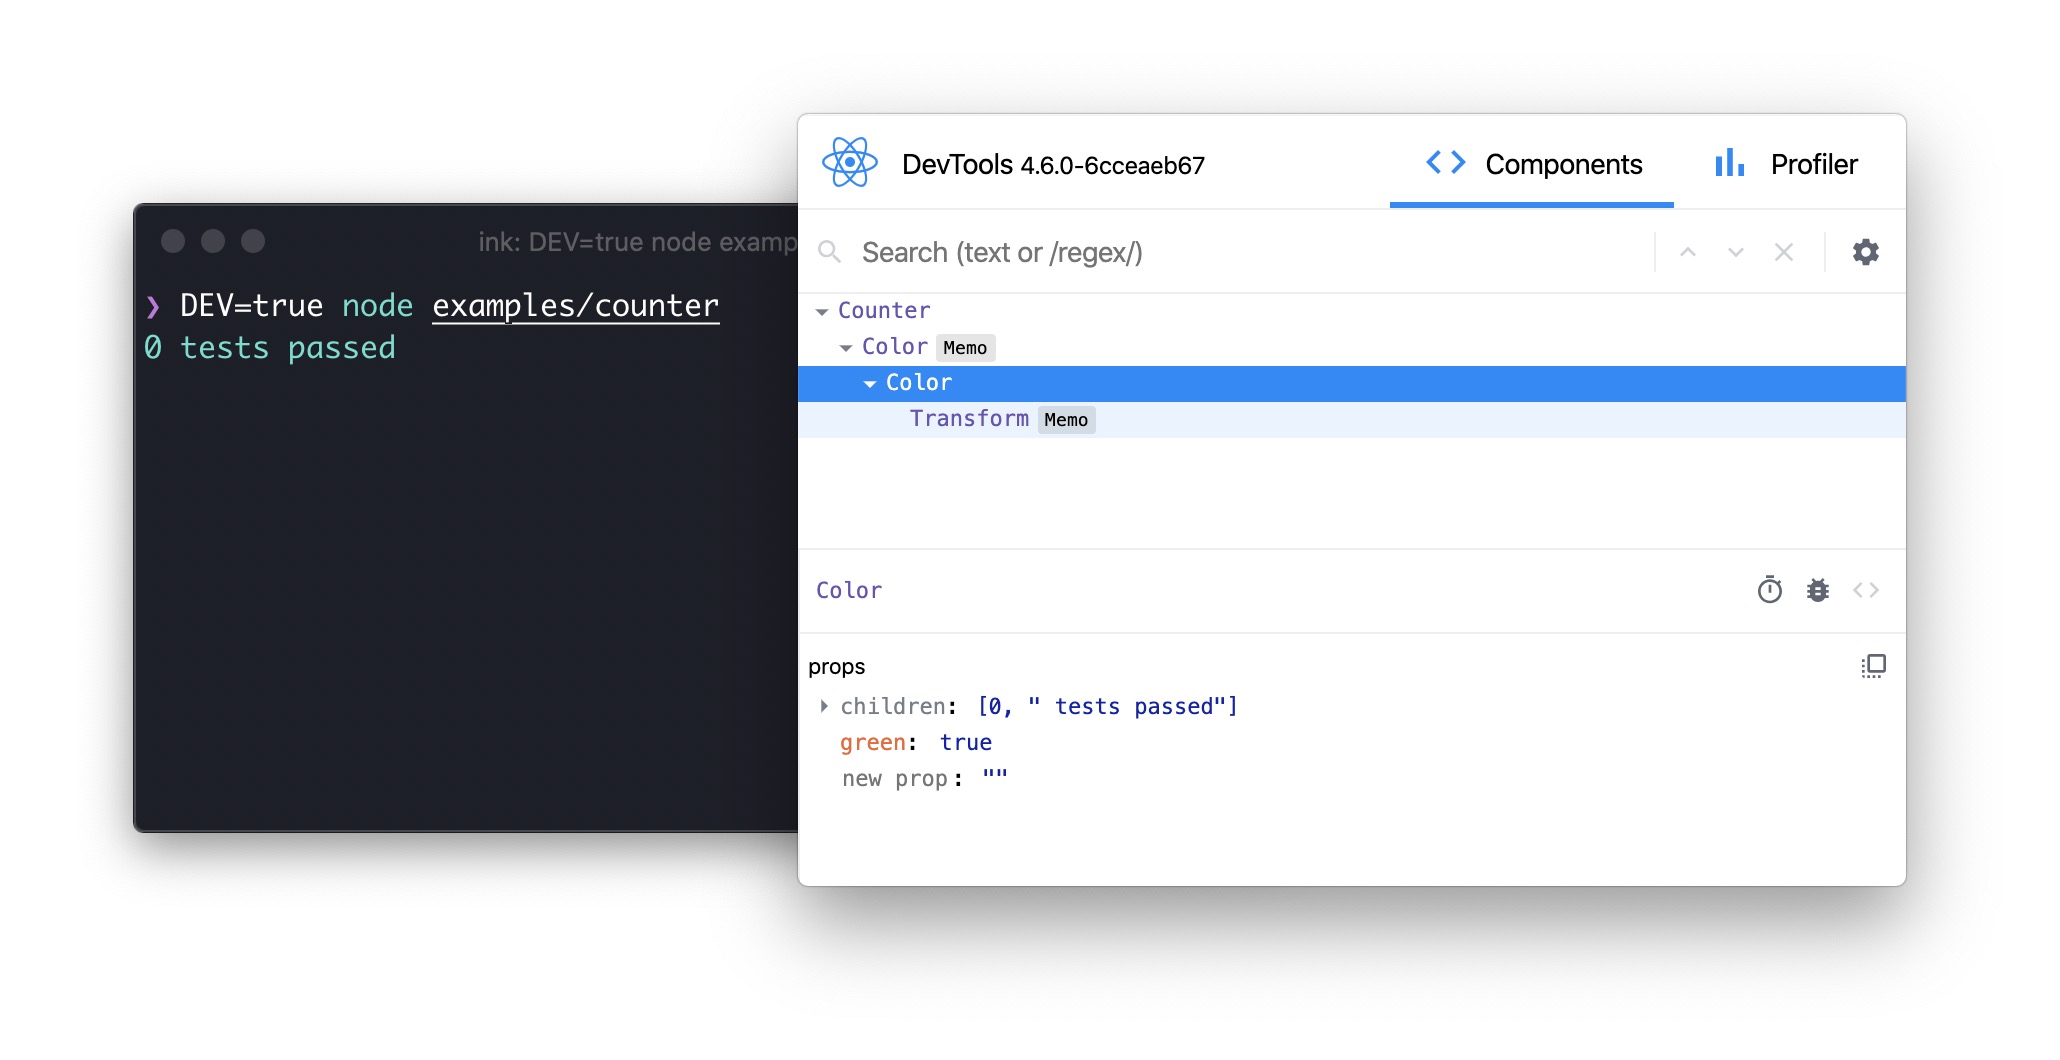
Ink supports React Devtools out of the box. To enable integration with React Devtools in your Ink-based CLI, first ensure you have installed the optional react-devtools-core dependency, and then run your app with the DEV=true environment variable:
DEV=true my-cli
Then, start React Devtools itself:
npx react-devtools
After it starts, you should see the component tree of your CLI.
You can even inspect and change the props of components, and see the results immediately in the CLI, without restarting it.
[!NOTE]
You must manually quit your CLI via Ctrl+C after you're done testing.
Screen Reader Support
Ink has basic support for screen readers.
To enable it, you can either pass the isScreenReaderEnabled option to the render function or set the INK_SCREEN_READER environment variable to true.
Ink implements a small subset of functionality from the ARIA specification.
render(<MyApp />, {isScreenReaderEnabled: true});
When screen reader support is enabled, Ink will try its best to generate a screen-reader-friendly output.
For example, for this code:
<Box aria-role="checkbox" aria-state={{checked: true}}>
	<Text>Accept terms and conditions</Text>
</Box>
Ink will generate the following output for screen readers:
(checked) checkbox: Accept terms and conditions
You can also provide a custom label for screen readers if you want to render something different for them.
For example, if you are building a progress bar, you can use aria-label to provide a more descriptive label for screen readers.