
llm-wiki-manager
llm-wiki-manager is the local cockpit for several llm-wiki workspaces. It
creates workspace folders, assigns ports, starts Docker services, exposes MCP
endpoints, and provides the donna shell: an agent-first terminal UI that can
inspect workspaces, run safe manager commands, call MCP tools, guide production
jobs, and run one-shot headless tasks. Its workspace registry is also the source
of truth for the Claude Desktop integration (plugins/claude-desktop): one MCP
extension serves every initialized workspace of the registry, with one active
workspace selected at a time, and the Claude plugin uses the same registry when
it runs a workspace skill headlessly. Setup, updates and limits:
docs/claude-desktop.md.
The llm-wiki, llm-wiki-manager and agent images are released together under
one coordinated version — the one npm shows above, and the one every image tag
must match. Rebuild the llm-wiki image when deploying a new release through
Docker: the manager and its runtime run from source and only need a restart, the
containers do not.
The manager does not implement the wiki engine or the external agents. It
orchestrates them — generically. Since 0.12.0 the Donna core is
business-agnostic: agents declare their capabilities through a standard
contract (agent_describe / agent_plan / agent_execute / agent_status /
agent_cancel), plans target capabilities rather than agent names, and a
deterministic dispatcher executes bounded tasks with idempotency, bounded
approvals, per-run budgets and automatic recovery after restart. The chat
stays available while runs execute; additional requests are queued.
Scope note: this is a single-user deployment baseline. Do not expose the
runtime as a shared write surface; it binds to 127.0.0.1 by default, and
--host 0.0.0.0 must be an explicit deployment choice with bearer-token and
network protection.
What it's for, in one sentence
wikiLLM turns a pile of scattered documents (Confluence pages, files, notes…) into a clean, up-to-date wiki, and can then regenerate deliverables from it (reports, pages, exports). The manager is the control deck: it keeps each project in its own corner, starts the right services, and lets you drive everything — either with the mouse in a browser, or by talking to an assistant.
A workspace = a project. Each project is isolated: its documents, settings, and results never get mixed up with the others.
Installation and command modes
The package can be installed either locally in a project or globally. The command used afterwards depends on the installation mode.
Local installation
Use a local installation when the manager should be pinned in a project's
package.json:
npm install @dotdrelle/wiki-manager
npm approve-scripts [email protected]  # only when npm reports that Bun's postinstall is pending
npx wiki-manager
npx wiki-workspace --help
npm install does not add wiki-manager or wiki-workspace to the shell's
global PATH. Run local executables with npx (or npm exec wiki-manager and
npm exec wiki-workspace). Bun is installed automatically as a package runtime;
you do not need to add ~/.bun/bin to PATH. Recent npm versions may require
the explicit npm approve-scripts [email protected] security approval shown above
before the first launch.
Global installation
Use a global installation when the commands should be available directly from any directory:
npm install --global @dotdrelle/wiki-manager
wiki-manager
wiki-workspace --help
The global installation also installs the required Bun runtime. A separately installed Bun remains supported, but is not required. If npm blocks Bun's installation script, reinstall with:
npm install --global --allow-scripts=bun @dotdrelle/wiki-manager
In both modes, launch the commands from the directory that should hold the
manager state (workspaces/, .env, and mcp.endpoints.json).
At interactive ShellUI startup, the manager checks Docker availability first,
then outbound HTTPS connectivity, followed by agent and workspace
configuration, workspace containers, MCP handshakes (tools/list), and the
Donna runtime. The connectivity probe uses the configured HTTP(S) proxy and
custom CA settings. MCP diagnostics distinguish configuration, authentication,
reachability, and protocol failures. Remote MCPs are skipped when Internet is
offline, while local endpoints are still checked; MCPs are also checked when
Docker is unavailable because they may run elsewhere.
The startup screen reports Ready, Degraded, or Setup required and
keeps the shell usable in degraded mode. It offers Retry pending checks,
Start services, and Open diagnostics (service logs plus detailed MCP
status). Set
WIKI_MANAGER_CONNECTIVITY_URL only when the default npm-registry ping endpoint
must be replaced by an organization-approved HTTPS endpoint.
After a workspace is loaded, ShellUI displays /status automatically as the
first operational view. When Open workspace also starts services, the status
snapshot is produced afterwards so it reflects their current container and MCP
state.
Functional overview
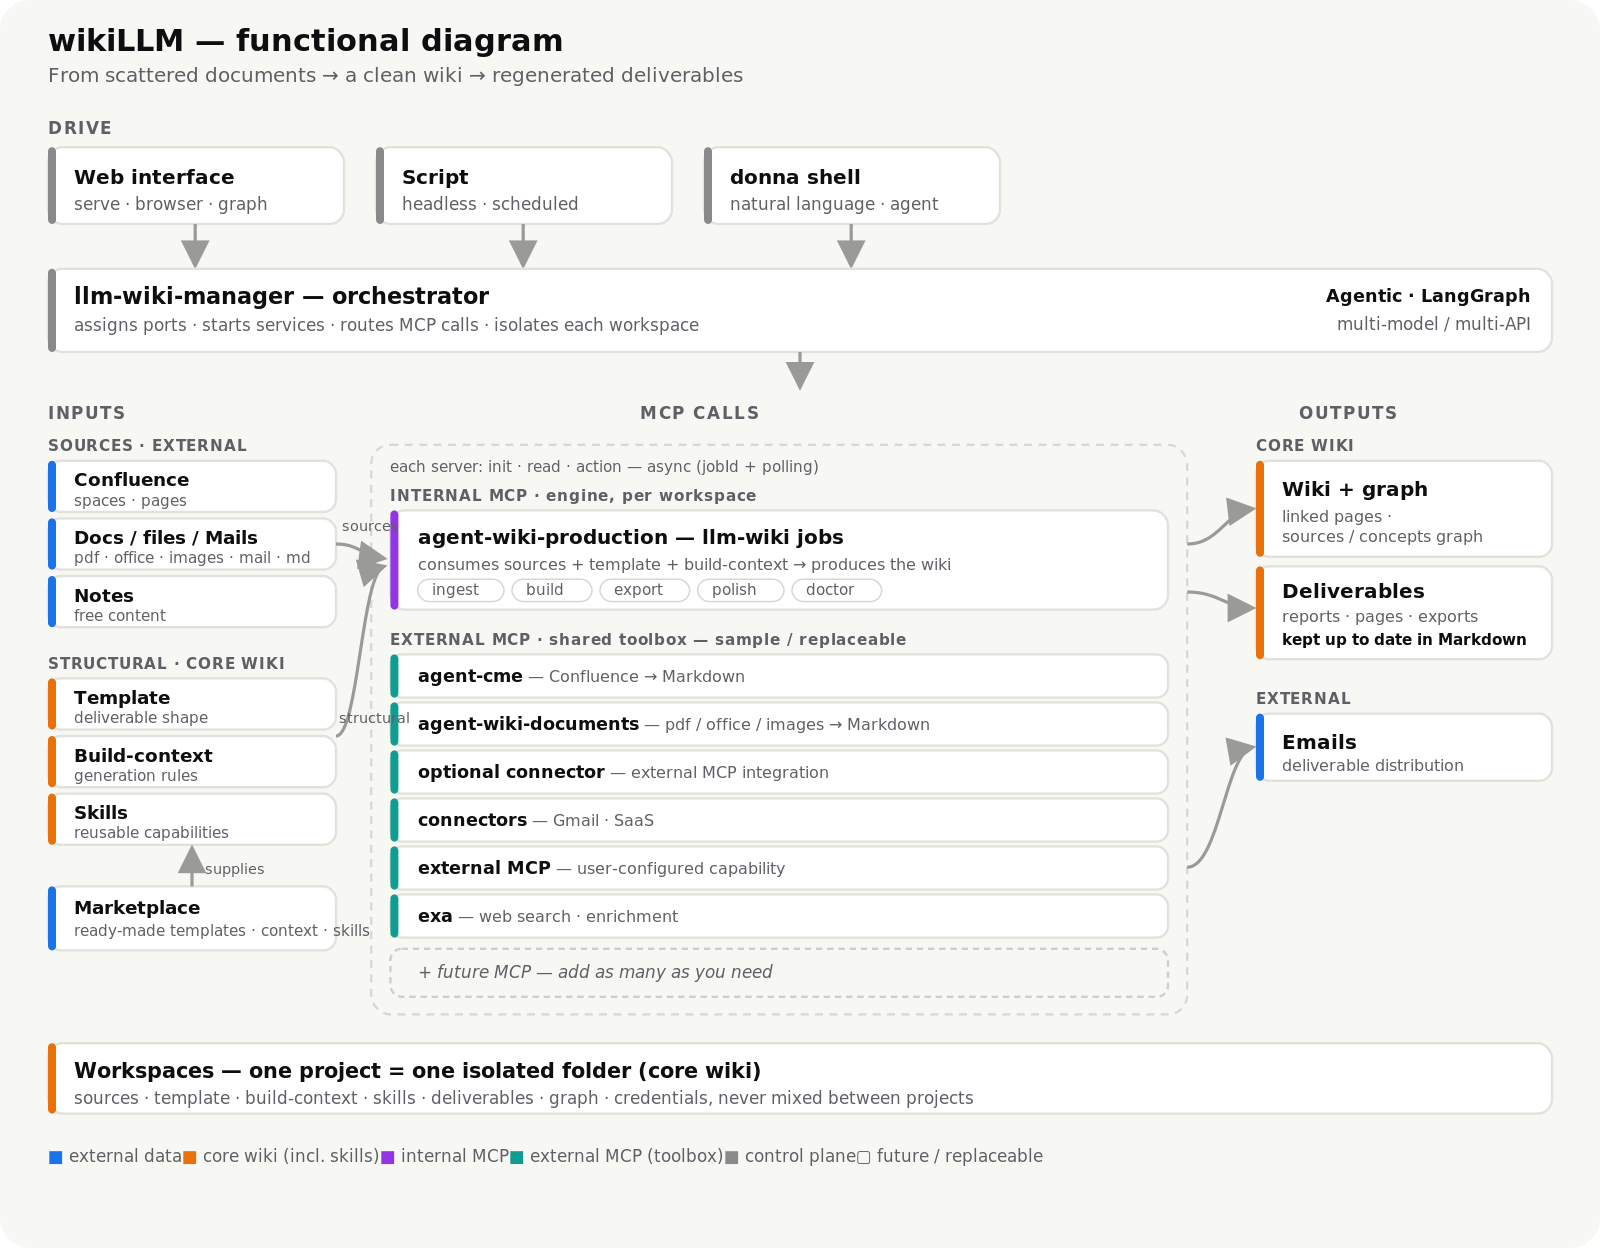
The diagram below shows the whole picture at a glance: how inputs (external sources plus structural template / build-context / skills from a marketplace) flow through the MCP calls — split between the internal production engine and a replaceable toolbox of external MCP servers — to produce the core wiki outputs, all driven by an agentic, multi-model orchestrator and grounded in isolated workspaces.
Under the hood, every conversation is isolated in its own thread while durable
facts live in a workspace-scoped memory: Donna retrieves the relevant ones for
chat, agent mode and runs, /remember saves explicitly, and Activity → Memory
lets you inspect, forget or restore them. Deleting a workspace purges that
memory with it.
How wikiLLM compares
Several open projects now build an LLM-maintained knowledge layer over your sources — some as a wiki, some as a retrieval and answer platform. They target different problems — the useful questions are what goes in, what comes out, and who operates it. Snapshot as of September 2026; all of these move quickly.
✅ first-class · 🟡 partial or indirect · ❌ not a goal
Projects compared: OpenWiki and DeepWiki-Open (code / knowledge wikis), RAGFlow and Onyx (RAG platforms), and GraphRAG.
Per-project details: OpenWiki emits OKF v0.2 and maintains a versioned evidence graph of “grounded claims”; GraphRAG is a research project now in maintenance mode; Onyx’s SSO/RBAC live in its enterprise edition.
The short version:
- OpenWiki and DeepWiki-Open build wikis from a code repository (OpenWiki also ingests personal sources — Notion, Gmail, Slack…). Their input is code or personal feeds, not a stack of business documents feeding your deliverable templates.
- RAGFlow and Onyx are RAG platforms: they index sources and answer questions from them, with agents and connectors, but the output is an answer, not a wiki you browse or a document you ship.
- GraphRAG builds retrieval structure and is now in maintenance mode — a complementary back end, not a wiki.
- wikiLLM is the only one whose output is both a browsable wiki and regenerated business documents, and the only one with the operational layer — isolated projects, bounded approvals, automatic recovery, a web console — that a shared internal tool needs.
What wikiLLM does not try to do (today):
- Document a codebase for coding agents — that is OpenWiki / DeepWiki-Open territory.
- Serve a true multi-user instance with per-user identity and an attributed audit trail. This is a single-user deployment baseline (see the scope note above).
- Ship or host the multi-provider AI gateway — routing to several providers is supported, the gateway itself is infrastructure you bring.
Quick start — your first wiki in ~5 minutes
The fastest way in: a browsable wiki, its dependency graph, and a grounded chat — all on the shipped example, with no external source to configure. External agents (Confluence, mail…) come later, only when you plug in real sources.
Prerequisites: Docker running and Node ≥ 22. Bun is installed with the npm package.
1 — Install globally, pick a home folder.
The manager keeps its state (workspaces, .env, endpoints) in the directory
where you launch it, so give it a home. This quick start uses the global mode;
see Installation and command modes for the
local npm install + npx mode.
npm install --global @dotdrelle/wiki-manager
mkdir -p ~/llm-wiki && cd ~/llm-wiki      # all manager state lives here
2 — Set the environment.
Copy the template and keep the defaults — nothing is mandatory for the local
demo (tokens/credentials are only needed when you connect real sources, see
docs/usage.md). The mcp.endpoints.json file is created
automatically on the first command.
cp .env.example .env
3 — Start the shared agents.
Start the common toolbox once (Confluence export cme, documents).
They run in the background and serve every workspace.
wiki-workspace agents up
wiki-workspace agents status              # ✅ each agent should report healthy
4 — Create the demo workspace.
This creates the folder, auto-selects ports, and runs wiki init with the
"basic" scaffold — a working example out of the box.
wiki-workspace config demo
5 — Start it. Two doors, your choice:
# A) just serve — the web interface
wiki-workspace up demo --open             # wiki + graph + built-in chat, in your browser

# B) the donna shell — talk in plain language
wiki-manager                              # then: /use demo
Two-step login (TOTP). The first interactive start enrolls your authenticator:
wiki-manager loginopens the manager's login page. The host CLI authorizes the QR code with a short-lived, one-time grant, so a reverse proxy cannot enroll an authenticator on your behalf. One session covers the shell and the served wiki, sliding for 12 h of inactivity;WIKI_MANAGER_TOTP=offdisables the gate, and headless/CI runs or a standaloneservewithout the manager runtime never pass through it.
6 — Check everything is live.
http://localhost:8080/ lists every workspace and whether it is running, with
a link to the ones that are — no sign-in (disable it with
WIKI_MANAGER_HUB=off). Then confirm the wiring from the donna shell:
/use demo            # activate the workspace
/config status       # ✅ LLM configured (apiKey, model, baseUrl)
/mcp status          # ✅ MCP endpoints connected (llm-wiki, production, cme, documents…)
/mcp tools           # the tools each agent exposes
/services            # ✅ serve / mcp-http / production-mcp running
Then send a one-line prompt to confirm the LLM answers, e.g.
say hello in one word. From the CLI you can re-check anytime with
wiki-workspace agents status and wiki-workspace list.
If
/config statusreports missing fields, run/config editto open the workspace.wikirc.yaml. That's where you set both the LLM (llm.provider,llm.model,llm.apiKey,llm.baseUrl) — direct chat needs them — and the vectorization underretrieval.vector(enabled,embeddingModel, optional separatebaseUrl/apiKey, and reranking) used for retrieval-grounded answers.
7 — Try a few commands & prompts.
Plain-language prompts (the web Agent/Donna mode or the donna shell):
"Summarize wiki/index.md and list the pages it links to."
"What sources is this page grounded on?"
"Build the deliverable from the current wiki."
"Remember that our reports are always in English."   # saved in workspace memory
Slash primitives (shell):
/wiki                # inspect the wiki
/skills              # bundled workflows: pipeline, wiki-sync, wiki-ingest, wiki-build, wiki-rebuild, deliver, curate, new-template, diagnose, status
/skills run pipeline # run the shipped end-to-end example
/memory              # list saved workspace facts (/remember, /forget)
8 — See a concrete result.
Open the default page wiki/index.md and the graph view in the browser,
then regenerate a deliverable:
wiki-workspace wiki demo build # or, in the shell: /skills run pipeline
That's the whole loop. Next: the four ways to use it and how to configure the external agents (CME & co.) live in docs/usage.md; the detailed story is in The journey; and installing from source is in Installing from source.
The journey: from first launch to first result
Follow this little story in order. By the end you'll have seen it all: the interface, the assistant, the tools, and scripting.
Step 1 — Create your workspace with wiki-workspace.
Everything starts here: wiki-workspace creates your project, e.g. my-project.
It's the folder that will hold its documents, settings, and results, all on its
own. It ships pre-filled with an example (the "basic" scaffold): enough to
have a working use case from the start.
Step 2 — Configure the MCPs and the environment. Fill in the services (MCP) and the environment file: the keys, URLs, and tokens the project needs (Confluence, e-mail, production…). It's like plugging in the cables before switching on.
Step 3 — Start the shared external agents. Start the common toolbox once and for all (Confluence, documents, e-mail, production). These agents run in the background and serve all your projects:
wiki-workspace agents up        # start cme, documents…
wiki-workspace agents status    # check they respond
One command starts the whole deployment — agent-runtime, agents and every configured workspace — and is safe to repeat while things are already up:
wiki-workspace start            # local images, then runtime + agents + workspaces
wiki-workspace start --open     # …and open the first workspace chat
wiki-workspace start --pull     # fetch published images before starting
Step 4 — Move to wiki-manager or serve.
Two entry doors, your choice:
wiki-workspace up my-project --open # open the web interface (serve) in the browser
serve→ the web interface: you browse the wiki (with its interdependency graph), click around, and chat with the built-in assistant.wiki-manager(thedonnashell) → you talk in plain language; it organizes the steps into a workflow and calls the tools for you.
👉 From this step you already have a concrete result: your wiki is in front of you.
(If the stack is already running, wiki-workspace wiki my-project serve --open
just reopens the web page.)
Step 5 — Discover the shipped use case via the wiki-manager commands.
The scaffold ships ready-to-use examples. In the shell, explore them:
/skills              list the bundled examples (pipeline, wiki-sync, wiki-ingest, wiki-build, wiki-rebuild, deliver, curate, diagnose, status…)
/skills show <name>  see what an example does
/skills run <name>   run it to see the result
It's the best way to discover every facet without building anything yourself: you start from a working case, then adapt it.
Step 6 — Let it run on its own (optional). Once comfortable, turn a task into a script and schedule it (e.g. every morning) — that's scripting mode. No need to think about it anymore.
Understanding a project's structure
A workspace keeps everything in five folders. The easiest way is to see them as a production line, from raw materials to finished product:
In one sentence: you ingest the sources into the wiki, then generate the deliverables by filling the templates with wiki content, according to the rules in the build-context.
How a deliverable is generated
The process always follows the same chain. Two entry points depending on your starting source.
Everything is driven in plain language from Agent/Donna mode, or by running a ready-made skill. Direct Chat is deliberately read-only with respect to production orchestration: it can answer and inspect allowed data, but it does not start a skill or a production job. No command line is needed.
Entry point A — from a wiki / Confluence export
At each step, either you ask Donna for the action in Agent mode, or you run the skill explicitly.
- Export Confluence (via the CME agent) → the markdown lands in
raw/untracked/. → "Export the KEY Confluence space into my-project" - Ingest — the sources become clean pages in
wiki/(the originals are archived inraw/ingested/). → "Ingest the project's sources" - Index — builds the search index so the AI finds the right passage. → "Update the index"
- Build — fills the
templates/with the wiki + thebuild-context/→ thedeliverables/. → "Generate the deliverables" - Export / polish — expands citations into their source and refines the rendering. → "Export and polish the deliverables"
💡 Even simpler:
/skills run wiki-syncexports the Confluence sources into Pending,/skills run wiki-ingestingests what waits there (each step is replayable on its own;/skills run wiki-rebuildre-runs TAXO over the archive),/skills run wiki-buildregenerates the deliverables,/skills run deliverpublishes them (addpolishto refine the rendering), and/skills run pipelineruns the whole chain end to end. The three step skills take an optional argument — a source name, or a template with or without its.mdextension.
Entry point B — from a simple PDF (the fastest)
Ingestion only reads markdown. For a PDF (or a Word file, HTML…), the documents agent does the conversion (it even reads scanned PDFs thanks to OCR, in French and English). Two ways to hand it the file:
- Simplest — via chat: drag/attach the PDF directly into the conversation and
ask "Convert this PDF into my-project". The agent turns it into markdown and
drops it into
raw/untracked/by itself. - Via folder: put the PDF in the documents agent's input folder
(
.agents-data/documents/input/), then ask "Convert the file my-doc.pdf into my-project".
Then it's the same path as entry point A: ingest → index → build → export. The
shortest route for a first try: hand over a PDF, then /skills run pipeline.
Exploring the example data
The scaffold ships with a working case. To discover it, in the chat or the donna
shell:
/skills                 list the examples (diagnose, pipeline, status, wiki-sync, wiki-ingest, wiki-build, wiki-rebuild, deliver, curate)
/skills show pipeline   show what the end-to-end example does
/skills run pipeline    run the full chain on the example sources
/wiki                   inspect the project's wiki
You can also simply open the folders raw/, wiki/, templates/, and
deliverables/ of the workspace to see, at each step, what goes in and what comes
out.
⚙️ Advanced (later): the same steps exist on the command line via
wiki-workspace wiki …(doctor,ingest,build,logs). Keep these for automation and debugging — for everyday use, stay in the chat or the skills.
In short
The right reflex to get started: steps 1 → 4, and your wiki is already in front of you in the browser (create → configure → start the agents → open).
Documentation
For the meaning of Concurrent tasks: 1 / 4, connector versus production defaults,
and which setting to change for tasks or ingestion model calls, read the
Configuration and performance help chapter,
also available in the product's Help panel.
The deep reference lives on git, not on this page: an npm landing page should answer "what is this and how do I start it", and stop there.
Reading this on npmjs.com? Relative links resolve against the repository, so follow them from the git page if one does not open.