Optics Framework
Self-healing test automation for mobile, web, TV — and AI agents.
One keyword engine. Six ways to drive it: CSV/YAML files, a Python SDK, Robot Framework, a REST API, an interactive terminal, or an MCP server your AI agent talks to.
Documentation · Install · Getting Started · Keywords · Architecture
Most frameworks assume a UI element has one true locator, and a test breaks the moment that locator changes. Optics assumes an element has several plausible identities — its XPath, its visible text, what it looks like on screen — and tries all of them before giving up.
That idea runs through the whole framework: locators fall back, drivers fall back, element values fall back. Tests are data (CSV or YAML), so non-coders can write them, and the same keywords are reachable from Python, Robot Framework, HTTP, and MCP.
Install
One line puts the optics CLI on your PATH:
curl -fsSL https://optics-framework.org/install | sh # macOS, Linux
irm https://optics-framework.org/install.ps1 | iex # Windows
It installs into its own virtual environment under ~/.optics, so nothing lands in your system Python. Then optics quickstart builds a project, checks your setup, and runs your first test.
Already managing your own environment? Optics needs Python 3.12+, and the core install ships no drivers, OCR, or LLM backends — you add only what you need:
python3 -m venv venv && source venv/bin/activate
pip install "optics-framework[appium,easyocr]"
Most extra names match the config.yaml source keys, so the word you install is usually the word you enable (exceptions: google-vision enables google_vision, and the bundles and mcp aren't config keys):
optics setup installs the drivers, OCR and LLM engines above (and the bundles) by name — pinned to your installed Optics version — and bare optics setup opens a TUI picker. optics quickstart goes one step further and offers the right extras for the platform you pick:
optics setup --list
optics setup --install appium easyocr
[!NOTE] The installer always includes the
mcpserver extra. With pip, add it yourself (it isn't an engine backendoptics setupmanages):pip install "optics-framework[mcp]".
[!IMPORTANT] Some extras need system tooling beyond the Python package. A driver extra installs only the Python client — mobile testing also needs the Appium server, a device/emulator, and platform tooling (Node.js, Android SDK/
adb, JDK).pytesseractneeds the Tesseract binary;playwrightneeds its browsers (playwright install). See the Installation guide.
[!WARNING] Conda is not supported for
easyocr+optics-frameworktogether (conflicting NumPy 1.x/2.x requirements). Use a standardvenv.
Quickstart
From a fresh install to a running test with one guided command:
pip install optics-framework
optics quickstart
optics quickstart asks what you want to automate, installs the matching engine, scaffolds the project, writes a platform-correct config.yaml, and runs an optics doctor check — then prints your next steps. Every prompt has a default, so pressing Enter throughout yields a runnable project.
Prefer to drive each step yourself?
optics init my_test_project --template contact
# point my_test_project/config.yaml at your device/app, start the Appium server, then:
optics dry_run my_test_project    # validate keywords, elements and module refs — no device (but the config's engines must be installed)
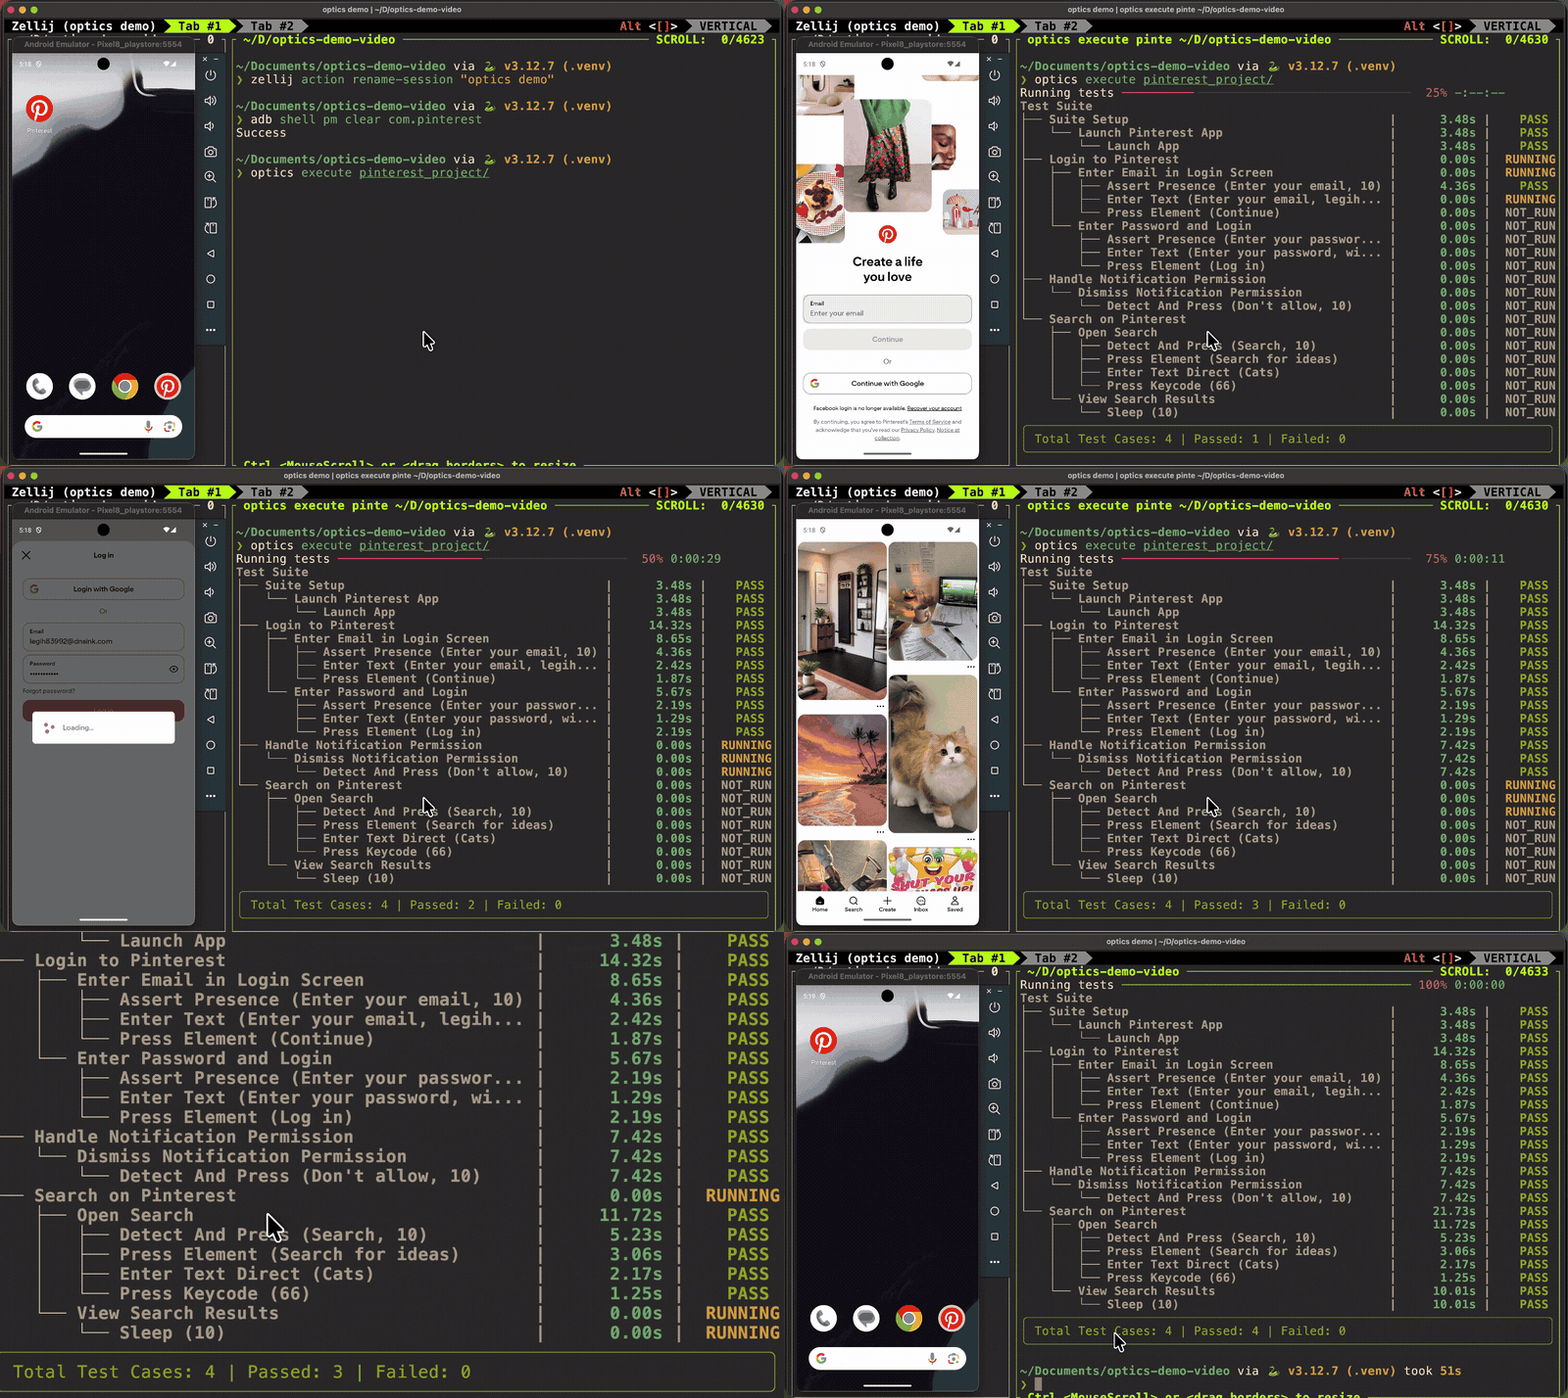
optics execute my_test_project
--template scaffolds a working project from a bundled sample. Each needs the matching extras installed (see Install); the headline [appium,easyocr] above covers the first three:
contact·calendar·youtube— Appium/Android, easyocr →[appium,easyocr]clock— Appium/Android, image templates + Tesseract OCR →[appium,pytesseract](plus the Tesseract binary)gmail_web— Selenium →[selenium,easyocr]playwright— Playwright →[playwright](thenplaywright installfor the browsers)
Omit --template for an empty scaffold with a commented starter config.yaml. Need only a config for an existing folder? optics configure <folder> writes one from a few questions, and optics doctor [folder] [--check] verifies engines, tooling, and project config.
Why Optics
A locator ladder, not a locator. Every element-based keyword walks a priority-ordered chain until one strategy succeeds:
Cheap strategies run first, so vision only costs you time when the tree can't help. Steps 1–4 are LocatorStrategy registrations; step 5 is a separate recovery layer, bounded to five turns and a six-keyword allowlist so it re-enters the ladder rather than tapping blind coordinates. Two more fallback axes sit alongside: multiple values per element name, and multiple enabled drivers or element sources, each tried in config order.
Beyond the ladder:
- Tests are data — elements, modules and test cases as plain CSV or YAML. No IDE, no programming.
- Targets — Android, iOS, web (Selenium/Playwright), Android TV, Samsung Tizen, LG webOS.
- Non-intrusive — the
bledriver drives production devices as a Bluetooth HID mouse/keyboard where debugging and screenshots are blocked. Coordinate-only, so pair it withcamera_screenshotand the vision strategies. - Agent-ready —
optics mcpexposes every keyword as a typed MCP tool and device state as MCP resources.
Write a test as data
my_test_project/
├── config.yaml
├── test_cases/test_cases.csv
├── modules/modules.csv
└── test_data/
    ├── elements.csv
    ├── error_definitions.csv      # optional
    └── input_templates/*.png      # optional, for image matching
Optics discovers these files by their content (CSV headers / YAML top-level keys), not their path — the folder names above are a convention, so elements.csv works equally under test_data/ or elements/ (the folder optics live's /save writes to).
test_data/elements.csv — names mapped to locators. Doubles as a general variable store; repeating a name builds a fallback list.
Element_Name,Element_ID
Add_Contact_Button,//android.widget.Button[@content-desc="Create contact"]
First_Name_element,//android.widget.EditText[@text="First name"]
Save_Button,Save
First_Name,John
A locator can be an XPath, text=…, css=…, a plain string, an image filename from input_templates/, or TEXT_ONLY:… to force a vision-based search.
modules/modules.csv — a reusable sequence of keywords; ${name} resolves against elements.csv.
module_name,module_step,param_1,param_2
Add Contact,Press Element,${Add_Contact_Button}
Add Contact,Enter Text,${First_Name_element},${First_Name}
Add Contact,Press Element,${Save_Button}
test_cases/test_cases.csv — modules sequenced into scenarios. A test case whose name contains suite + setup (or teardown) is hoisted to run around the whole suite.
test_case,test_step
Suite Setup,Launch Contact Application
Add Contact with Contact App,Add Contact
Add Contact with Contact App,Verify Contact is Added
Six ways to run the same keywords
Every successful keyword is buffered as you work. To persist the buffer:
/save <test_case> <module_name>
That appends the recorded keywords to modules/modules.csv as <module_name>, adds a (<test_case>, <module_name>) row to test_cases/test_cases.csv, creates a header-only elements/elements.csv stub if none exists, and copies the session's screenshots to execution_output/<module_name>/. The buffer then clears, so the next actions become the next module. If either name already exists, re-run the identical /save to confirm the append.
Other commands: /device [id], /elements, /screenshot, /help, /quit. Full reference: Live Usage.
from optics_framework import Optics

optics = Optics()
optics.setup(
    driver_sources=[{"appium": {"enabled": True, "url": "http://localhost:4723"}}],
    elements_sources=[{"appium_find_element": {"enabled": True}}],
)

optics.launch_app(app_identifier="com.example.app")
optics.enter_text("username_field", "testuser")
optics.press_element("submit_button")
optics.validate_element("welcome_message")
optics.quit()
{ "mcpServers": { "optics": { "command": "optics", "args": ["mcp"] } } }
Then: start_session → observe (screenshot, optics://session/{id}/source) → act (press_element, enter_text, …) → terminate_session. For networked use: optics mcp --transport http --port 8090. Sessions are not shared with optics serve — each is its own process.
Keywords
Every public method on the four API classes is automatically a keyword, on every surface above. CSV/YAML uses Title Case (Press Element → press_element).
Run optics list for the live catalogue with signatures, or read the Keyword Usage guide for parameters and examples. Location keywords accept percentage-based Area-of-Interest bounds (aoi_x/y/width/height, 0–100) to scope a vision search to part of the screen.
[!NOTE]
Press CheckboxandPress Radio Buttonstill resolve but are deprecated aliases ofPress Element— usePress Elementdirectly.Add APIis available on theOpticsPython class only, not to the CSV/YAML runner; define APIs in anapi.yamland call them withInvoke APIinstead.
Configure once, in config.yaml
Every section is a priority-ordered list and every entry has an enabled flag. Enable a second driver and it becomes a fallback. Prefer not to hand-write it? optics configure <folder> writes one from a few questions, or optics quickstart builds the whole project including the config.
driver_sources:
  - appium:
      enabled: true
      url: "http://localhost:4723"
      capabilities:
        platformName: Android
        automationName: UiAutomator2
        deviceName: emulator-5554
        appPackage: com.google.android.contacts
        appActivity: com.android.contacts.activities.PeopleActivity

elements_sources:
  - appium_find_element: { enabled: true }
  - appium_page_source:  { enabled: true }
  - appium_screenshot:   { enabled: true }

text_detection:
  - easyocr: { enabled: true }

image_detection:
  - templatematch: { enabled: false }

log_level: INFO
Enabling the LLM features
The llm_models block powers both natural-language mode in optics live (Ctrl-N) and AI self-heal. Pick the engine that matches the account you already have, install its extra, and enable it:
llm_models:
  - openai:
      enabled: true
      url: https://openrouter.ai/api/v1         # omit for OpenAI itself
      capabilities:
        model: anthropic/claude-sonnet-5-5
        api_key_env: OPENROUTER_API_KEY         # default OPENAI_API_KEY

ai_self_heal: true                              # opt into the LLM backstop; default false
Keys always come from environment variables (GEMINI_API_KEY, OPENAI_API_KEY, ANTHROPIC_API_KEY, or the variable api_key_env names). Never commit keys to config.yaml. Enable more than one entry and Optics falls back to the next when a call fails. A misconfigured LLM degrades to "no self-heal" rather than a hard failure.
Full reference: Configuration. Adding your own engine is a file drop plus an interface — see Extending the Framework.
Results
An optics execute run writes to <project>/execution_output/:
junit_output.xml— written incrementally, so CI sees progress as it happenslogs.json— structured logs whenjson_log: true- screenshots — pre/post action frames, plus strategy-annotated and AOI overlays
detected_errors_<session_id>.json— on-screen error detection
Drop an error_definitions.csv into test_data/ and Optics scans visible text for crash dialogs, Session expired, network errors, and the like — no assertions required. Matches also land in the JUnit XML as a synthetic failing testcase, so CI fails a build on "the app crashed mid-test" the same way it fails a normal assertion. See Error Detection.
CLI reference
optics init        Scaffold a new project (positional NAME; --template, --path, --force, --git-init)
optics quickstart  Guided walkthrough: engines + project + config + doctor check
optics configure   Write/edit a project's config.yaml (guided prompts; --edit opens a TUI)
optics doctor      Diagnose engines, tooling and a project's config (--check for CI)
optics setup       Install engine backends (--list, --install); bare command opens a TUI
optics dry_run     Validate a project without touching a device
optics execute     Run a project (--runner test_runner|pytest)
optics live        Interactive keyword session against a live target
optics generate    Emit pytest or Robot Framework code from a project
optics list        Print every discoverable keyword
optics serve       Start the REST API server (--host, --port, --workers)
optics mcp         Start the MCP server (--transport stdio|http)
optics completion  Install shell autocompletion
optics --version   Print the installed version
Details in the CLI guide.
Contributing
Contributions welcome — bug reports, docs, and code are all first-class.
- Bigger items are queued under
help wanted. - Found a bug or missing a keyword? Open an issue.
The contribution guide covers development setup, step-by-step recipes (adding a keyword or engine backend), commit conventions, and the pull-request format reviewers expect. Tooling details live in the Developer Guide; behaviour expectations in our Code of Conduct.
git clone [email protected]:mozarkai/optics-framework.git
cd optics-framework
pipx install poetry
poetry install --with dev,test,docs

poetry run pytest                    # tests + coverage
poetry run ruff check --fix .        # lint
poetry run pre-commit run --all-files
poetry run mkdocs serve              # docs preview
Commits follow Conventional Commits, enforced by commitizen in the commit-msg hook.
Security issues follow SECURITY.md rather than public issues.
License & support
Apache 2.0 — see LICENSE.
Questions and bugs: GitHub Issues.