TencentCloud MCP Servers
A suite of specialized MCP servers that help you get the most out of TencentCloud. Build cloud-native applications, manage infrastructure, and accelerate AI development and deployment wherever you use MCP.
🌍 Languages: English | 中文
Table of Contents
- TencentCloud MCP Servers
What is the Model Context Protocol (MCP) and how does it work with TencentCloud MCP Servers?
The Model Context Protocol (MCP) is an open protocol that enables seamless integration between LLM applications and external data sources and tools. Whether you're building an AI-powered IDE, enhancing a chat interface, or creating custom AI workflows, MCP provides a standardized way to connect LLMs with the context they need.
An MCP Server is a lightweight program that exposes specific capabilities through the standardized Model Context Protocol. Host applications (such as chatbots, IDEs, and other AI tools) have MCP clients that maintain 1:1 connections with MCP servers. Common MCP clients include agentic AI coding assistants (like CodeBuddy, Cursor, Q Developer, Cline, Windsurf) as well as chatbot applications like Claude Desktop, with more clients coming soon. MCP servers can access local data sources and remote services to provide additional context that improves the generated outputs from the models.
TencentCloud MCP Servers use this protocol to provide AI applications access to TencentCloud documentation, contextual guidance, and best practices. Through the standardized MCP client-server architecture, TencentCloud capabilities become an intelligent extension of your development environment or AI application.
TencentCloud MCP servers enable enhanced cloud-native development, infrastructure management, and development workflows—making AI-assisted cloud computing more accessible and efficient.
The Model Context Protocol is an open source project run by Anthropic, PBC. and open to contributions from the entire community. For more information on MCP, you can find further documentation here
Why TencentCloud MCP Servers?
MCP servers enhance the capabilities of foundation models (FMs) in several key ways:
-
Improved Output Quality: By providing relevant information directly in the model's context, MCP servers significantly improve model responses for specialized domains like TencentCloud services. This approach reduces hallucinations, provides more accurate technical details, enables more precise code generation, and ensures recommendations align with current TencentCloud best practices and service capabilities.
-
Workflow Automation: MCP servers convert common workflows into tools that foundation models can use directly.
-
Specialized Domain Knowledge: MCP servers provide deep, contextual knowledge about TencentCloud services that might not be fully represented in foundation models' training data, enabling more accurate and helpful responses for cloud development tasks.
Available MCP Servers: Quick Installation
MCP Server List Sync With TencentCloud Developer MCP Market.
Get started quickly with one-click installation buttons for popular MCP clients. Click the buttons below to install servers directly in CodeBuddy, Cursor or VS Code:
-
If you are using Cursor for local deployment, click in the list for quick installation.
-
If you are using VS Code for local deployment, click in the list for quick installation.
-
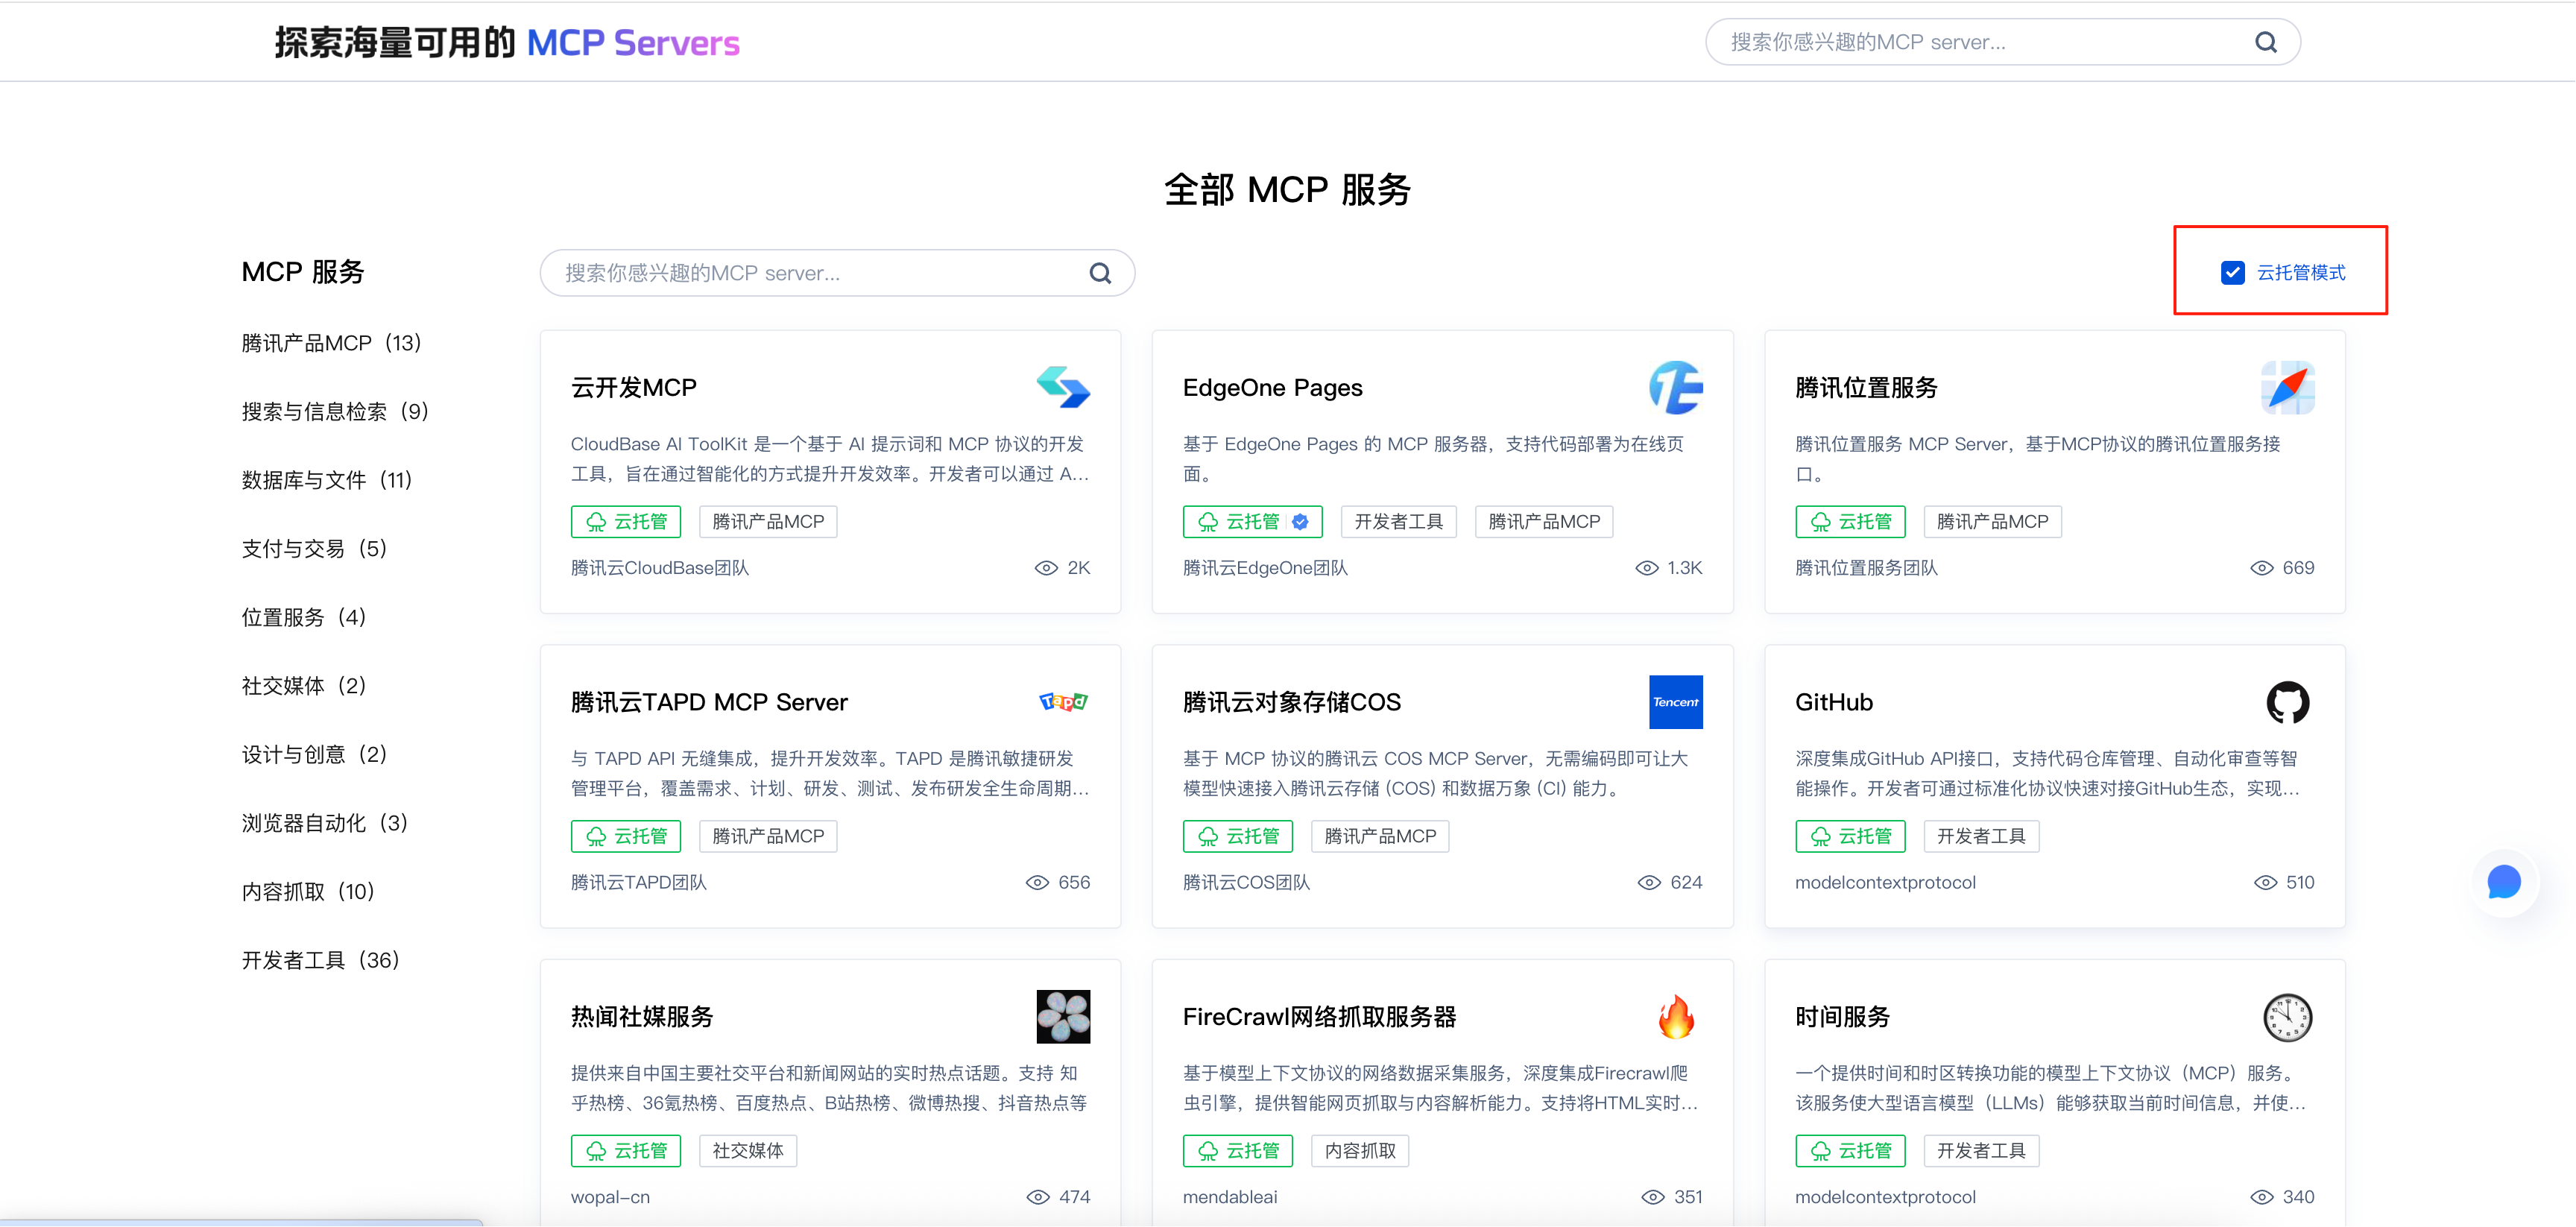
If you are using Hosted Deployment mode, click
in the list for quick installation.
Project Management
| Server Name | Description | Install | Hosted |
|---|---|---|---|
| Tencent Cloud TAPD MCP Server | Seamless integration with the TAPD API to enhance development efficiency. TAPD is Tencent's Agile R&D Management Platform, covering the entire lifecycle of development from requirements and planning to development, testing, and release. It supports natural language conversations with TAPD, enabling the management of requirements, defects, tasks, iterations, and more. | ||
| CNB MCP Server | The CNB MCP Server is a large language model toolkit that supports the MCP protocol, designed to communicate via standard input/output (STDIO). Users can start the server by configuring mcpServers, specifying the API base URL and access token. This server requires Node.js version 18 or higher and provides a detailed development guide, including installing dependencies, generating type definitions, configuring environment variables, and building the project. Additionally, users can utilize the @modelcontextprotocol/inspector tool for previewing and debugging. The primary purpose of this server is to offer developers a flexible and extensible interface for interacting with CNB's large language models. |
Development Efficiency
| Server Name | Description | Install | Hosted |
|---|---|---|---|
| CloudBase AI ToolKit | The CloudBase AI ToolKit is an integrated development environment (IDE) designed to streamline the creation, deployment, and hosting of full-stack web applications, mini-programs, databases, and backend services using AI. It supports multiple languages and platforms, offering features like AI-driven code generation, seamless cloud development integration, and rapid deployment. The toolkit includes pre-configured project templates for various frameworks (e.g., React, Vue, UniApp) and supports AI tools. With its plugin-based architecture, it enables environment management, database operations, cloud function management, and static hosting. The toolkit also provides intelligent debugging, fast CDN access, and a built-in knowledge base for efficient development. | ||
| Tencent Cloud Code Analysis (TCA) MCP Server | Tencent Cloud Code Analysis MCP Server, based on the MCP protocol, accurately tracks and manages code quality defects, code standards, code security vulnerabilities, and ineffective code discovered through code analysis. It also measures code complexity, duplicate code, and code statistics. | ||
| TDesign MCP Server | The TDesign MCP Server is a robust tool designed to support the development and utilization of component libraries. It offers four core functionalities: 1) get-component-changelog for retrieving component change logs, aiding developers in version upgrades; 2) get-component-docs to provide component documentation, assisting in code generation and transformation; 3) get-component-dom to obtain the DOM structure of components, facilitating custom CSS styling; and 4) get-component-list to enumerate all available components, helping developers select and combine components to implement new features. With a simple JSON configuration, developers can easily launch and utilize this server. | ||
| CODING DevOps MCP Server | CODING DevOps MCP Server is an implementation based on the Model Context Protocol (MCP), designed to seamlessly integrate with the CODING DevOps platform. It provides a standardized set of interfaces, enabling users to efficiently manage projects, work items, and code. Key features include project management (e.g., creating, deleting, and searching for projects), work item management (e.g., creating, deleting, and breaking down work items), and code management (e.g., commit history queries and merge request management). Additionally, it supports intelligent Git integration and optimizes merge request workflows, enhancing the automation capabilities of code management. The server is designed with a focus on user-friendliness, offering detailed error handling and flexible configuration support to help users quickly identify and resolve issues. Through environment variables and project-level defaults, users can easily configure the server to meet diverse requirements. |
SaaS
| Server Name | Description | Install | Hosted |
|---|---|---|---|
| DNSpod MCP Server | The Tencent Cloud DNS MCP server is implemented to manage authoritative DNS domains and obtain DNS resolution statistics. | No Support | |
| Domain MCP | The method of acquiring a domain name is through paid acquisition of the usage rights for one or multiple years, which we refer to as domain registration. | Install Go Source | |
| Private DNS MCP | The MCP server, leveraging Private DNS, supports rapid creation of private zones and viewing of private zone resolution details. | No Support | |
| tencentcloud-ocr-wordrecognition-multimodal | Document AI deeply integrates OCR with multimodal large models to achieve high-precision recognition, intelligent parsing, and structured information extraction. | Install Go Source | |
| tencentcloud-ocr-document-high | Supports detection and recognition of text throughout the entire image, returning text box positions and text content. | Install Go Source | |
| hunyuan-image-mcp | Tencent Hunyuan Image Generation is an API technology service that provides AI image generation and processing capabilities. It can intelligently create image content by combining input text or images, featuring superior drawing quality, enhanced Chinese language understanding, diverse style options, and extensive application scenarios, providing technical support for high-quality image content creation and content operations. | Install Go Source | |
| WeDataMCP | The WeData Unity Semantics MCP Server provides a foundation for quickly implementing intelligent data analytics agents, featuring robust data retrieval and query processing capabilities. | No Support | |
| WebSearchMCP | MCP Internet Search is powered by Tencent Cloud's Web Search API, utilizing Sogou's search engine infrastructure. It provides intelligent search enhancement across the full spectrum of public internet resources, featuring an end-to-end pipeline from content indexing through retrieval to intelligent ranking. | No Support |
PaaS
| Server Name | Description | Install | Hosted |
|---|---|---|---|
| EdgeOne Pages MCP | The MCP server based on EdgeOne Pages supports code deployment as an online page. | ||
| mcp-server-tat | TencentCloud TAT (TencentCloud Automation Tools) MCP Server, used to execute commands directly on Tencent Cloud instances in MCP-supported clients. | ||
| mcp-server-as | Tencent Cloud AS MCP Server is a tool designed for managing Tencent Cloud Auto Scaling groups and related resources. Its primary functions encompass the full lifecycle management of Auto Scaling groups (including creation, modification, enabling, and disabling), the execution of scaling policies (supporting manual scaling up and down), and capacity management (modifying desired capacity). | ||
| Tencent Cloud Log Service | Query log data stored in CLS (Cloud Log Service) through MCP Server to integrate the big model platform/tools with log data. For example, using natural language to query logs reduces the complexity of log queries; integrating it into O&M troubleshooting processes enables intelligent analysis of system anomalies. | No Support | |
| TencentDB for MySQL MCP | TencentDB for MySQL provides users with secure, reliable, high-performance, and easily maintainable enterprise-grade cloud database services. | Install Go Source | |
| TDSQL-C MySQL MCP | TDSQL-C for MySQL is Tencent Cloud's self-developed next-generation cloud-native relational database. | Install Go Source | |
| CDN MCP | Content Delivery Network (CDN) distributes website content to a vast network of acceleration nodes deployed globally, enabling users to access required content from nearby locations and avoiding network instability and high access latency caused by network congestion. | Install Go Source | |
| CLB MCP | Cloud Load Balancer (CLB) provides secure and efficient Layer 4 and Layer 7 traffic distribution services. Traffic routed through CLB is automatically distributed across multiple backend servers, thereby scaling system service capacity and eliminating single points of failure. | Install Go Source | |
| SSL MCP | Tencent Cloud SSL Certificates provides comprehensive services for SSL certificate application, management, and deployment, offering you a one-stop HTTPS solution. | Install Go Source | |
| Live MCP | Cloud Streaming Services (CSS) provides you with lightning-fast, reliable, and enterprise-grade cloud live streaming solutions. | Install Go Source | |
| VOD MCP | Providing end-to-end, premium media services for audio, video, and images—from content creation and upload to storage, transcoding, AI-powered processing, accelerated distribution, playback, and copyright protection. | Install Go Source | |
| TencentDB for Redis MCP | TencentDB for Redis® is a caching and storage service built by Tencent Cloud that is compatible with both Redis and Memcached protocols. | Install Go Source | |
| TencentDB for MongoDB MCP | TencentDB for MongoDB is a high-performance NoSQL database built by Tencent Cloud based on the globally popular MongoDB, offering 100% full compatibility with the MongoDB protocol. | Install Go Source | |
| SCF MCP | Serverless Cloud Function (SCF) is a serverless execution environment provided by Tencent Cloud for enterprises and developers, enabling you to run code without the need to purchase and manage servers. | Install Go Source | |
| TSF APPlicationManager MCP | Application Management is a PaaS platform centered around applications and microservices, providing one-stop application lifecycle management capabilities and data-driven operational support. It offers multi-dimensional monitoring data for applications and services, helping enterprises create and manage cloud resources, enabling them to focus fully on their core business. | Install Go Source | |
| Tencent Cloud Elasticsearch MCP Server | Tencent Cloud Elasticsearch Service (ES) is a fully managed cloud-based massive data search and analysis service, featuring a high-performance proprietary kernel and integrated X-Pack. The MCP server based on Tencent Cloud ES provides query services for ES cluster index data. | No Support | |
| TSE MCP | Registry and Configuration provides dynamic service discovery, distributed configuration management, and service governance capabilities for cloud-native applications in microservices and distributed scenarios. With features such as zero modification, seamless migration, and multi-language support, it helps businesses migrate to the cloud easily and rapidly. | Install Go Source | |
| VectorDB MCP | Tencent Cloud VectorDB is a fully managed, self-developed enterprise-grade distributed database service designed specifically for storing, retrieving, and analyzing multi-dimensional vector data. | Install Go Source | |
| VPN MCP | VPN Connections is a transmission service based on network tunneling technology that enables connectivity between local data centers and Tencent Cloud resources. It helps you quickly establish a secure, reliable, and encrypted channel over the Internet. | Install Go Source | |
| VPC MCP | Virtual Private Cloud (VPC) is a dedicated cloud network space built on Tencent Cloud that provides network services for your resources on Tencent Cloud, with complete logical isolation between different VPCs. | Install Go Source | |
| PostgreSQL MCP | TencentDB for PostgreSQL enables you to effortlessly set up, operate, and scale the most powerful open-source database PostgreSQL in the cloud. | Install Go Source | |
| BI MCP | TencentCloud BI (Business Intelligence) provides comprehensive BI capabilities covering the entire workflow from data source integration and data modeling to data visualization and analysis. With simple drag-and-drop operations, you can complete complex report development, while supporting enterprise collaboration scenarios such as report sharing and distribution. | Install Go Source | |
| CKafka MCP | TDMQ for CKafka is a distributed, high-throughput, and highly scalable messaging system that is 100% compatible with open-source Kafka API versions 2.4, 2.8, and 3.2. | Install Go Source | |
| TCHouse-C MCP | Tencent Cloud TCHouse-C is an enterprise-grade cloud data warehouse service built on the open-source OLAP engine ClickHouse. | Install Go Source | |
| EO MCP | TencentCloud EdgeOne (EO) Edge Security and Acceleration Platform leverages Tencent Cloud's globally distributed edge nodes to deliver comprehensive edge services including domain name resolution, intelligent acceleration for both static and dynamic content, and TCP/UDP Layer 4 acceleration. | Install Go Source | |
| ES MCP | Tencent Cloud Elasticsearch Service (ES) is a fully managed cloud-based massive data search and analytics service, featuring a high-performance proprietary kernel and integrated X-Pack capabilities. | Install Go Source | |
| RocketMQ MCP | TDMQ for RocketMQ (abbreviated as TDMQ RocketMQ) is a distributed, highly available message queue service. | Install Go Source |
IaaS
| Server Name | Description | Install | Hosted |
|---|---|---|---|
| COS MCP | The Tencent Cloud COS MCP Server is a tool designed to seamlessly integrate large models with Tencent Cloud's storage (COS) and data processing (CI) capabilities using the MCP protocol. It offers core functionalities such as file upload/download, image processing (e.g., super-resolution, cropping, QR code recognition), and metadata/natural language retrieval. Typical use cases include automated data transfer to COS, batch processing of web content, and cloud-based media transformation. Installation can be done via npm or source code, with options for local or remote (SSE) connections. Configuration requires parameters like SecretId, SecretKey, Bucket, and Region, ensuring secure and efficient data management. | ||
| mcp-server-cvm | Implementation of Tencent Cloud CVM (Cloud Virtual Machine) MCP server for managing Tencent Cloud instances and network resources. | ||
| Lighthouse MCP Server | An MCP (Model Context Protocol) server built on Tencent Cloud Lighthouse API for seamless AI model integration and cloud server management. | No Support | |
| CBS MCP | Cloud Block Storage (CBS) provides persistent block-level storage services for your Cloud Virtual Machines (CVM). | Install Go Source | |
| HAI MCP | Tencent Cloud High-Performance Application Service (HAI) MCP server, supporting operations such as status queries, startup, and shutdown of HAI instances. | No Support |
When to use Local vs Remote MCP Servers?
TencentCloud MCP servers can be run either locally on your development machine or remotely on the cloud. Here's when to use each approach:
Local MCP Servers
- Development & Testing: Perfect for local development, testing, and debugging
- Offline Work: Continue working when internet connectivity is limited
- Data Privacy: Keep sensitive data and credentials on your local machine
- Low Latency: Minimal network overhead for faster response times
- Resource Control: Direct control over server resources and configuration
Remote MCP Servers
- Team Collaboration: Share consistent server configurations across your team
- Always Available: Access your MCP servers from anywhere, any device
- Automatic Updates: Get the latest features and security patches automatically
- Scalability: Easily handle varying workloads without local resource constraints
Remote and Local Installation & Setup
Steps for Using Remote Hosted MCP
-
Cloud Configuration
-
Visit the MCP details page in the Tencent Cloud Developer Community MCP Marketplace, using Tencent Cloud COS MCP Server as an example
-
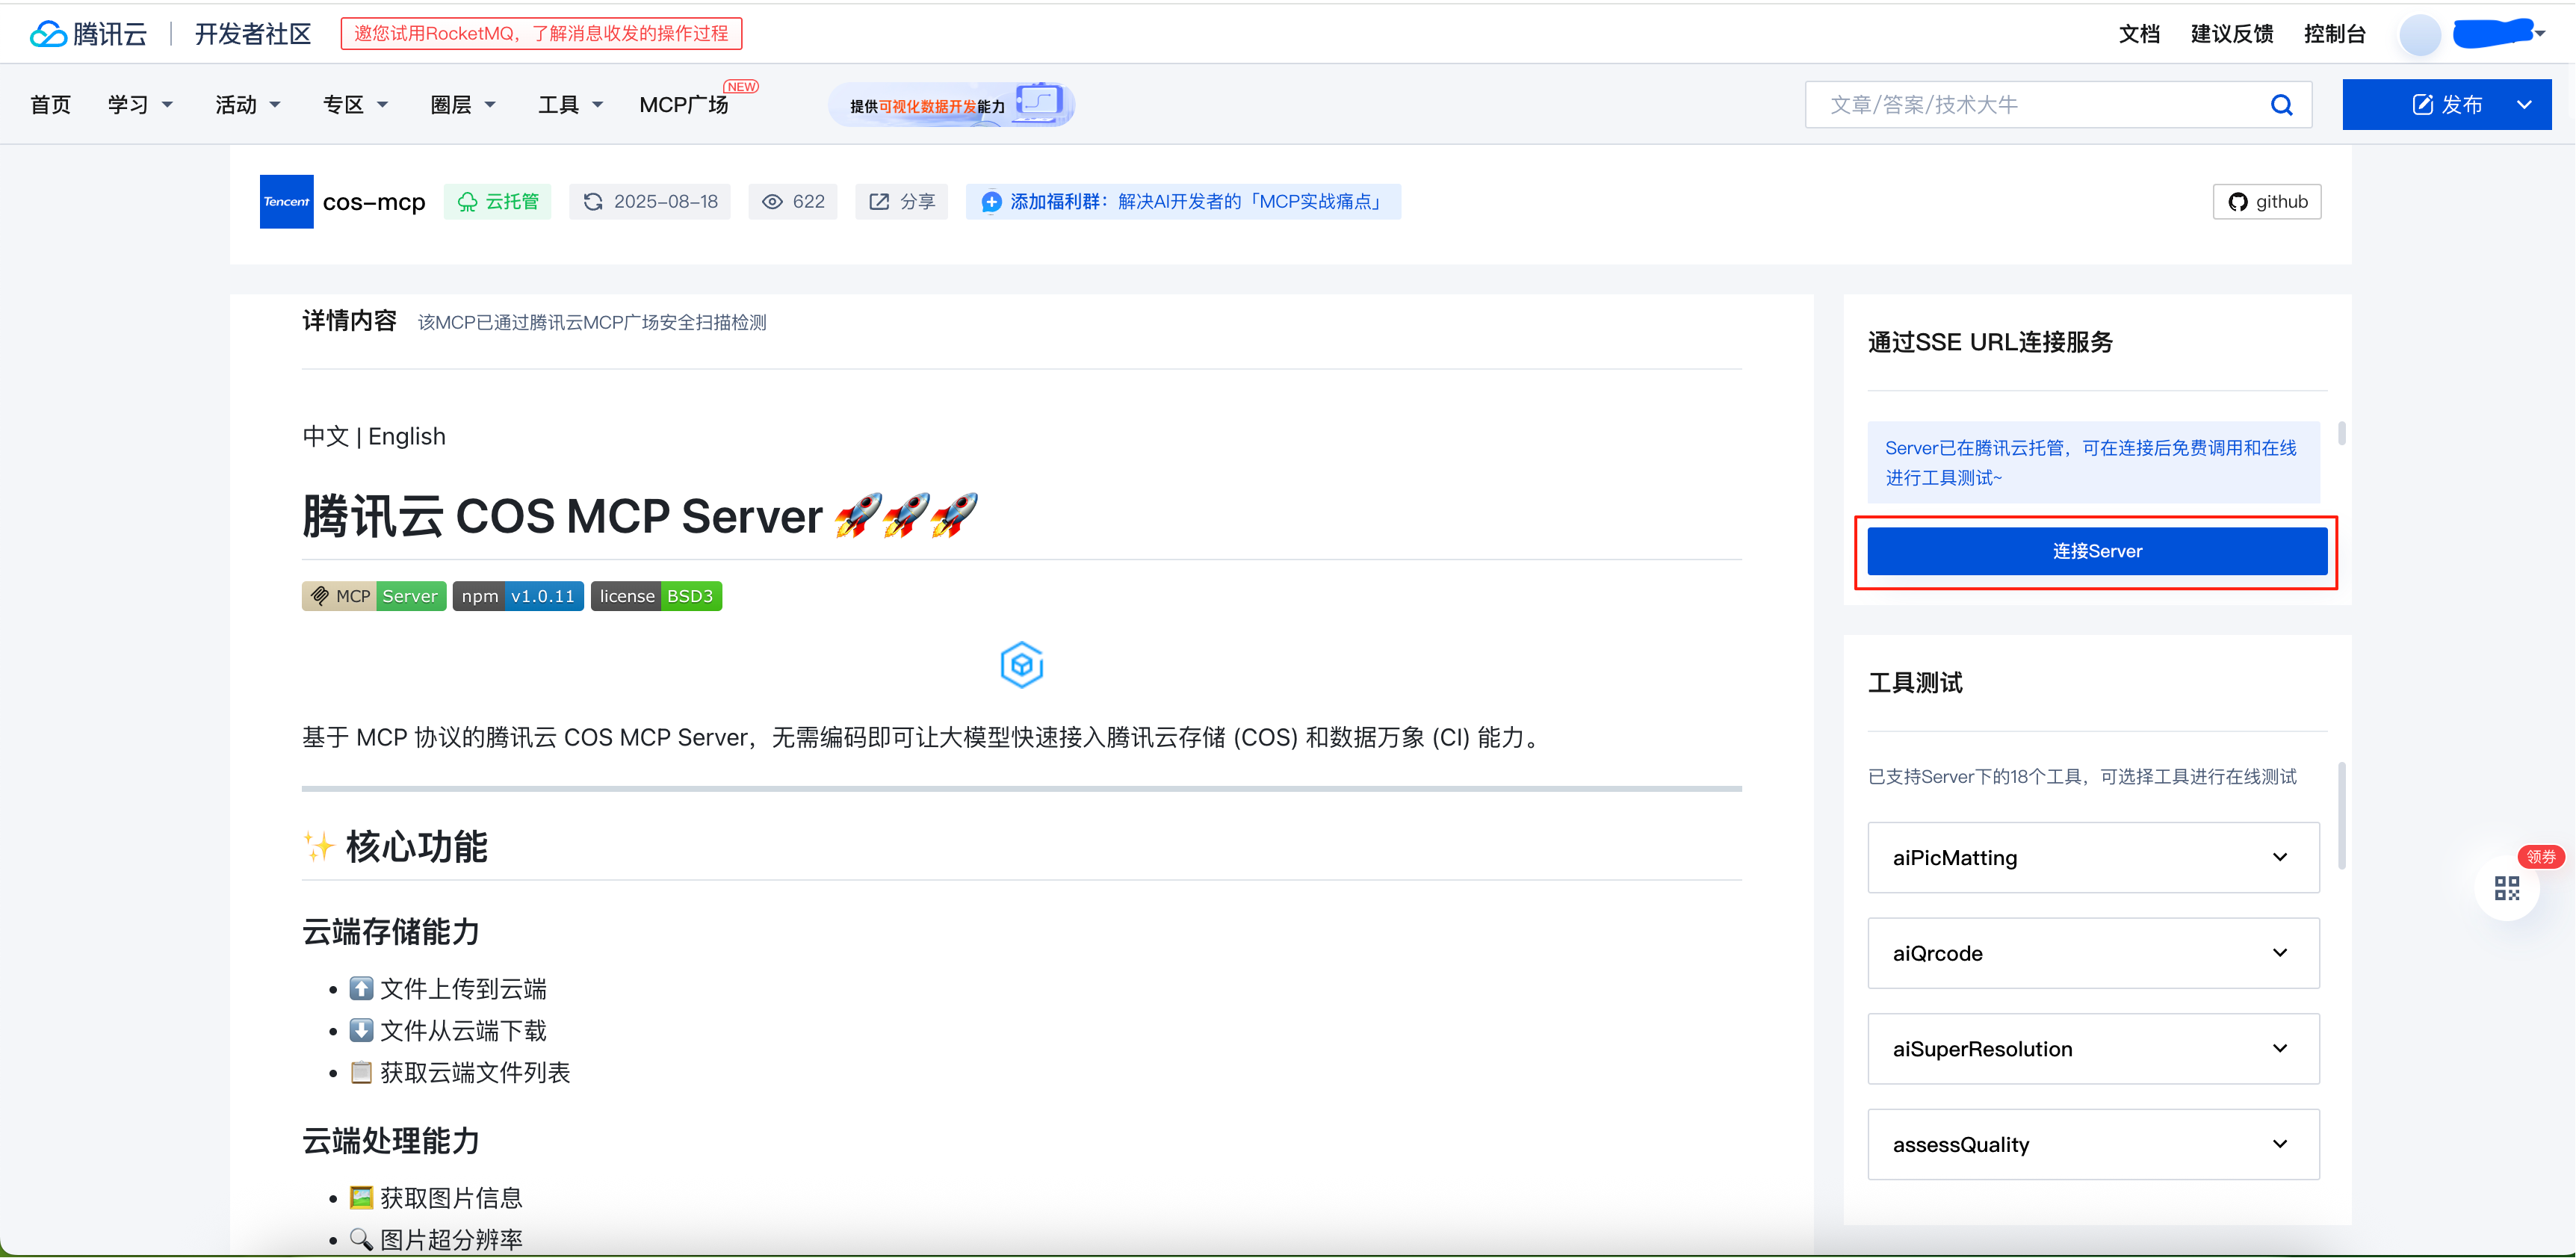
Click the Connect Server button on the details page
-
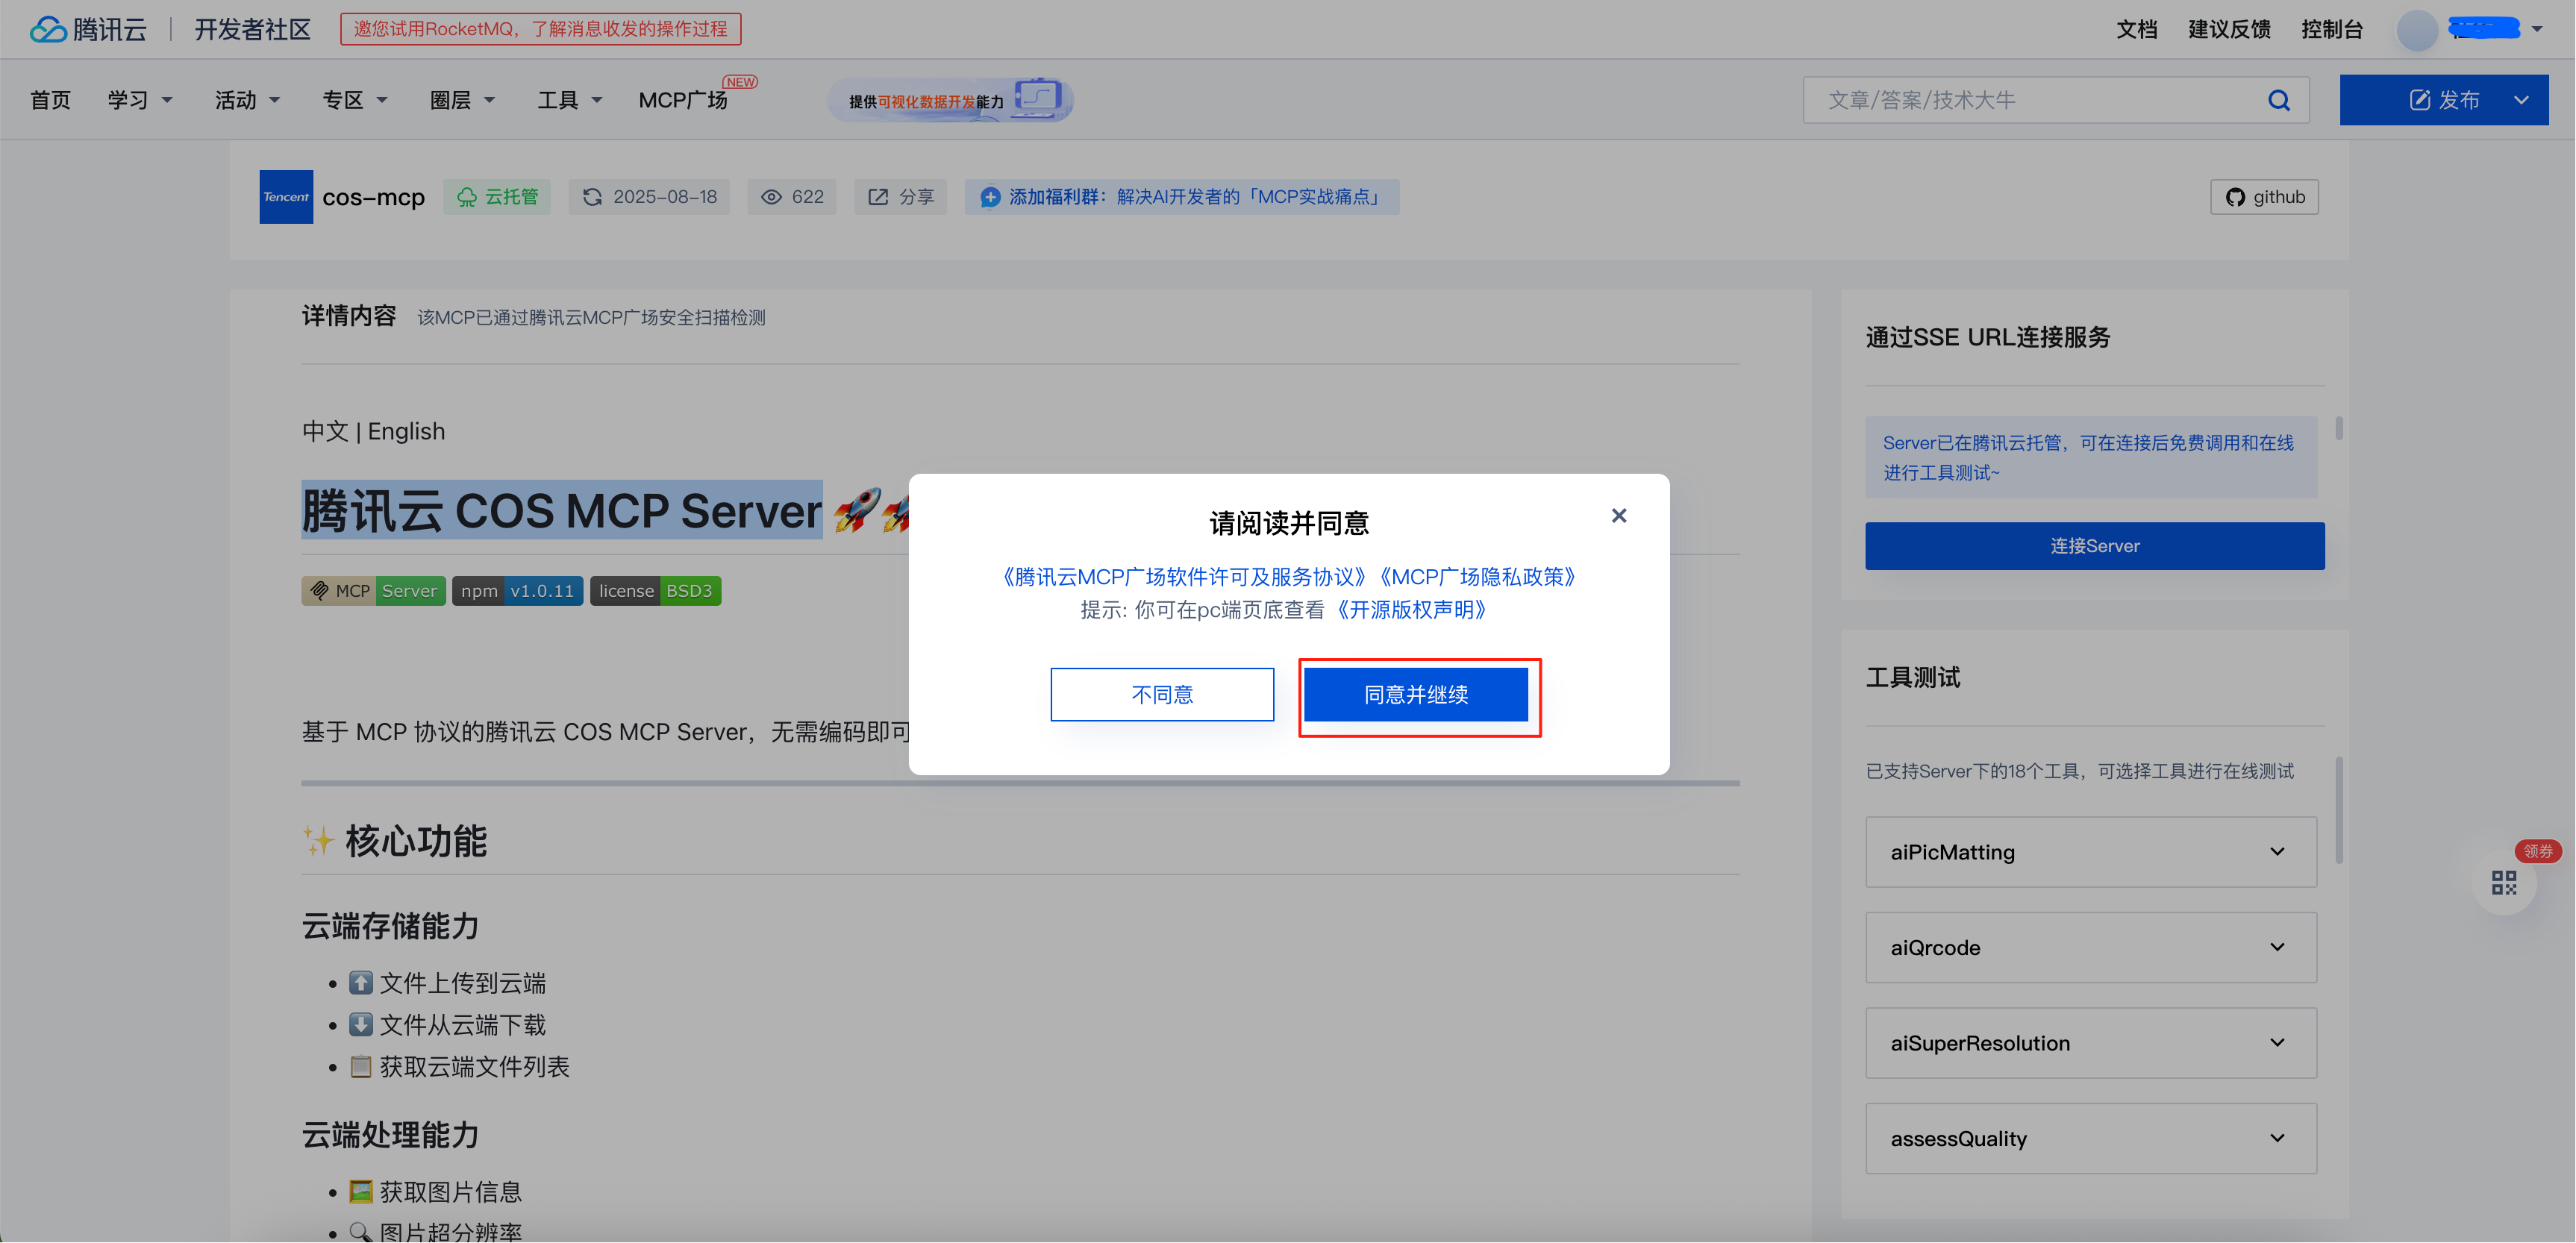
Agree to the Tencent Cloud Developer MCP Marketplace Software License and Service Agreement and continue
-
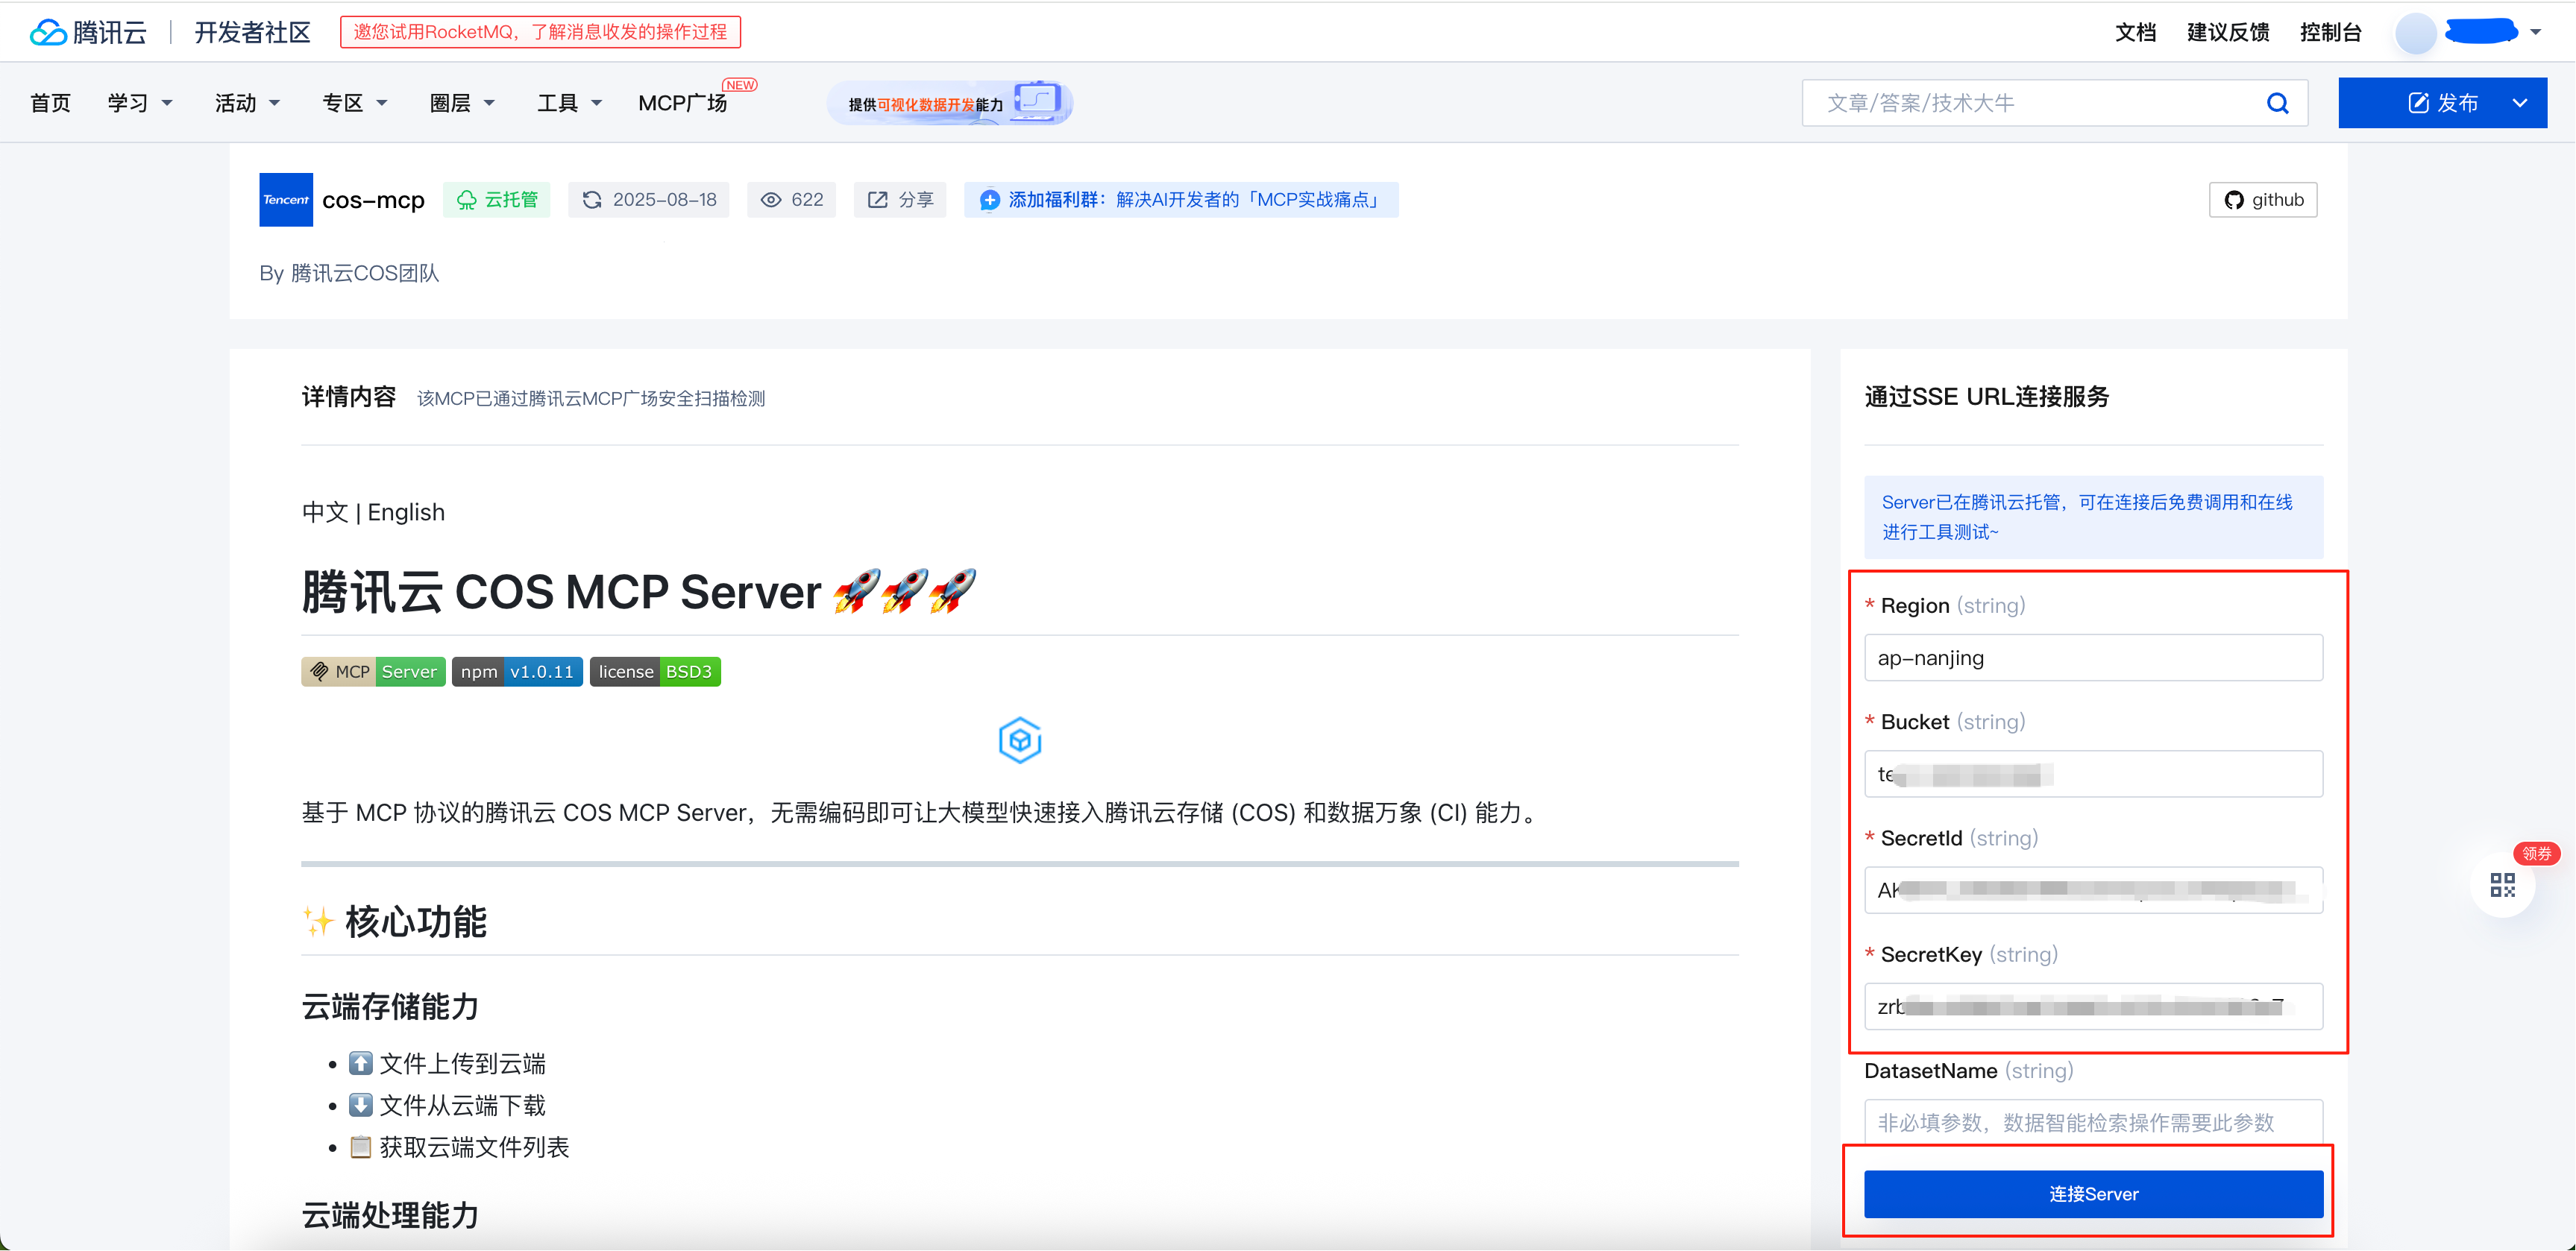
Enter the required parameters and click Connect Server to create an SSE URL
Fill in the required parameters, where
Regionis the location of the hosted service andBucketis the name of the storage bucket for the hosted service. These can be obtained and purchased from Tencent Cloud Object Storage.Obtain or generate your SecretID and SecretKey from API Key Management
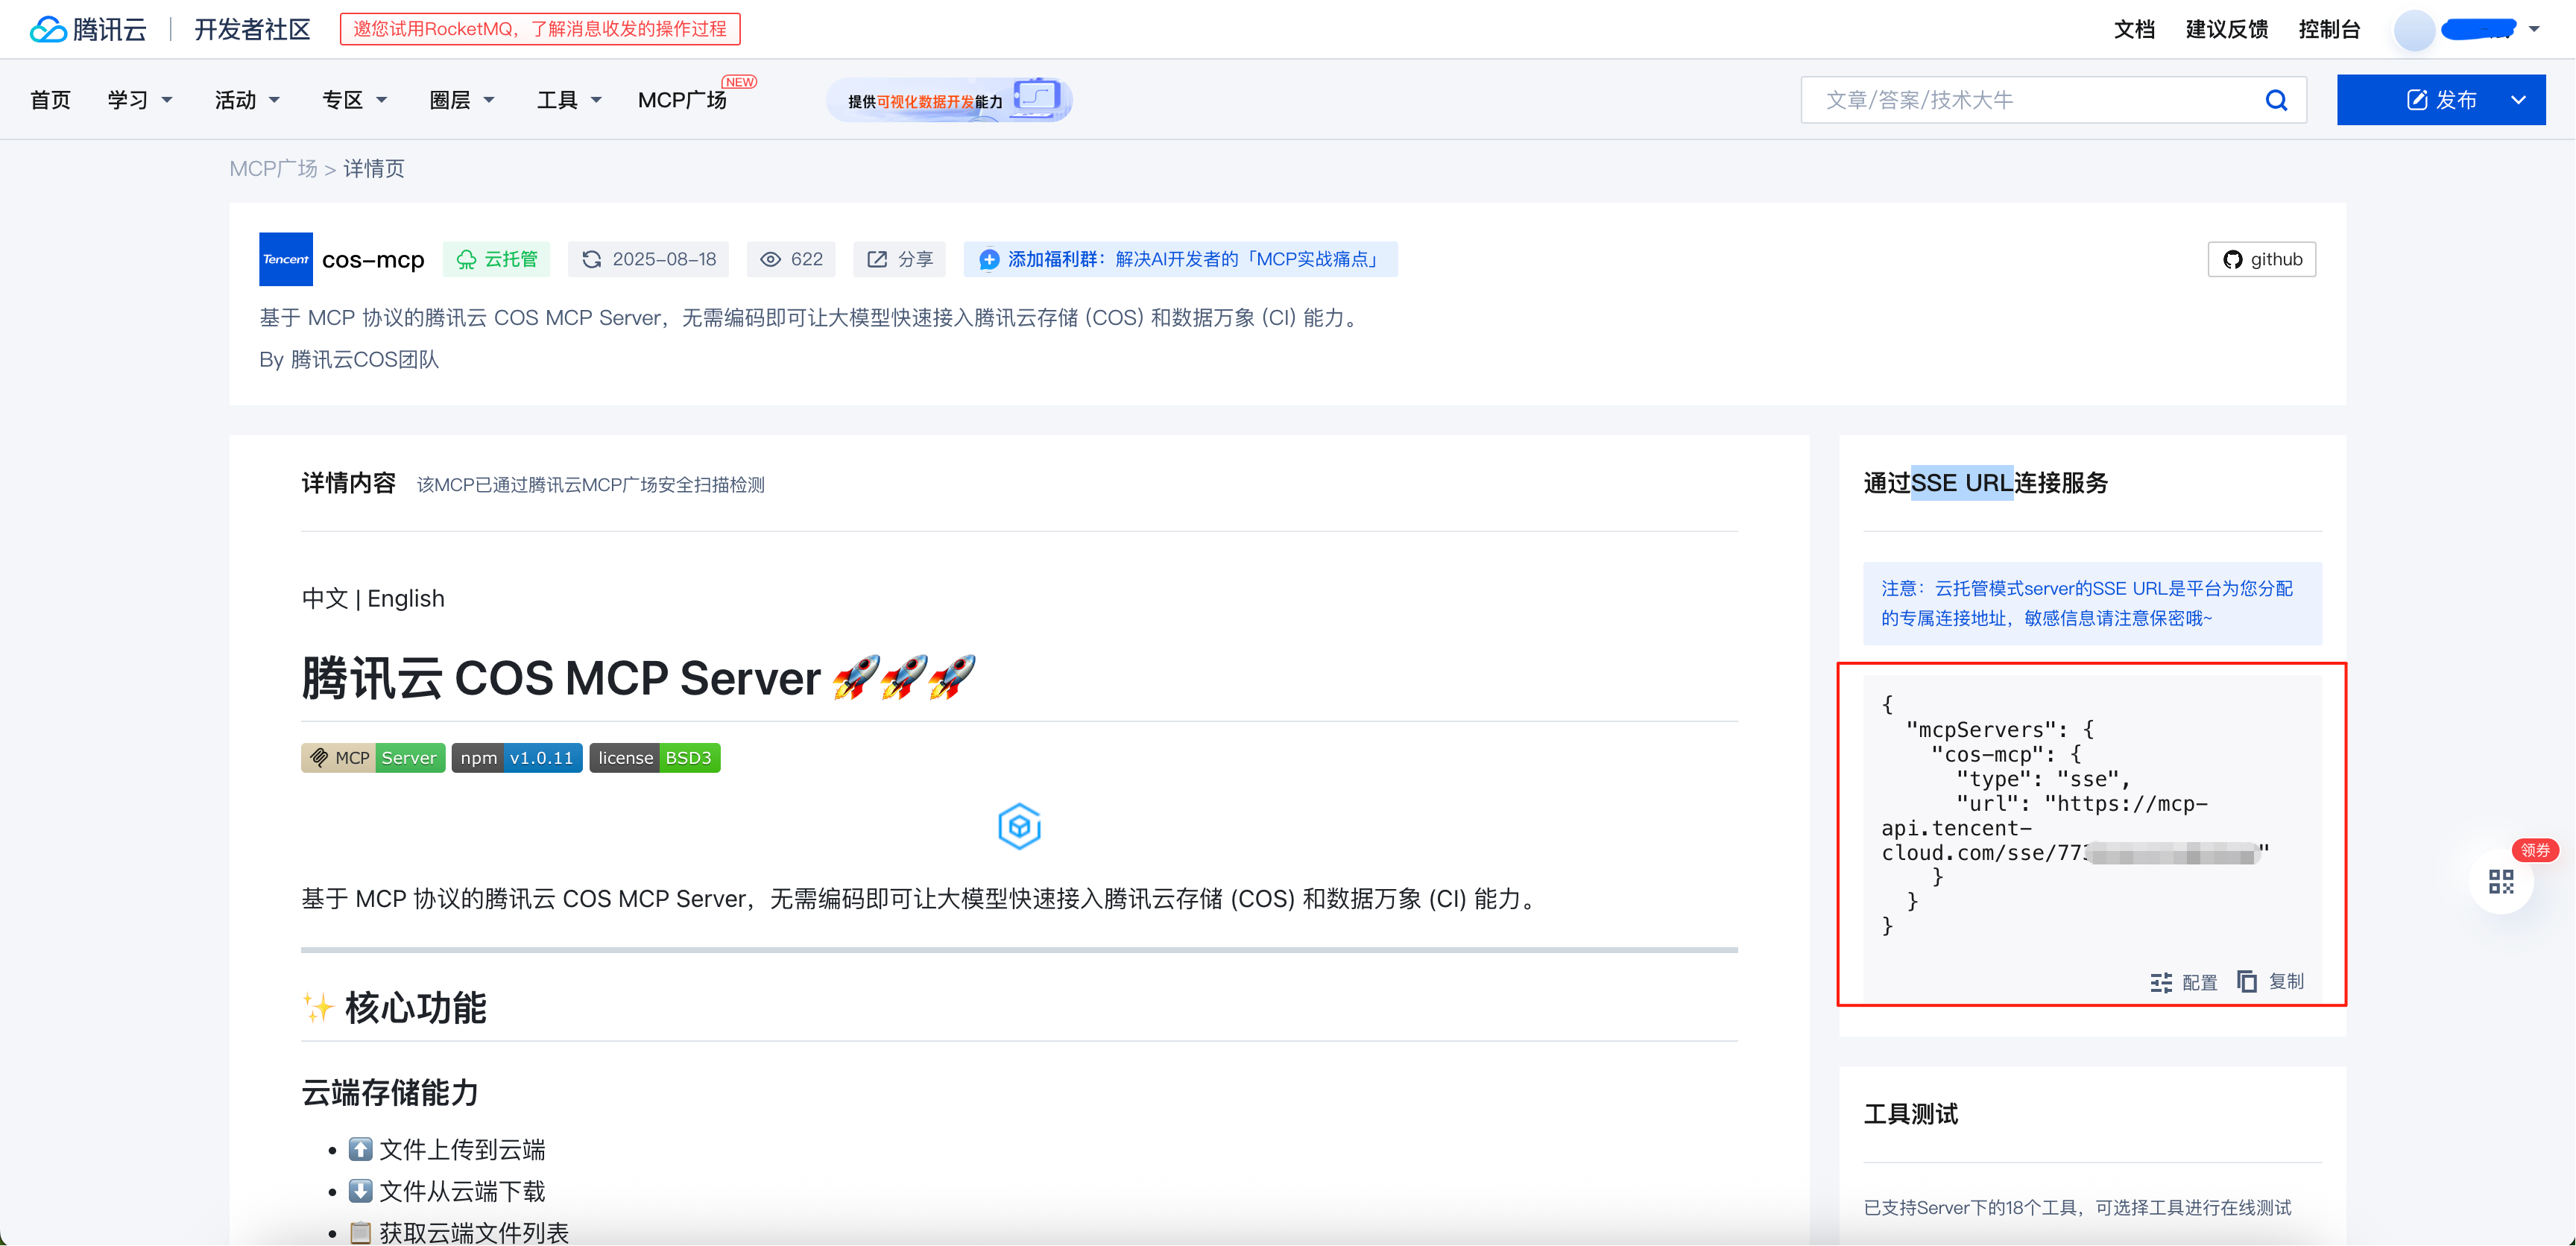
 Please securely store the generated SSE URL and do not disclose it.
-
-
Cloud Testing
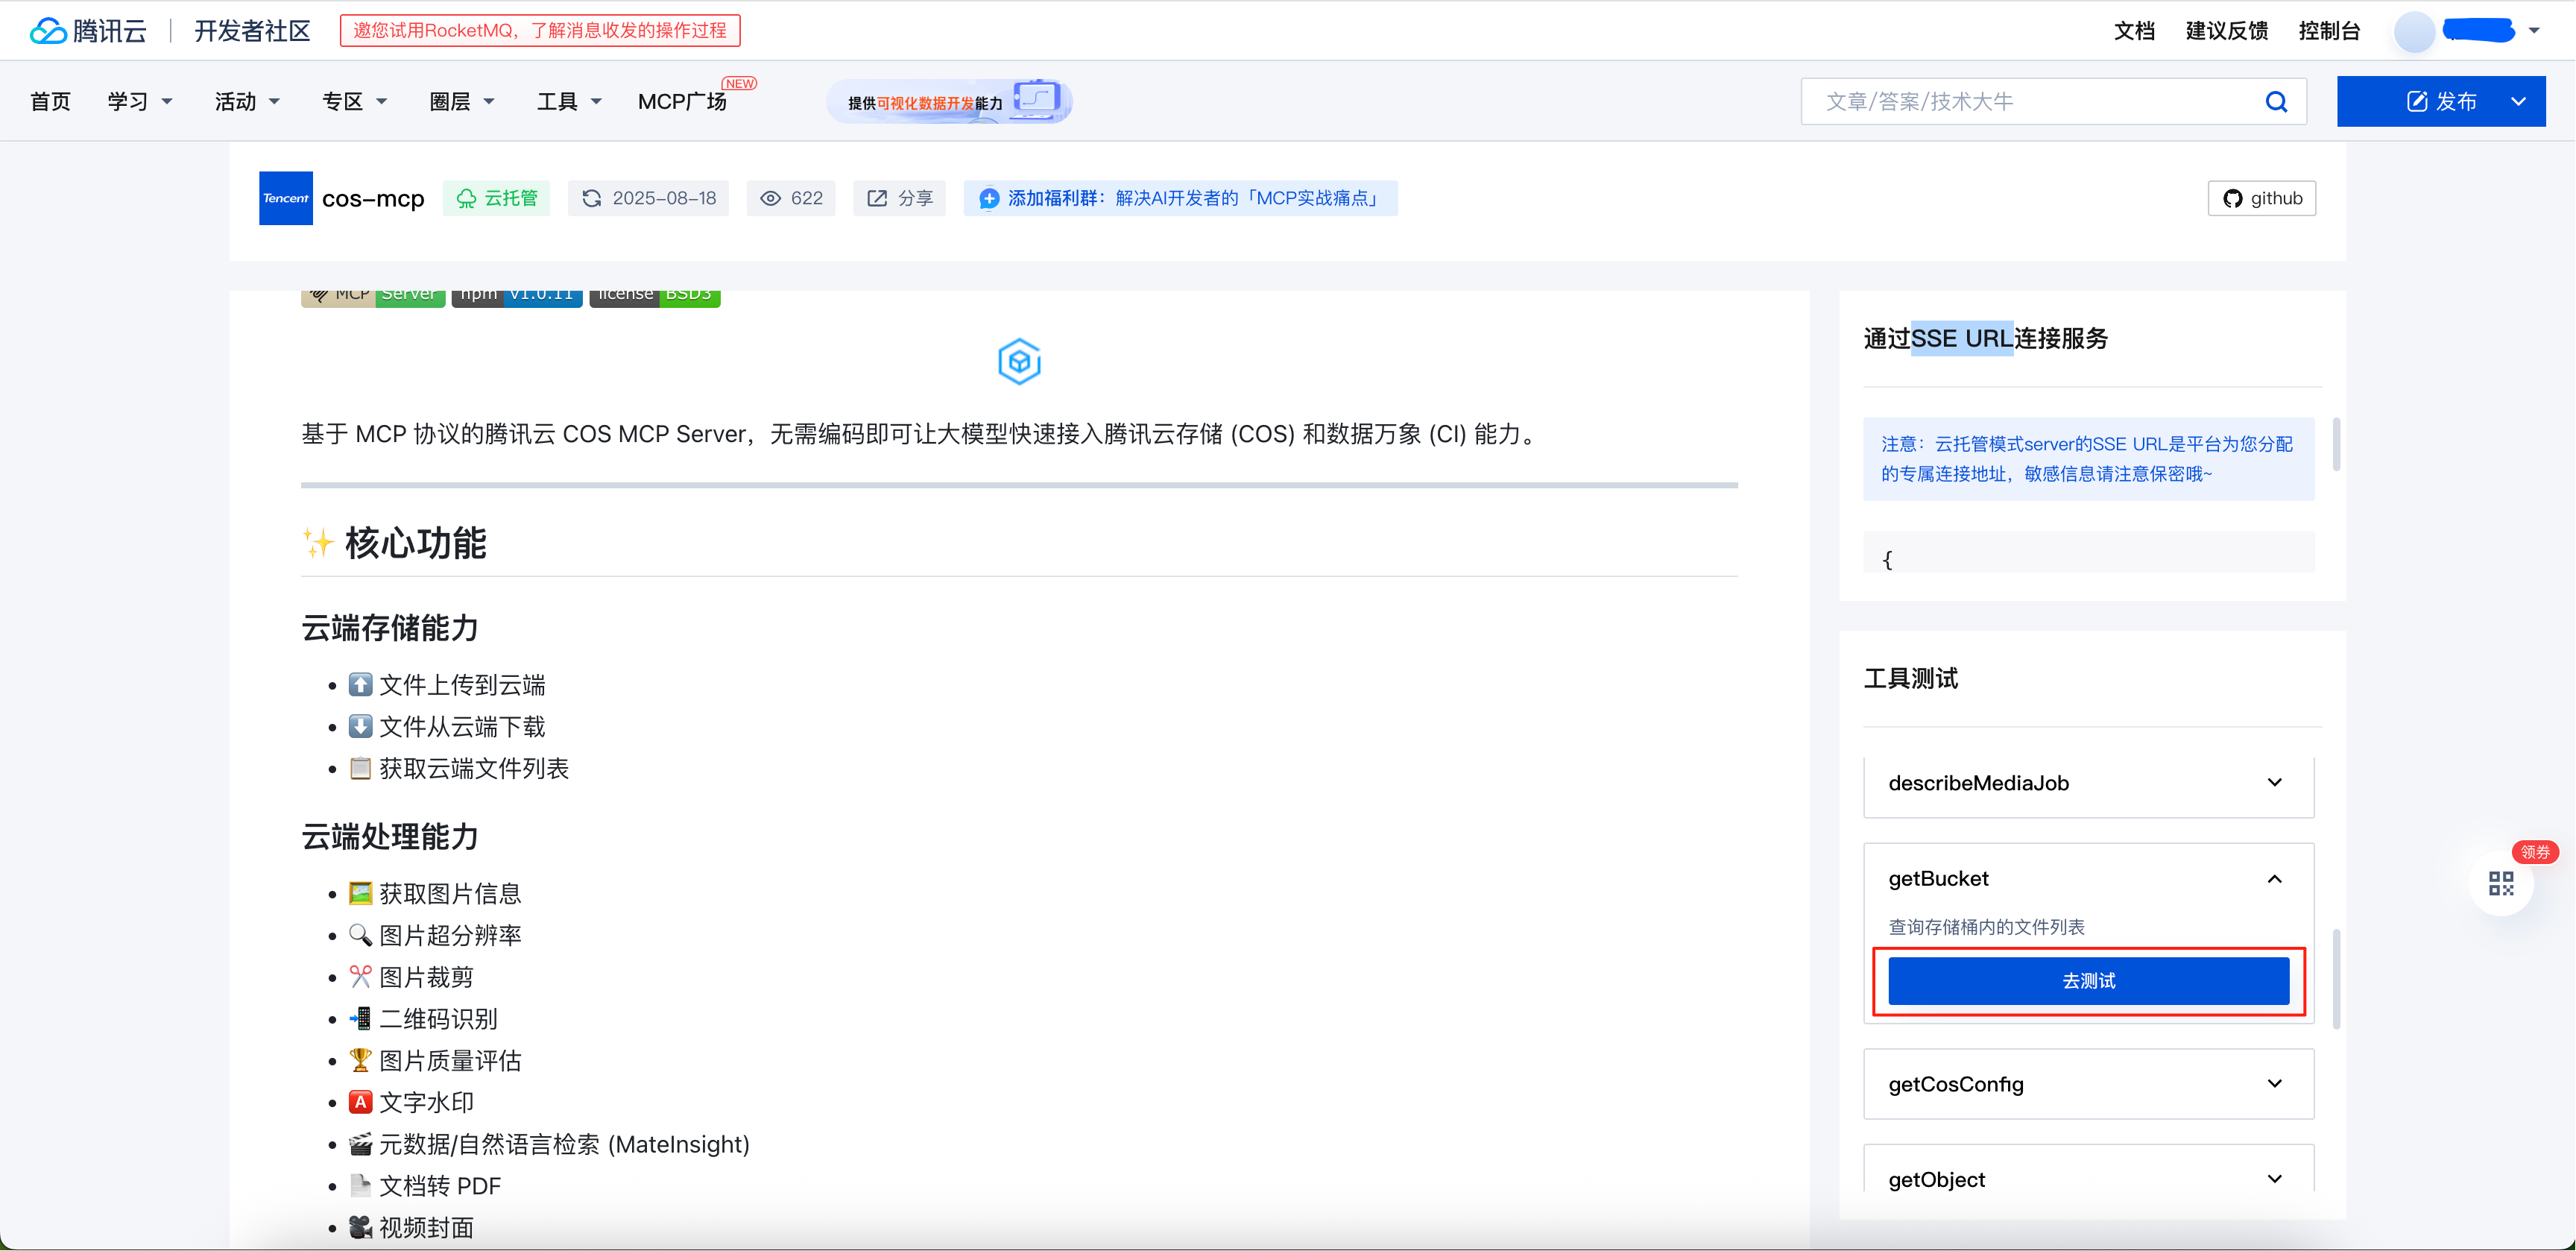
- Select the corresponding tool and click Test
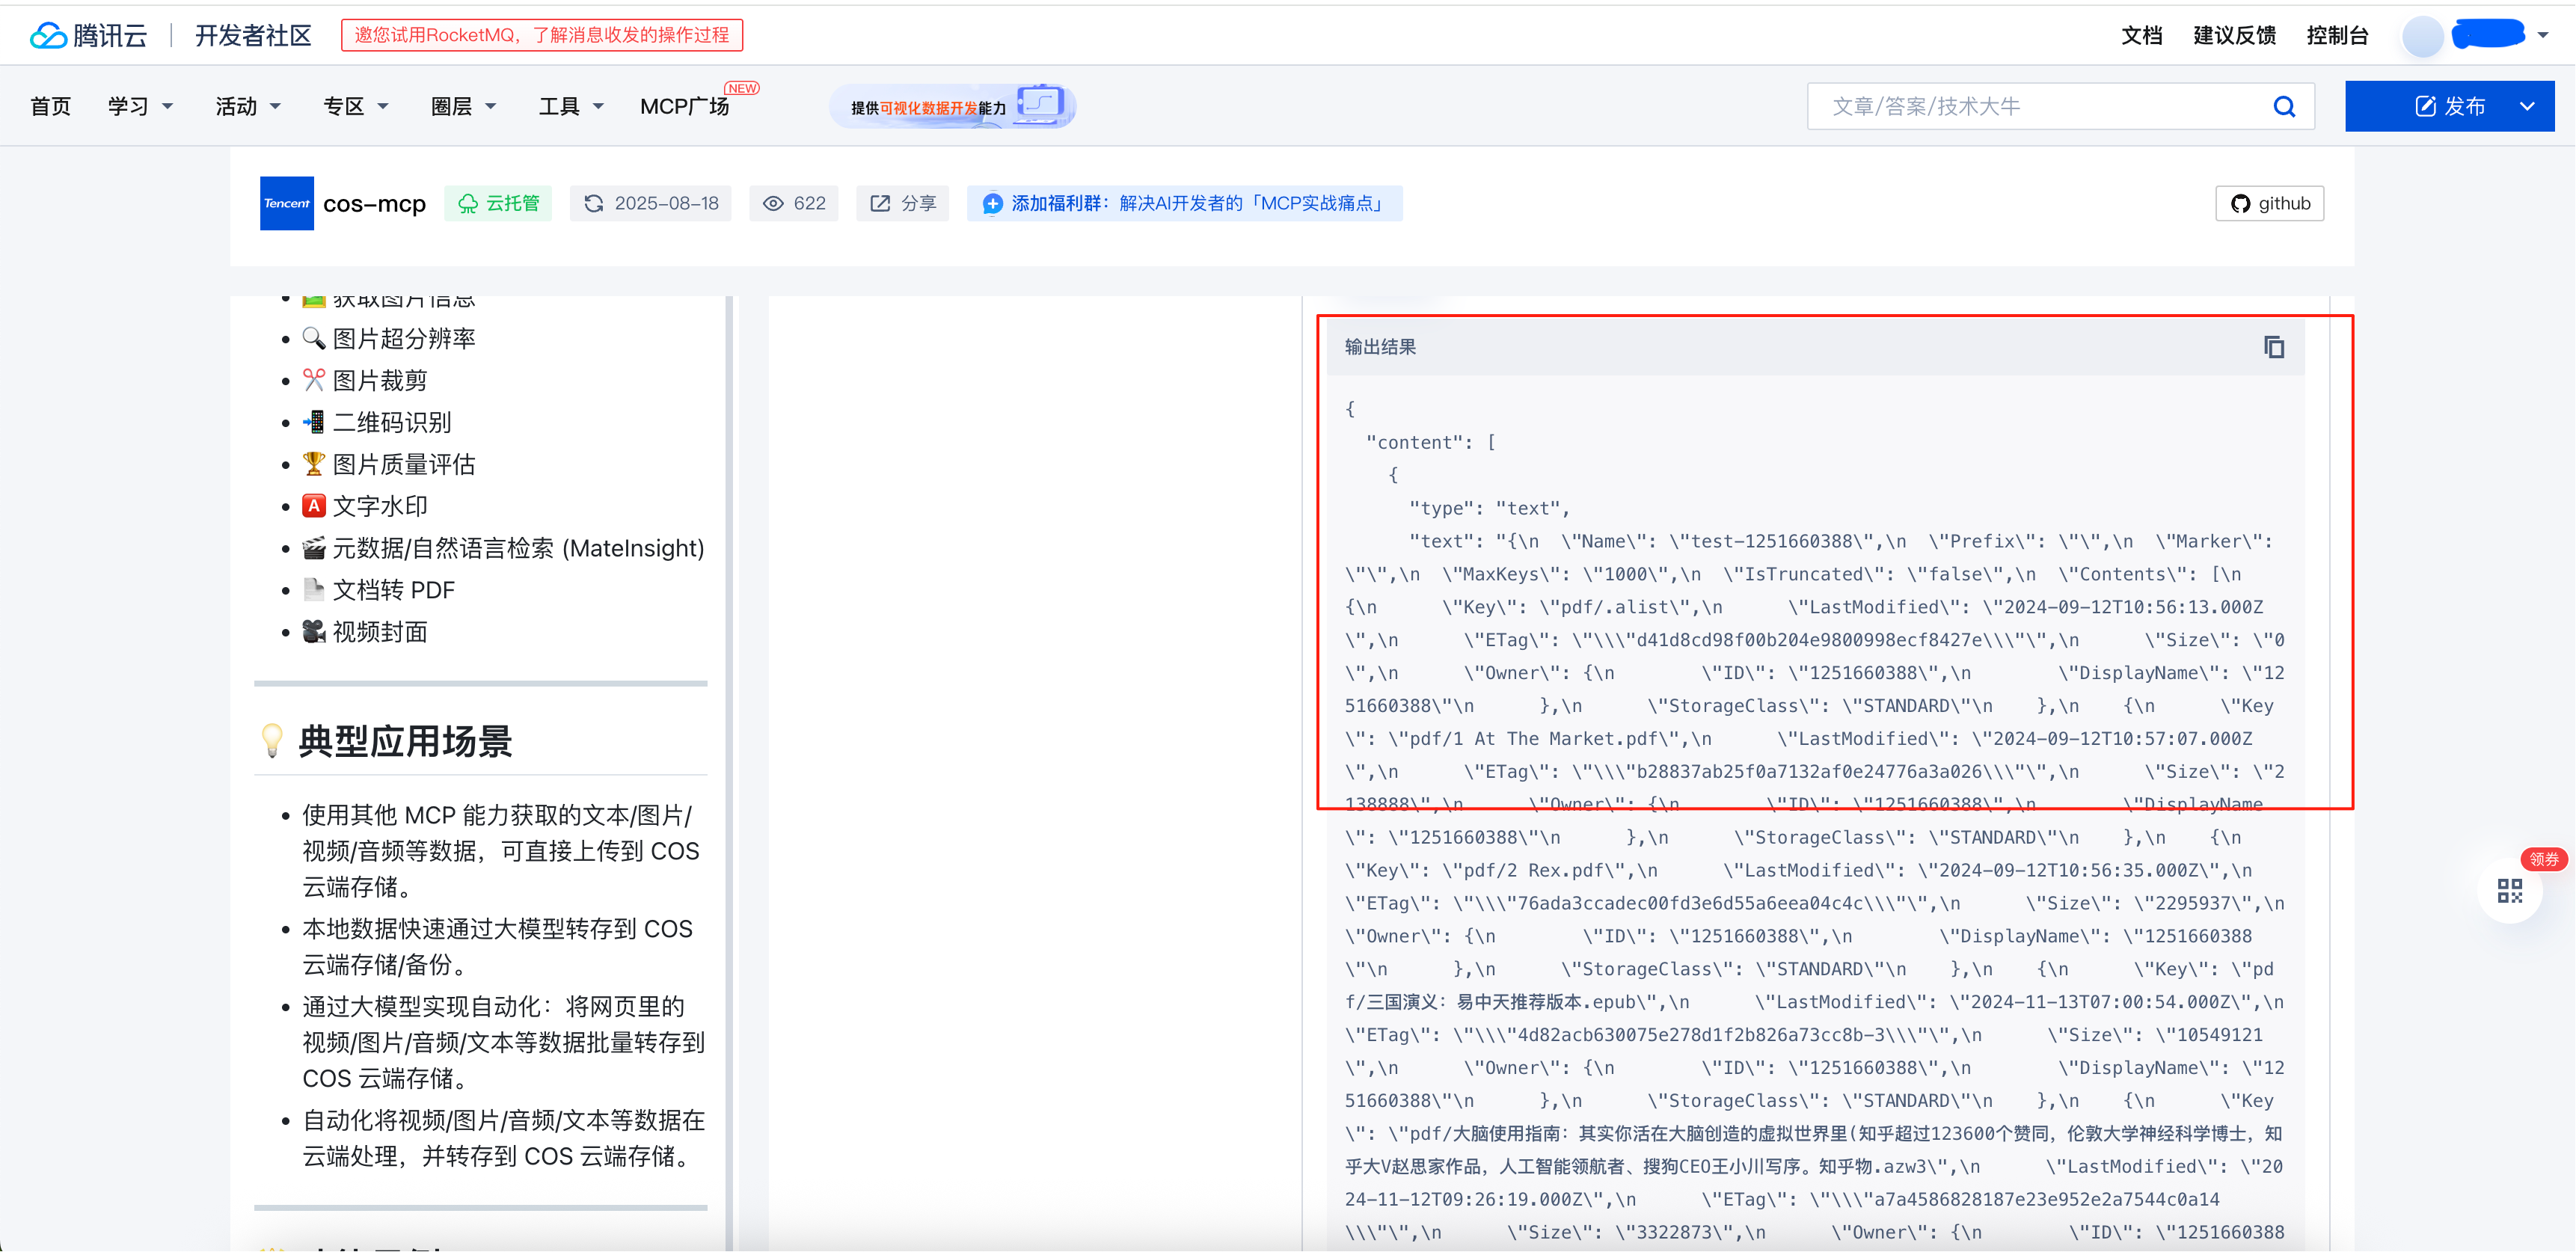
 The test results are shown in the image below, indicating that the online configuration was successful
- Select the corresponding tool and click Test
-
IDE Configuration for Hosted Services, using CodeBuddy as an example
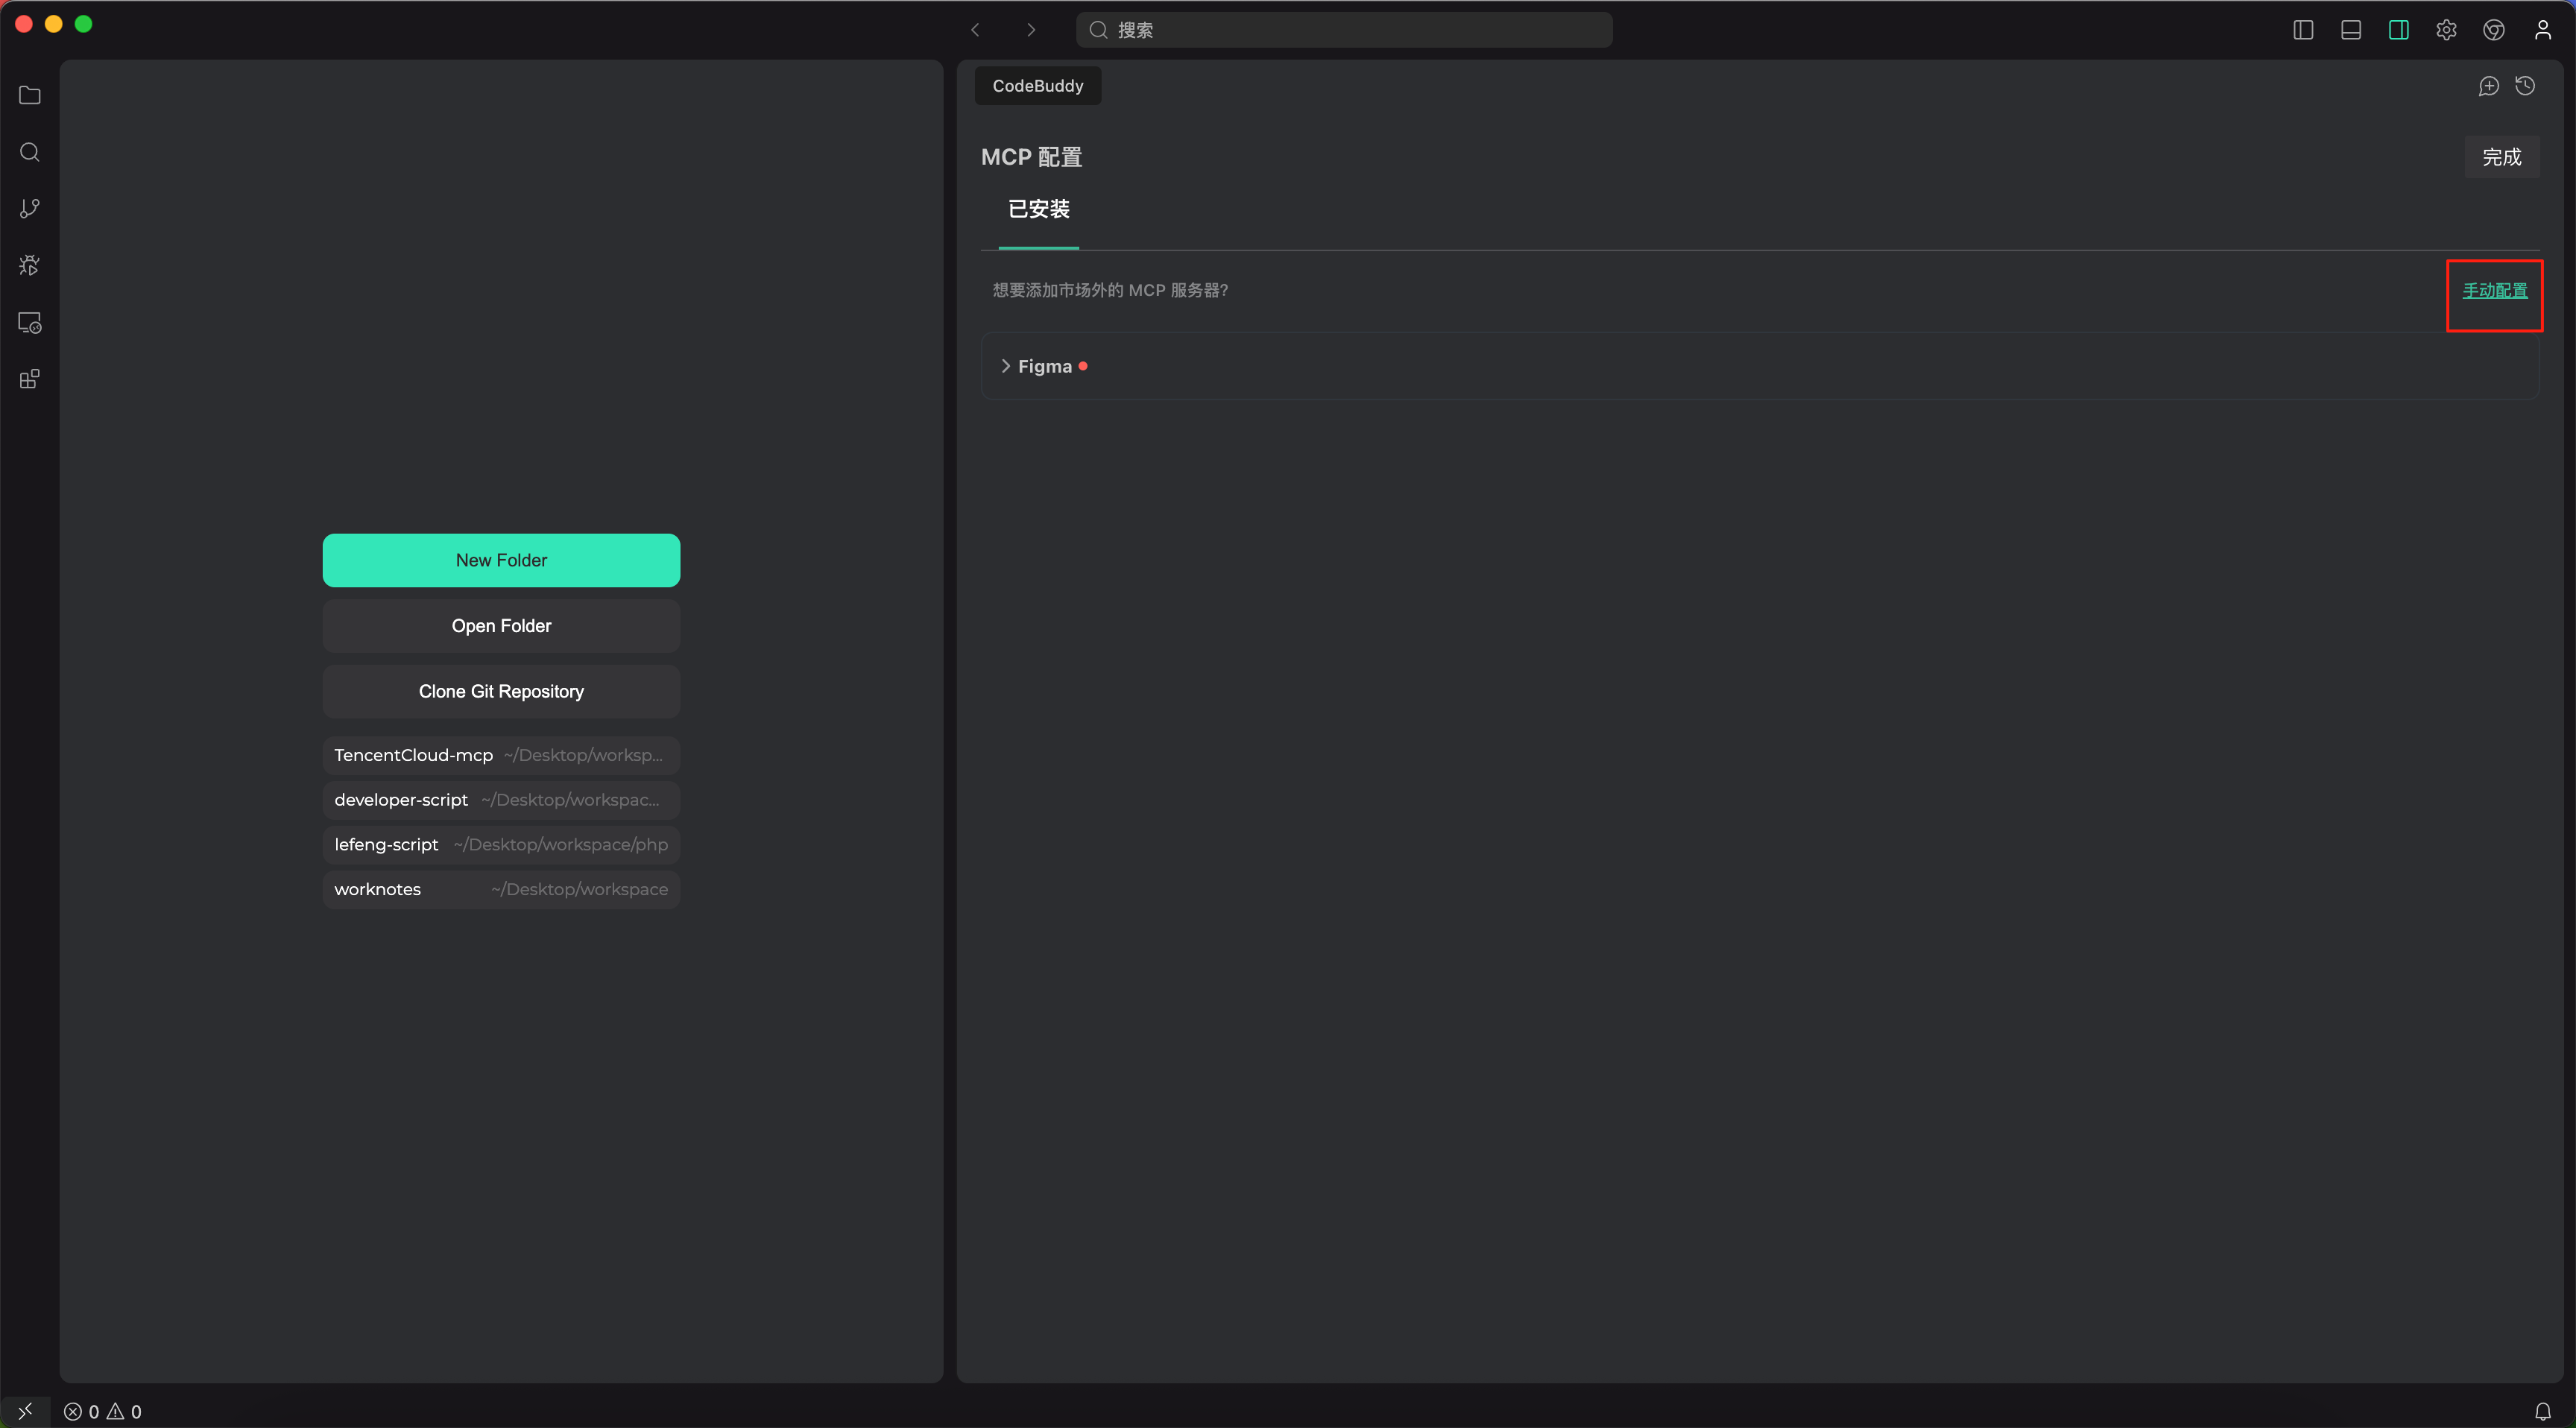
- Open the IDE settings and find the manual configuration under CodeBuddy
 Add the MCP service configuration using the configuration generated by the cloud hosting service
After modification, it should look like the image below{ "mcpServers": { "cos-mcp": { "type": "sse", "url": "https://mcp-api.tencent-cloud.com/sse/<your-token>" // Replace with your own SSE URL token generated from cloud hosting } } }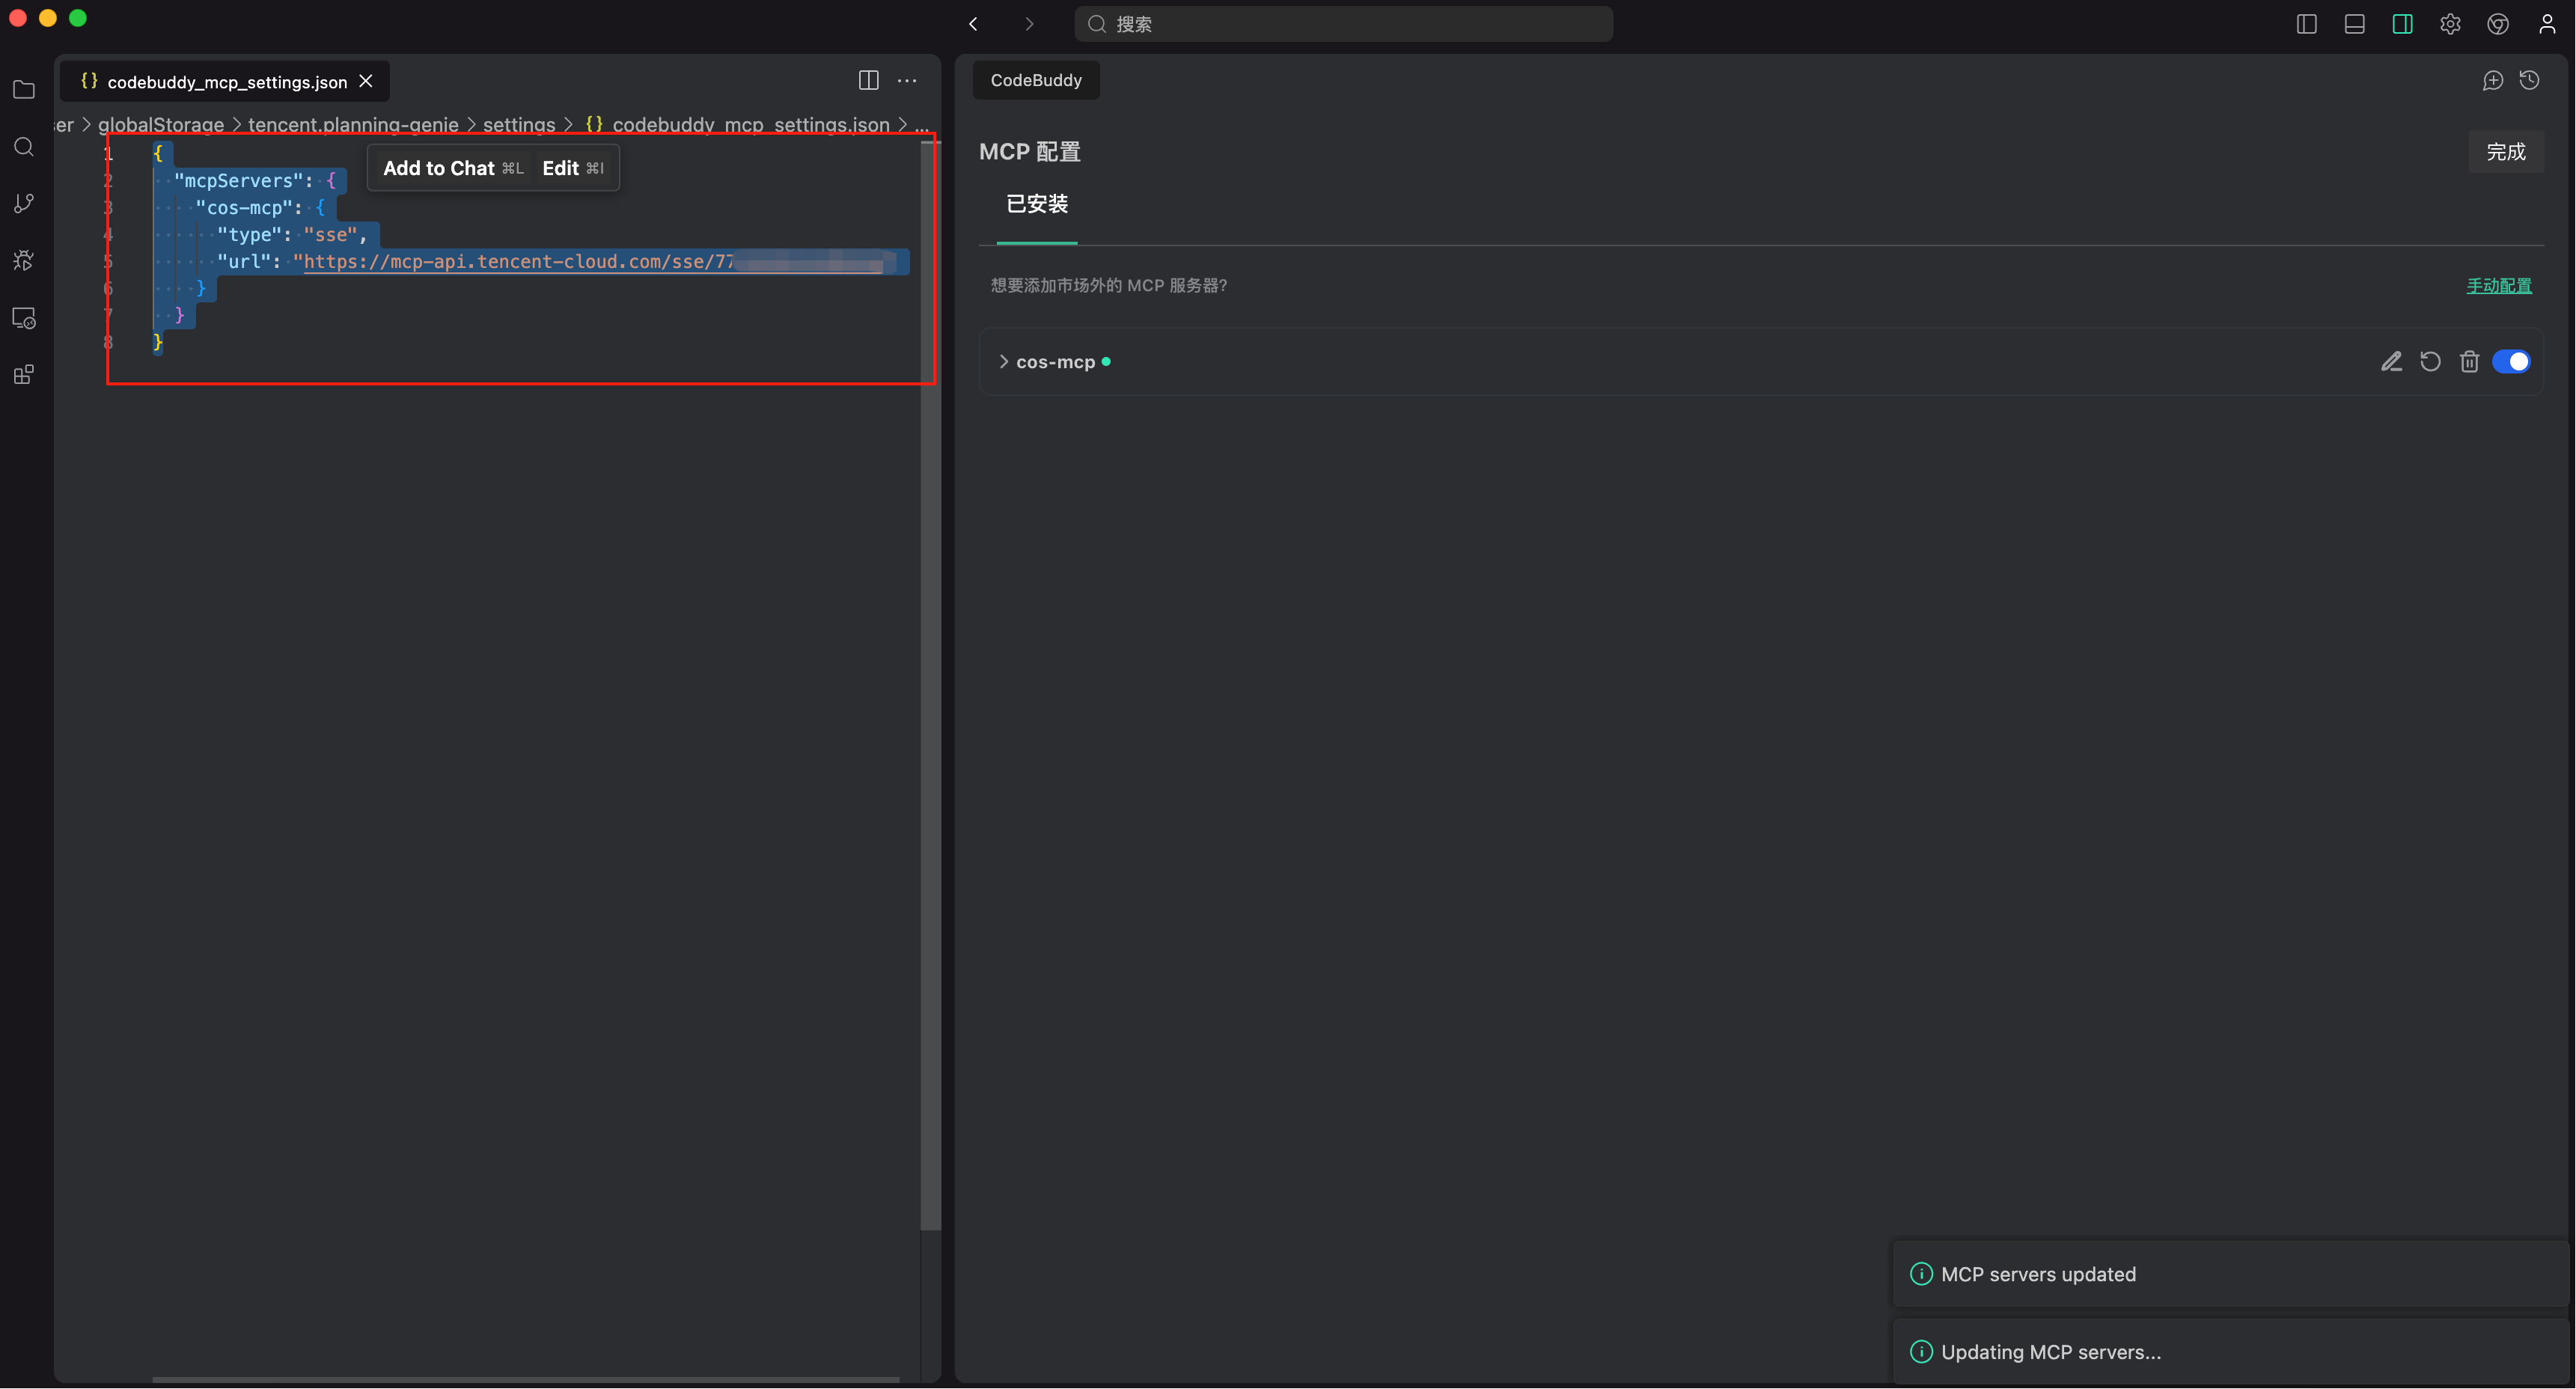
- Open the IDE settings and find the manual configuration under CodeBuddy
-
Using Cloud-Hosted MCP Services in the IDE
-
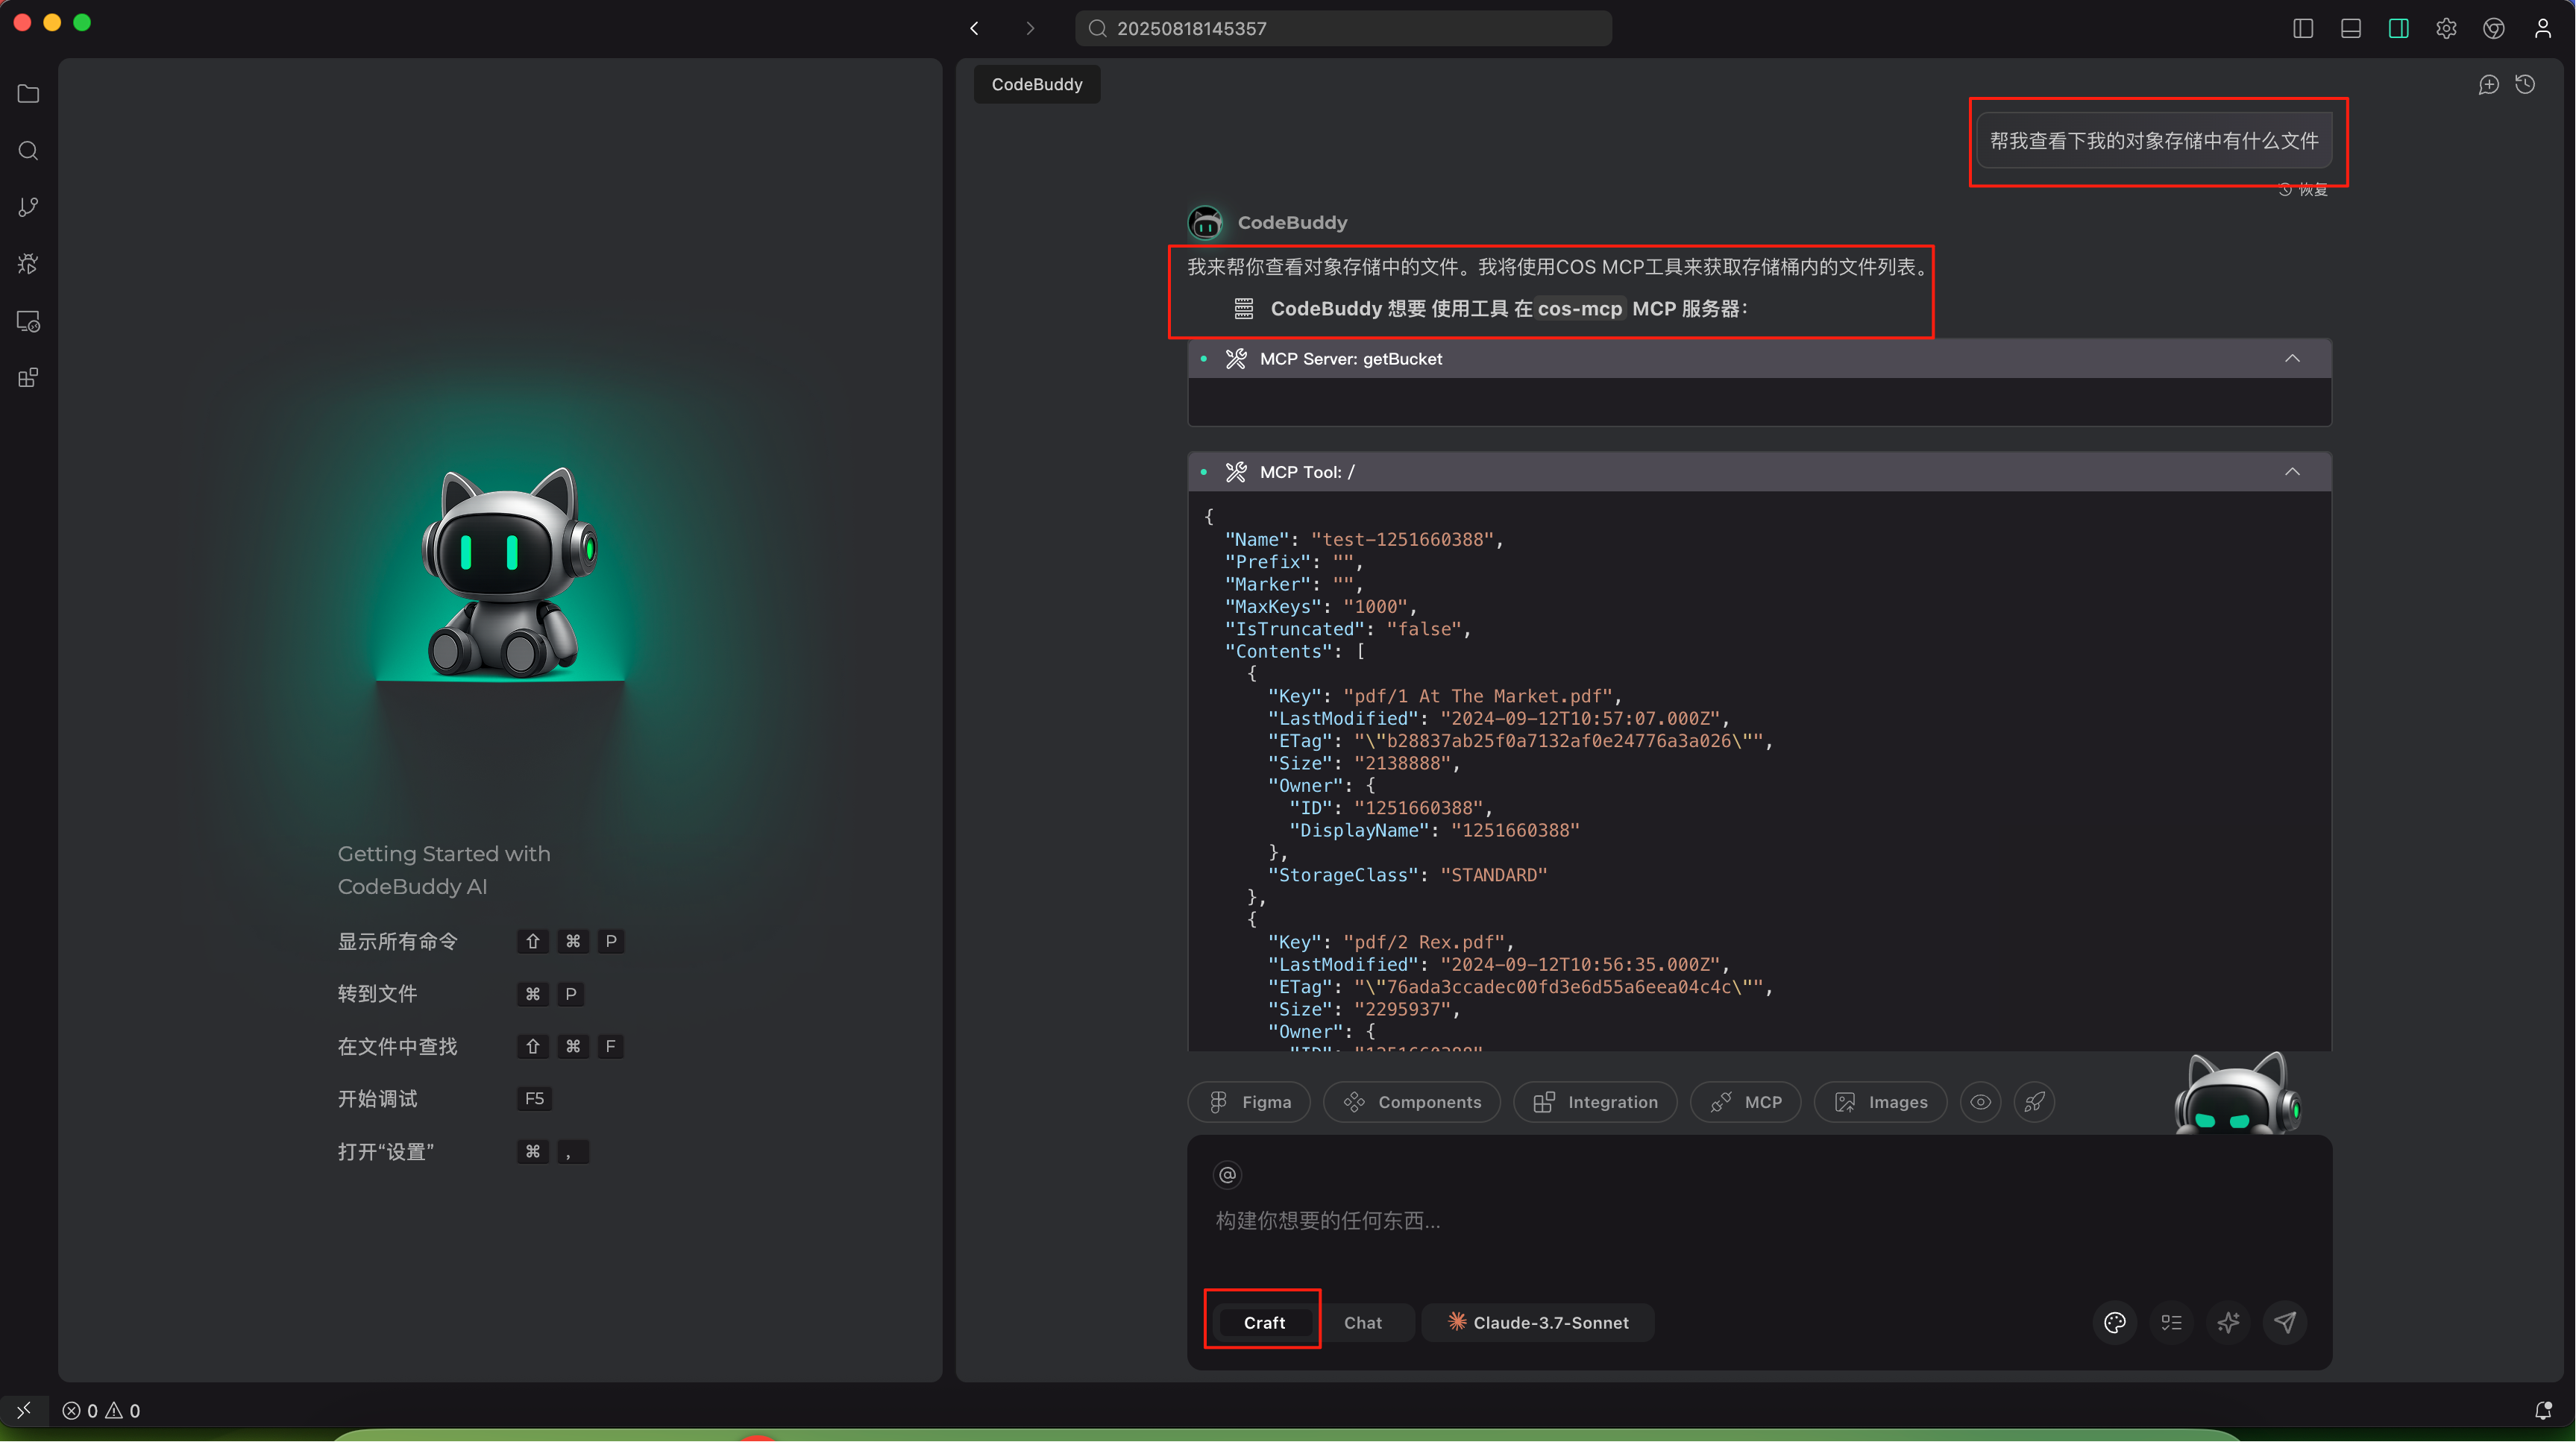
In CodeBuddy, enter Help me check what files are in my object storage to use the COS MCP service
Note: Select Craft mode, as chat mode will not call MCP services
CodeBuddy summarizes the content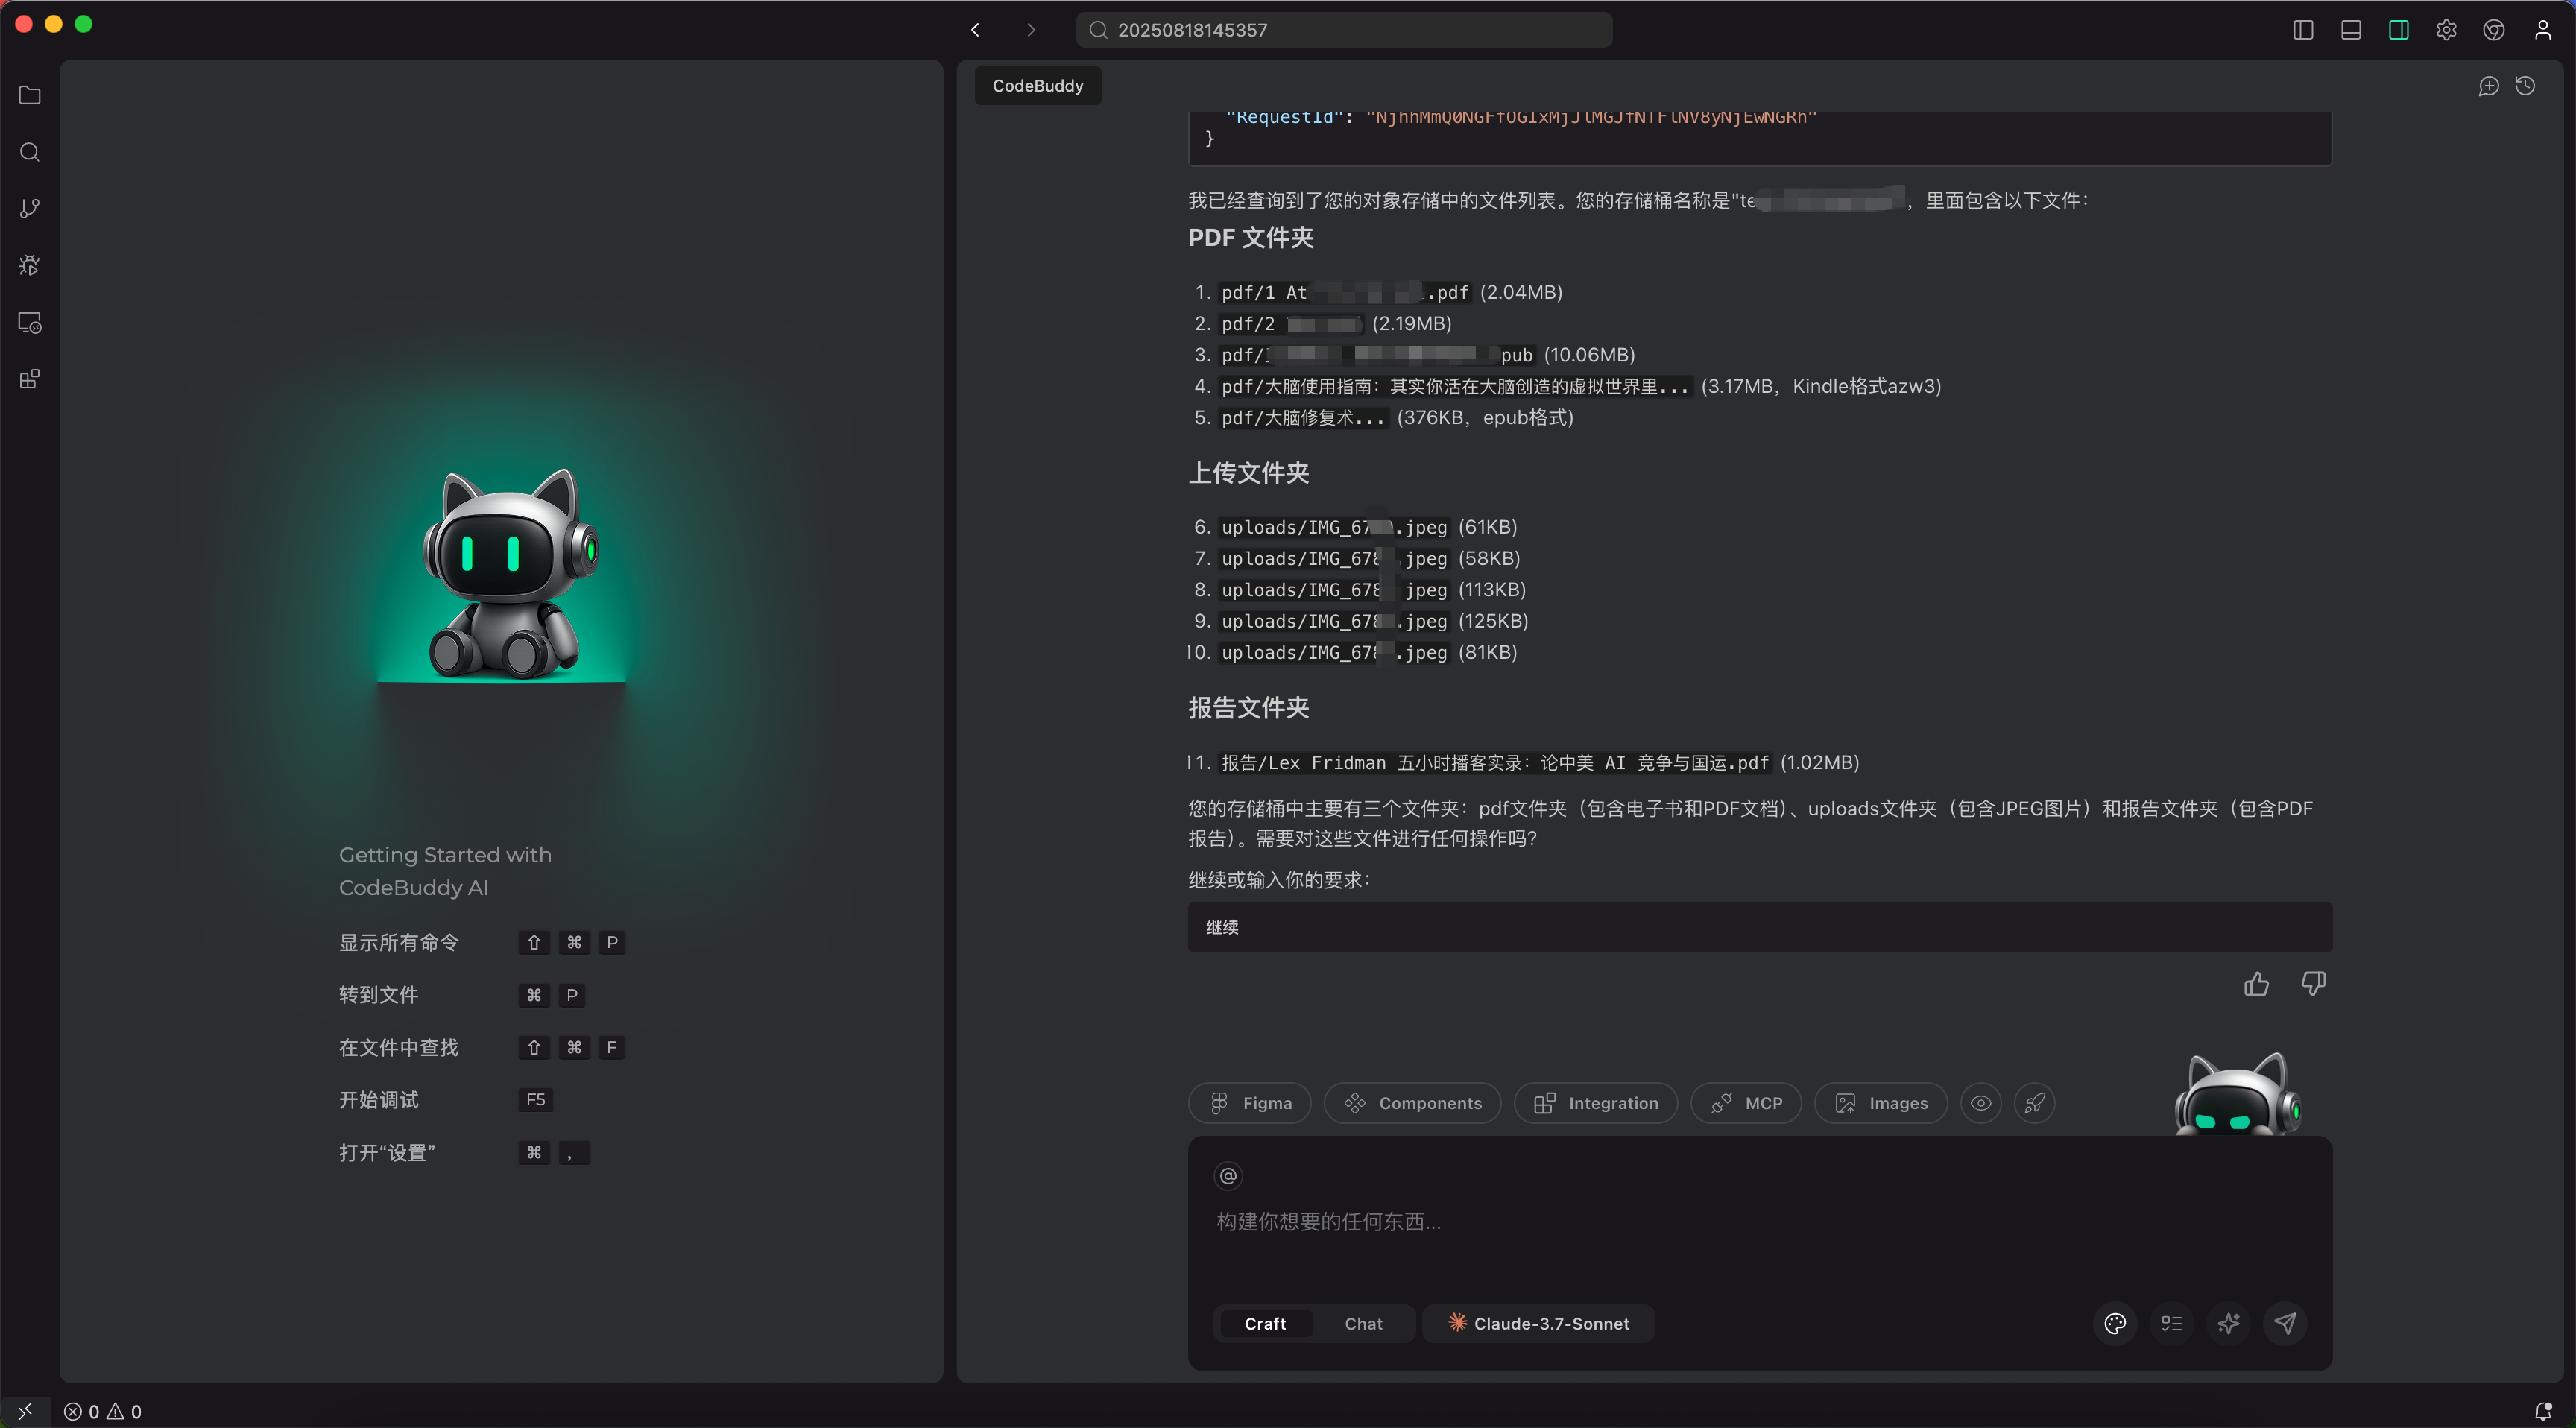
-
-
More Information
-
Other cloud-hosted MCP services in the Tencent Cloud Developer Community MCP Marketplace can be used following these same steps.
-
Steps for Local Installation of MCP
MCP servers with go source, you can typically:
- Install go from golang, version >= 1.24.1. Skip this step if already installed.
- Using Domain MCP as an example, enter
cd src/domainin the terminal to navigate to the source directory. - Run
go buildto compile the source code, which will generate the executable file domain_server. - Execute
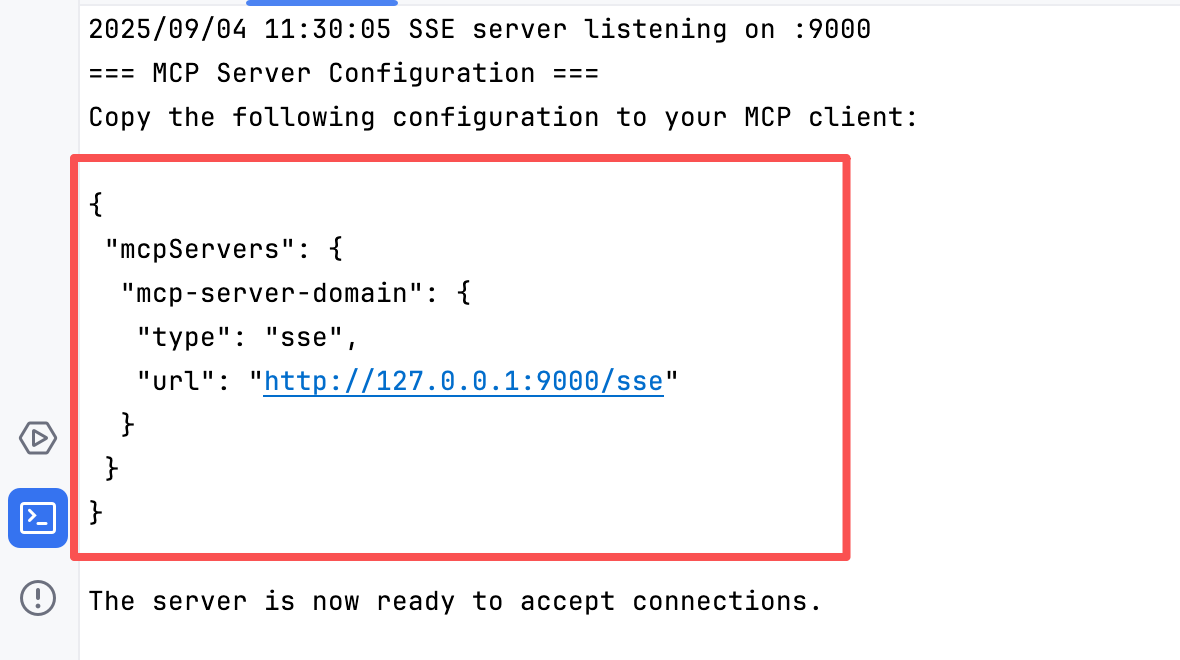
./domain_serverto start the MCP service. - Copy the configuration information output from Step 4 and configure it in your IDE. Configuration
MCP servers with uvx command, you can typically:
-
Install
uvxfrom Astral -
Add the server to your MCP client configuration
-
Use tencent-cvm as example, add tencent-cvm to your MCP client configuration
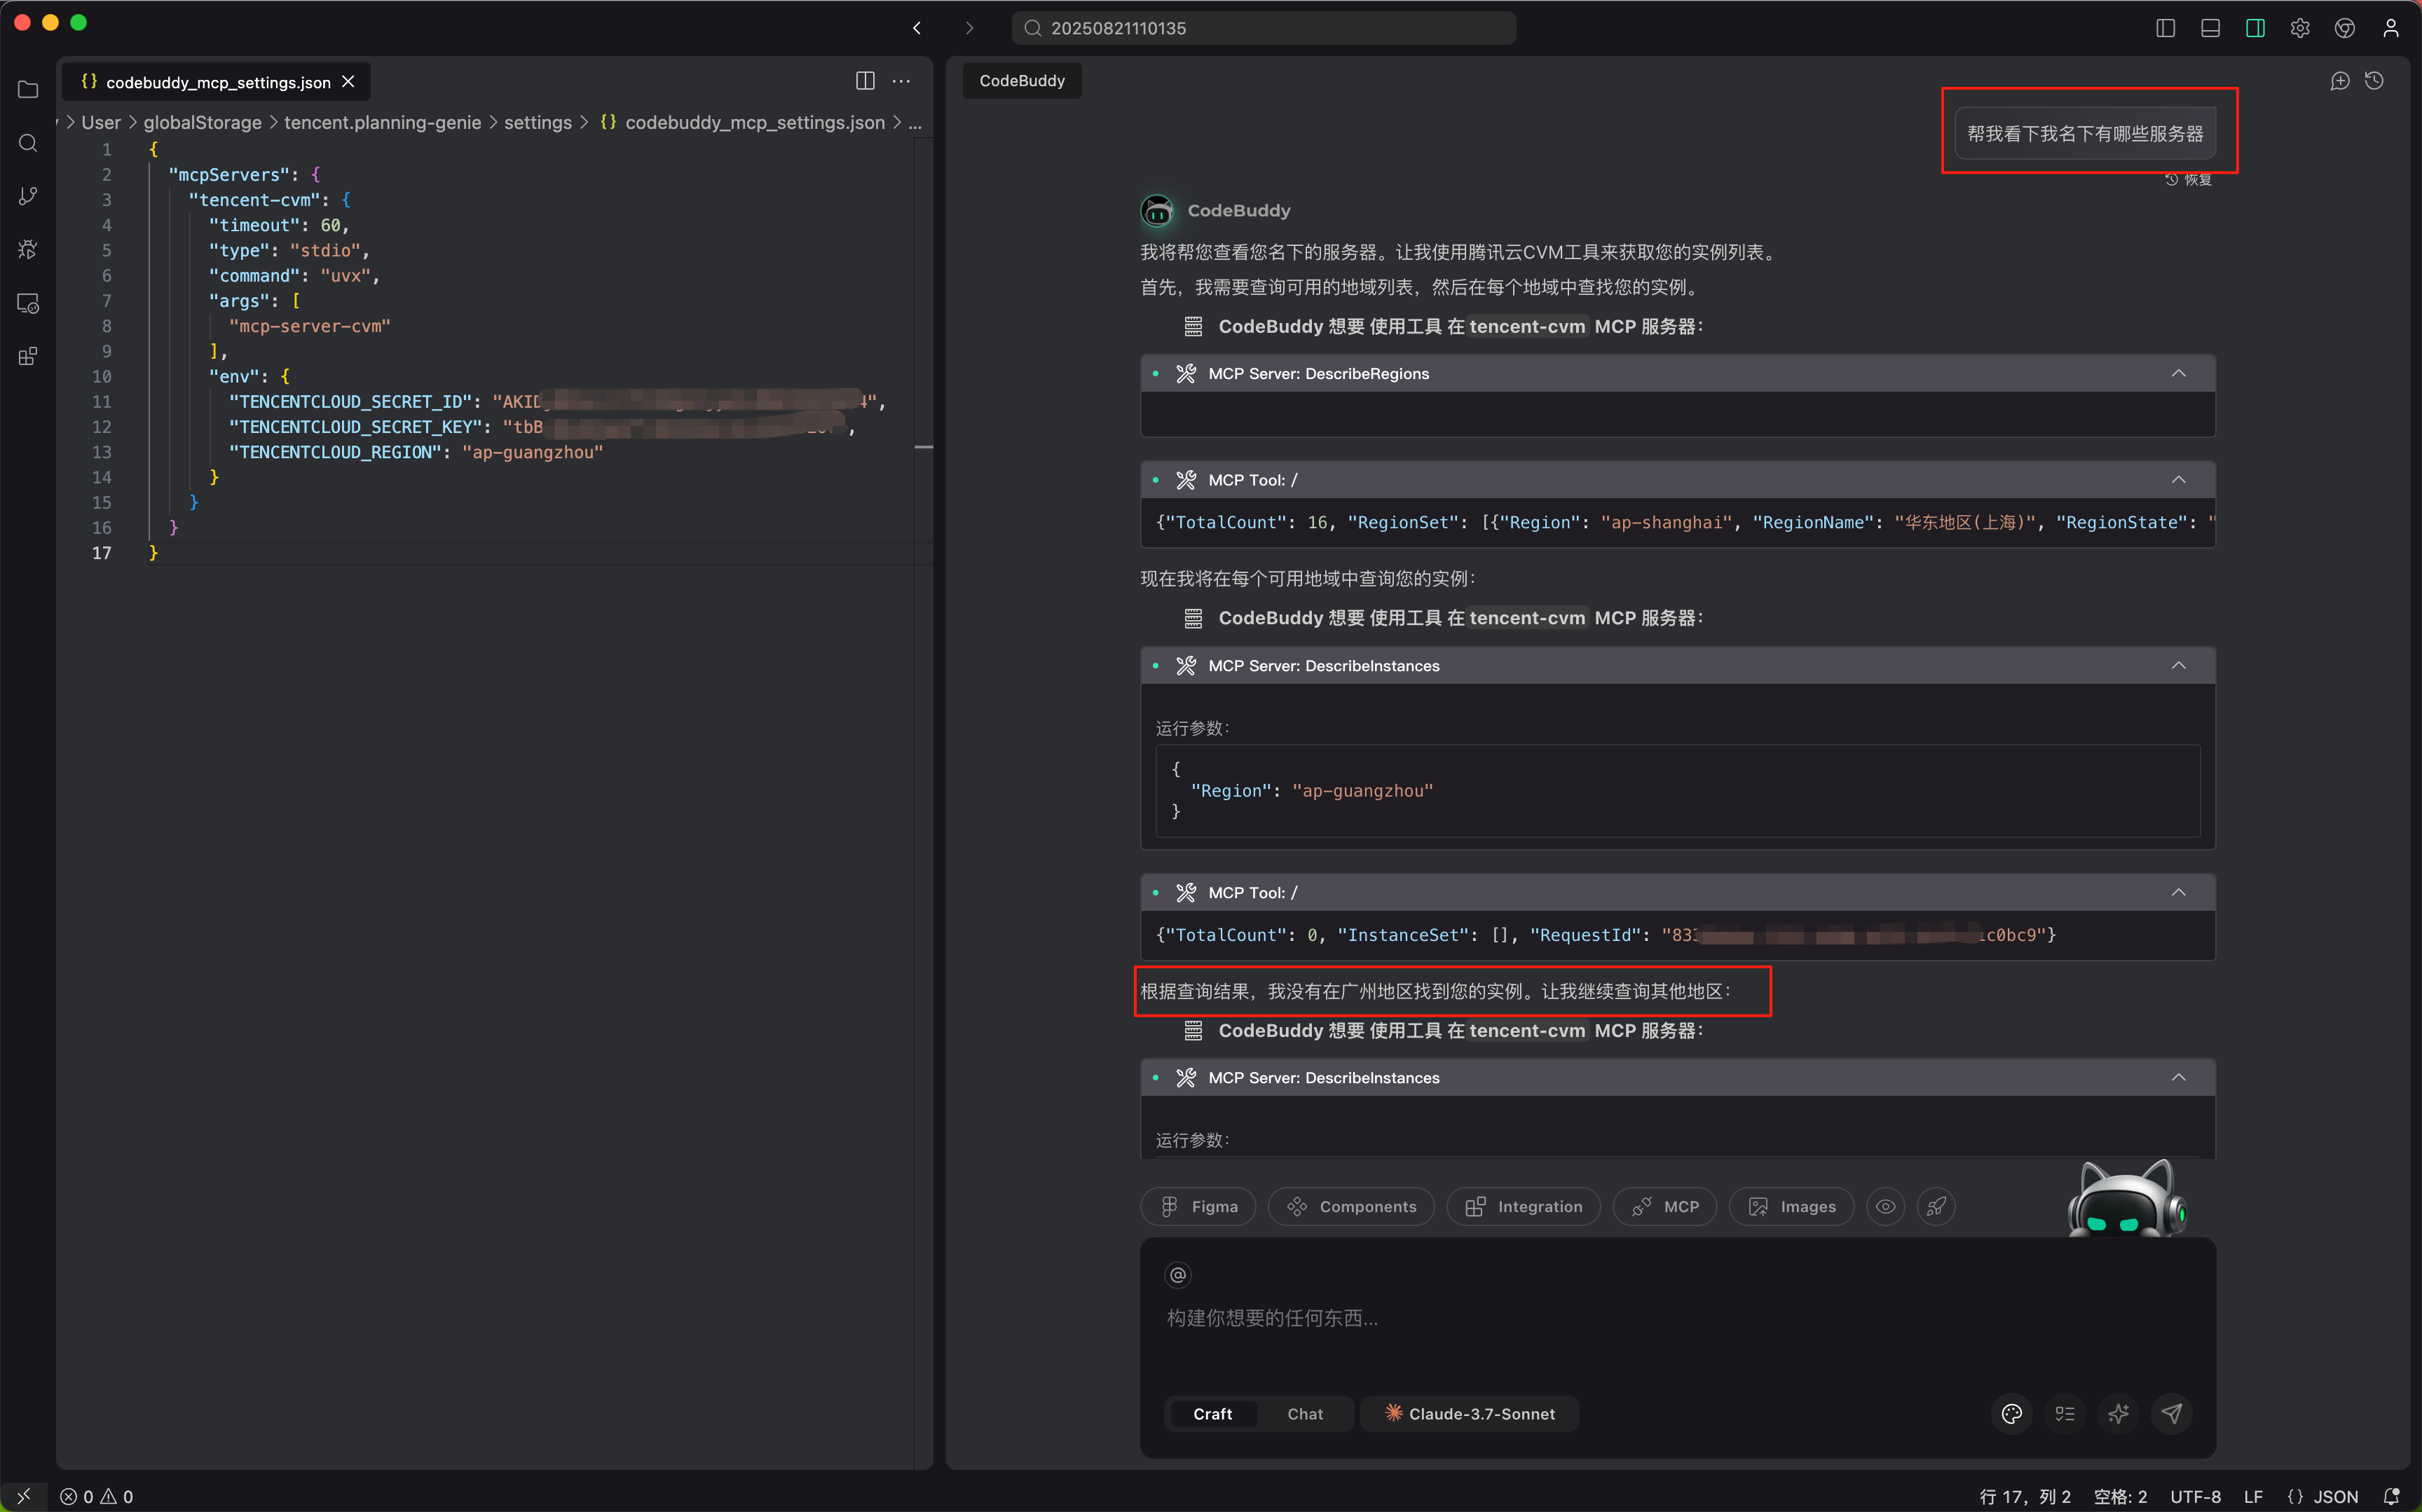
Example configuration for TencentCloud MCP:
{
  "mcpServers":{
    "mcp-server-tapd": {
        "command": "uvx",
        "args": [
            "mcp-server-tapd"
        ],
        "env": {
            "TAPD_API_USER": "",
            "TAPD_API_PASSWORD": "",
            "TAPD_API_BASE_URL": "https://api.tapd.cn",
            "TAPD_BASE_URL": "https://www.tapd.cn",
            "BOT_URL": ""
        }
    },
    "tencent-cvm": {
        "command": "uvx",
        "args": [
            "mcp-server-cvm"
        ],
        "env": {
            "TENCENTCLOUD_SECRET_ID": "YOUR_SECRET_ID_HERE",
            "TENCENTCLOUD_SECRET_KEY": "YOUR_SECRET_KEY_HERE",
            "TENCENTCLOUD_REGION": "YOUR_REGION_HERE"
        }
    },
    "tencent-tat": {
        "command": "uvx",
        "args": [
            "mcp-server-tat"
        ],
        "env": {
            "TENCENTCLOUD_SECRET_ID": "YOUR_SECRET_ID_HERE",
            "TENCENTCLOUD_SECRET_KEY": "YOUR_SECRET_KEY_HERE",
            "TENCENTCLOUD_REGION": "YOUR_REGION_HERE"
        }
    },
    "tencent-as": {
        "command": "uvx",
        "args": [
            "mcp-server-as"
        ],
        "env": {
            "TENCENTCLOUD_SECRET_ID": "YOUR_SECRET_ID_HERE",
            "TENCENTCLOUD_SECRET_KEY": "YOUR_SECRET_KEY_HERE",
            "TENCENTCLOUD_REGION": "YOUR_REGION_HERE"
        }
    }
  }
}
MCP servers with npx command, you can typically:
-
Install
npmfrom Node.js -
Add the server to your MCP client configuration
-
Use cos-mcp as example, add cos-mcp to your MCP client configuration
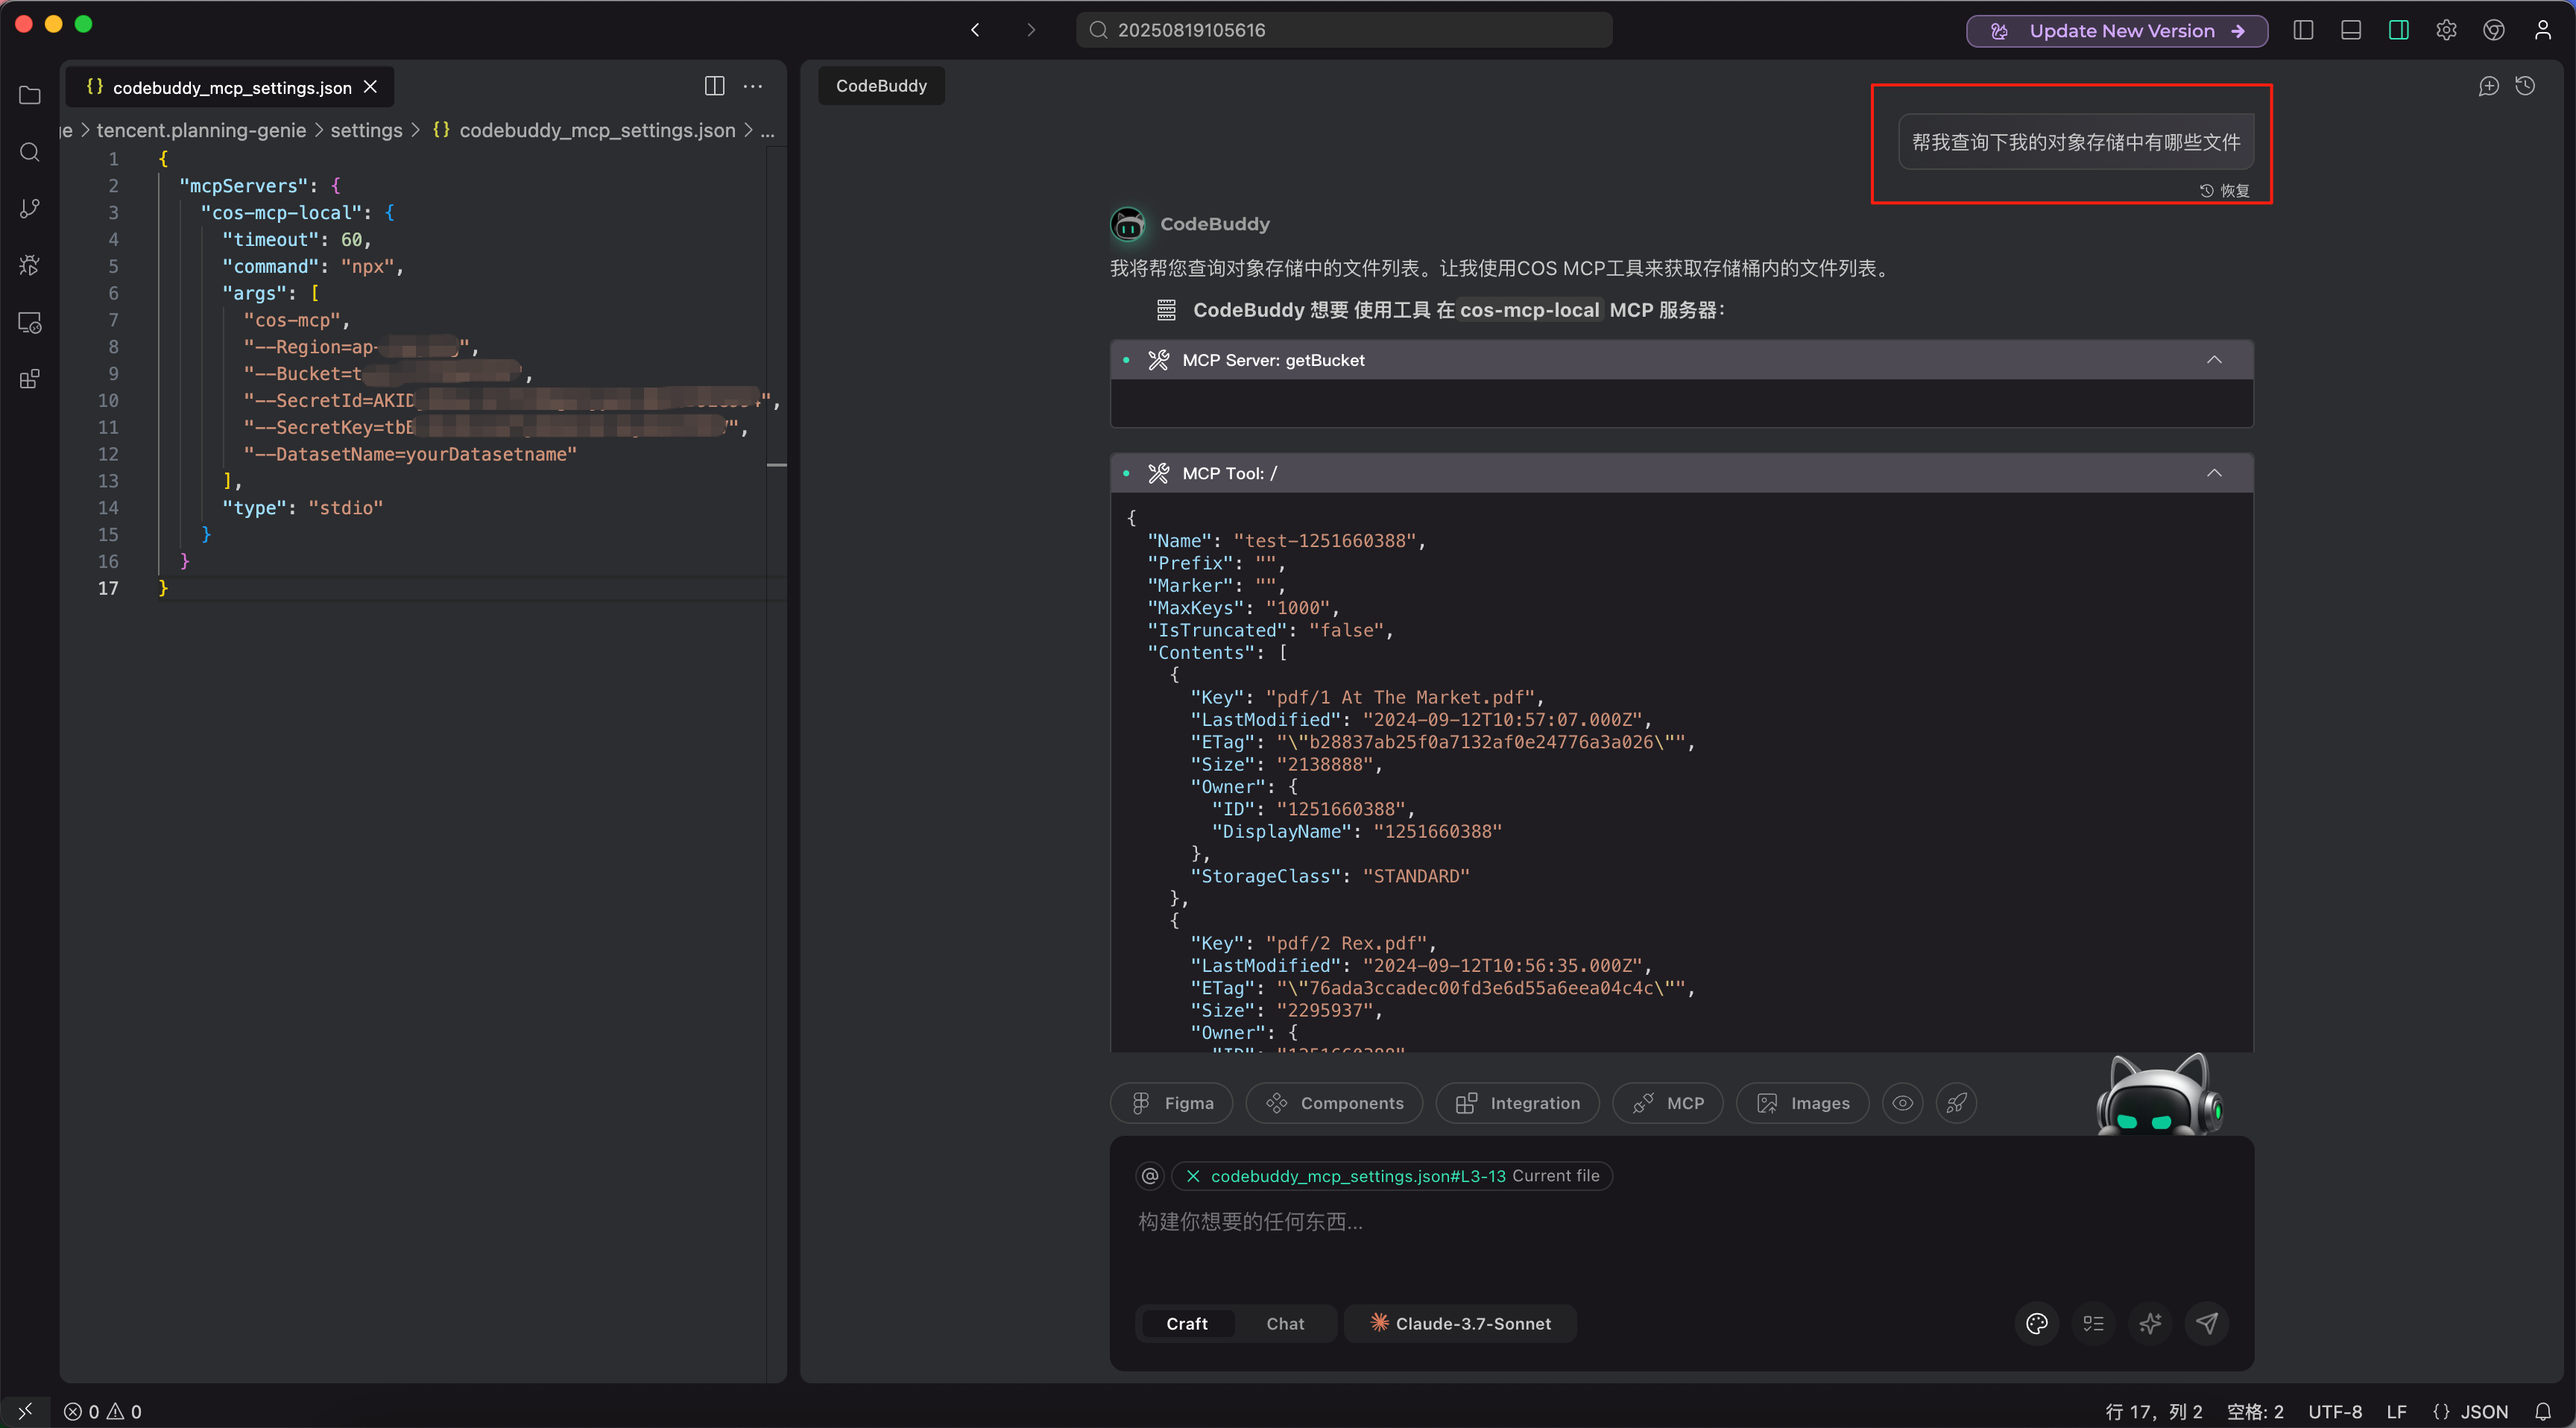
Example configuration for TencentCloud MCP:
{
  "mcpServers": {
    "edgeone-pages-mcp-server": {
        "command": "npx",
        "args": [
            "edgeone-pages-mcp"
        ],
        "env": {
            "EDGEONE_PAGES_API_TOKEN": "",
            "EDGEONE_PAGES_PROJECT_NAME": ""
        }
    },
    "cos-mcp": {
        "command": "npx",
        "args": [
            "cos-mcp"
        ]
    },
    "cloudbase": {
        "command": "npx",
        "args": [
            "npm-global-exec@latest",
            "@cloudbase/cloudbase-mcp@latest"
        ],
        "env": {
            "INTEGRATION_IDE": "TencentMCPMarket"
        }
    },
    "tca-mcp-server": {
        "command": "npx",
        "args": [
            "-y",
            "-p",
            "tca-mcp-server@latest",
            "tca-mcp-stdio"
        ],
        "env": {
            "TCA_TOKEN": "<TCA_TOKEN>",
            "TCA_USER_NAME": "<TCA_USER_NAME>"
        }
    },
    "cnb": {
        "command": "npx",
        "args": [
            "-y",
            "-p",
            "@cnbcool/mcp-server",
            "cnb-mcp-stdio"
        ],
        "env": {
            "API_BASE_URL": "<BASE_URL>",
            "API_TOKEN": "<YOUR_TOKEN>"
        }
    },
    "coding-devops": {
        "command": "npx",
        "args": [
            "-y",
            "coding-devops-mcp-server"
        ],
        "env": {
            "CODING_TOKEN": "xxxxxxxxxxxxxx"
        },
        "disabled": false,
        "autoApprove": []
    },
  }
}
Installation and Setup
Getting Started with CodeBuddy
-
Follow the steps above in the Installation and Setup section to install
uvfrom Astral. -
Follow the steps above in the Installation and Setup section to install
npmfrom Node.js. -
You can place MCP configuration in two locations, depending on your use case:
Configure MCP servers in CodeBuddy settings or in ~/Library/Application Support/CodeBuddy/User/globalStorage/tencent.planning-genie/settings/codebuddy_mcp_settings.json.
codebuddy_mcp_settings.json
{
  "mcpServers": {
    "cloudbase": {
      "command": "npx",
      "args": ["npm-global-exec@latest", "@cloudbase/cloudbase-mcp@latest"]
    }
  }
}
Getting Started with Cursor
-
Follow the steps above in the Installation and Setup section to install
uvfrom Astral. -
Follow the steps above in the Installation and Setup section to install
npmfrom Node.js. -
You can place MCP configuration in two locations, depending on your use case:
A. Project Configuration
- For tools specific to a project, create a .cursor/mcp.json file in your project directory.
- This allows you to define MCP servers that are only available within that specific project.
B. Global Configuration
- For tools that you want to use across all projects, create a ~/.cursor/mcp.json file in your home directory.
- This makes MCP servers available in all your Cursor workspaces.
.cursor/mcp.json
{
  "mcpServers": {
    "cloudbase": {
      "command": "npx",
      "args": ["npm-global-exec@latest", "@cloudbase/cloudbase-mcp@latest"]
    }
  }
}
-
Using MCP in Chat The Composer Agent will automatically use any MCP tools that are listed under Available Tools on the MCP settings page if it determines them to be relevant. To prompt tool usage intentionally, please prompt Cursor to use the desired TencentCloud MCP Server you wish to use. For example,
Using the COS MCP Server, do... -
Tool Approval By default, when Agent wants to use an MCP tool, it will display a message asking for your approval. You can use the arrow next to the tool name to expand the message and see what arguments the Agent is calling the tool with.
Getting Started with Windsurf
-
Follow the steps above in the Installation and Setup section to install
uvfrom Astral, install Python. -
Follow the steps above in the Installation and Setup section to install
npmfrom Node.js -
Access MCP Settings
- Navigate to Windsurf - Settings > Advanced Settings or use the Command Palette > Open Windsurf Settings Page
- Look for the "Model Context Protocol (MCP) Servers" section
-
Add MCP Servers
- Click "Add Server" to add a new MCP server
- You can choose from available templates like GitHub, Puppeteer, PostgreSQL, etc.
- Alternatively, click "Add custom server" to configure your own server
-
Manual Configuration
- You can also manually edit the MCP configuration file located at
~/.codeium/windsurf/mcp_config.json
- You can also manually edit the MCP configuration file located at
~/.codeium/windsurf/mcp_config.json
{
  "mcpServers": {
    "cloudbase": {
      "command": "npx",
      "args": ["npm-global-exec@latest", "@cloudbase/cloudbase-mcp@latest"]
    }
  }
}
Getting Started with VS Code
- Follow the steps above in the Installation and Setup section to install
uvfrom Astral, install Python. - Follow the steps above in the Installation and Setup section to install
npmfrom Node.js
Configure MCP servers in VS Code settings or in .vscode/mcp.json (see VS Code MCP docs for more info.):
.vscode/mcp.json
{
  "mcpServers": {
    "cloudbase": {
      "command": "npx",
      "args": ["npm-global-exec@latest", "@cloudbase/cloudbase-mcp@latest"]
    }
  }
}
More Information
-
Scan QrCode join the WeChat Group of MCP

Please contact us if you have any questions